2021 Jeep Wrangler Modifications
Creating a Flat Towable Rock Crawler
Article Date: July, 2021
Article and Photography by Mark Quasius
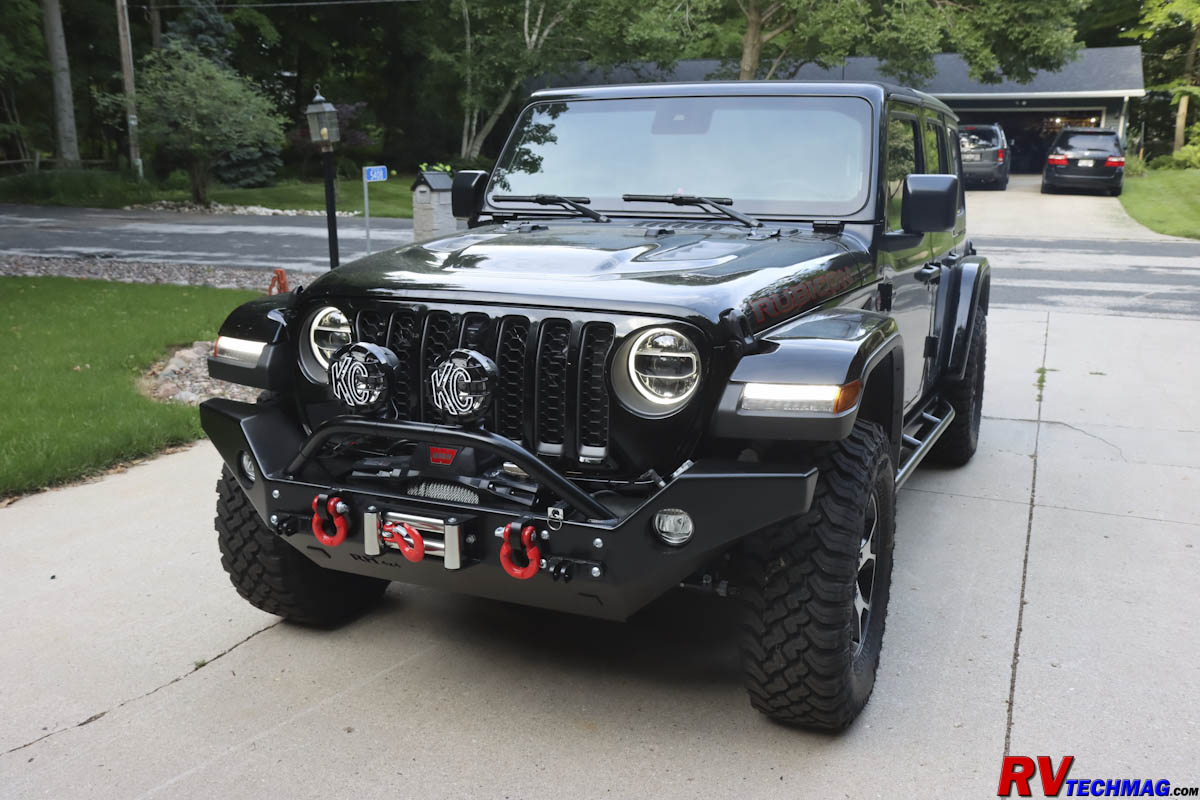
The Jeep Wrangler is a legend in its own right and its go-anywhere, do-anything ability makes it a favorite with
anyone who wants to travel off the beaten path and explore places where the average vehicle won't be able to go. In recent years it's also
been a favorite with the RV community due to its ability to be easily towed behind a motorhome. Jeeps have matured over the years and they
now offer a comfortable ride and the features and amenities that most owners are used to in modern upscale vehicles, all the while retaining
the rough and tumble ability that Jeeps are capable of. Combine that with some great traditional styling and its easy to see why the Jeep
Wrangler is an extremely popular vehicle.
This popularity has caught on with many buyer who buy it for the coolness associated with the Wrangler and it's true
that most of these "mall cruisers" never see any dirt or rock under their wheels unless their garage floor is dusty but there is still a large
contingent of true Jeepers who actually drive them as they were originally intended to be. The Wrangler is a capable vehicle as it rolls off
the factory floor, especially if it's the upper end Rubicon model. The Rubicon is much more than stylish trim and those Rubicon letters on the
hood. It's fitted with a special Rock Crawler transfer case with an extreme 4:1 low range. In addition, stiffer springs and suspension,
electronically locking front and rear differentials, a sway bar disconnect and some off-road performance settings kick it up a notch. Yet, there
is a huge aftermarket industry for everything and anything Jeep that can transform any Jeep into a serious off-roading machine or pimped up mall
cruiser. The Wrangler has more aftermarket gear available from a wide range of aftermarket suppliers than any other vehicle. I've had numerous
Jeps over the years and my latest two vehicles are a 2020 Gladiator Rubicon and a 2021 Wrangler Unlimited Rubicon and thy've all taken advantage
of the aftermarket add-ons. We take our Jeeps to places like Moab and Ouray, where we crawl Moab's red rock canyons or visit Colorado's
ghost towns and old mining trails built for mules carrying ore. We also tow our Jeeps behind a motorhome so it was necessary to mod our Jeeps
so that they could do some serious off-road wheeling while still being able to be towed thousands of miles behind our RV.
Making it Towable
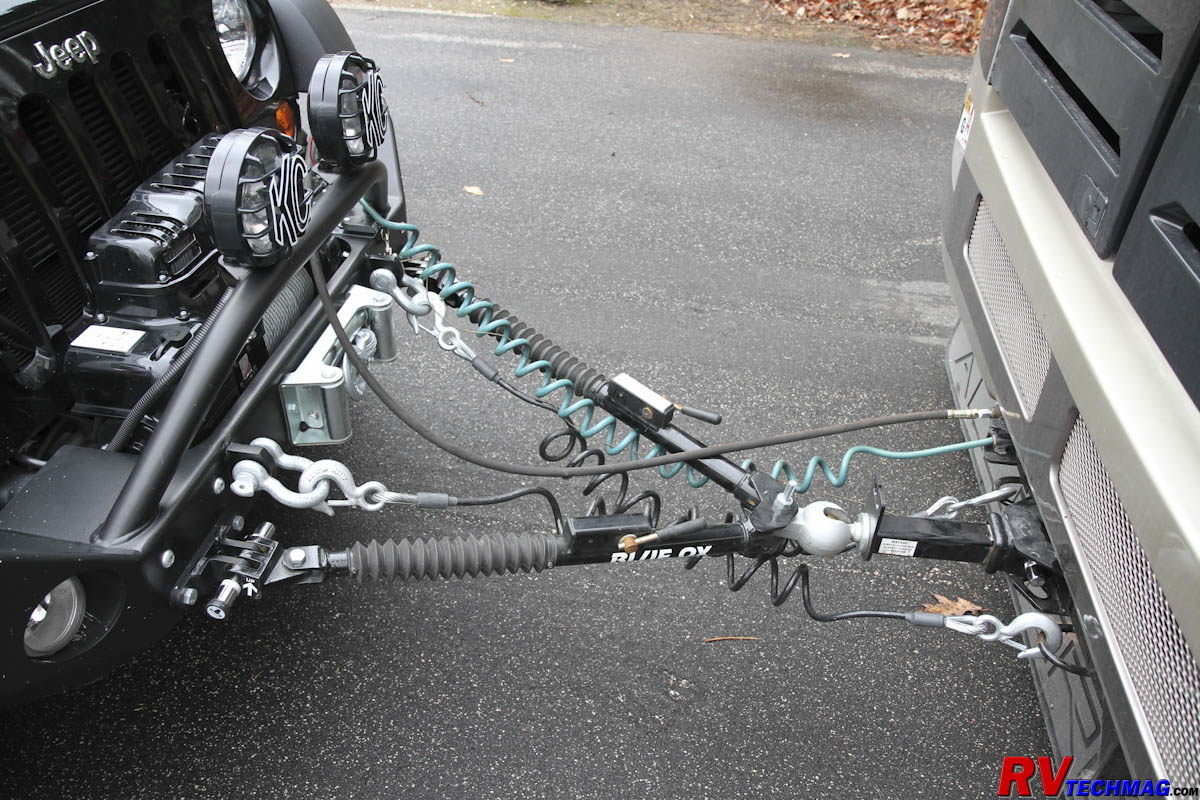
Typical Tow Bar Setup
There are three ways to tow another vehicle behind a motorhome. The first version is to pull a car trailer and drive
the vehicle up onto the trailer. The trailer can be a flatbed or an enclosed trailer. An enclosed trailer is a great choice if you have a classic
vehicle that you want to protect from the elements while a flatbed car hauler is quick and easy. The biggest problem with trailers happens once you
get to the RV park. Many sites don't have room to park a large class A motorhome with a 20' trailer behind it. You'll find that you'll have to unload
your vehicle and then go find a spot where the campground wants you to park the trailer, unhook it and then take the motorhome to your campsite.
That takes time and is inconvenient, especially if a one night stopover. The second method is to use a tow dolly. The tow dolly doesn't take up
as much room as a trailer and can be kept in your campsite, hooked up to your RV. However you do have to drive the vehicle onto the dolly and
secure it. It's generally reserved for vehicles that cannot be flat towed and is a second best option to flat towing. Flat towing, also known as
"four down" involves using as tow bar to tow your vehicle with all four wheels on the road. It's the easiest and fastest way to tow, as long as your
vehicle is capable of being flat towed. In that respect, Jeep Wranglers are perfect for flat towing. You simply attach the tow bar to the baseplate
mounted on the front of the Jeep, clip on the safety cables, plug in your lighting connector and breakaway cable, shift the transfer case into neutral
and away you go.
In order to flat tow any vehicle you must find a way to attach the tow bar to the vehicle. Tow bar manufacturers offer
baseplates that are custom designed for each vehicle that attach to the vehicle's frame and offer a set of mounting lugs that the tow bar connects
to. You just extend the tow bar arms and insert a pair of pins and you are connected. You then connect a pair of safety cables from the
motorhome's hitch to the towed vehicle's connection points, which are usually right on the baseplate, to prevent a runaway should the tow bar fail or
disconnect for any reason. The next step is to connect a lighting umbilical cord from the RV's trailer lighting socket to the auxiliary lighting connection
on your towed vehicle. Various lighting systems are available to allow you to control your vehicles tail, stop and turn signal lighting from the motorhome
when towing. Lastly, it's important to have a supplemental braking system on the towed vehicle to apply its brakes when the motorhome slows down or stops.
There is a wide selection of options from numerous manufacturers to meet those needs but after years of familiarity with many of them I made some
equipment choices, which I'll detail in the next few sections.
Choosing a Tow bar
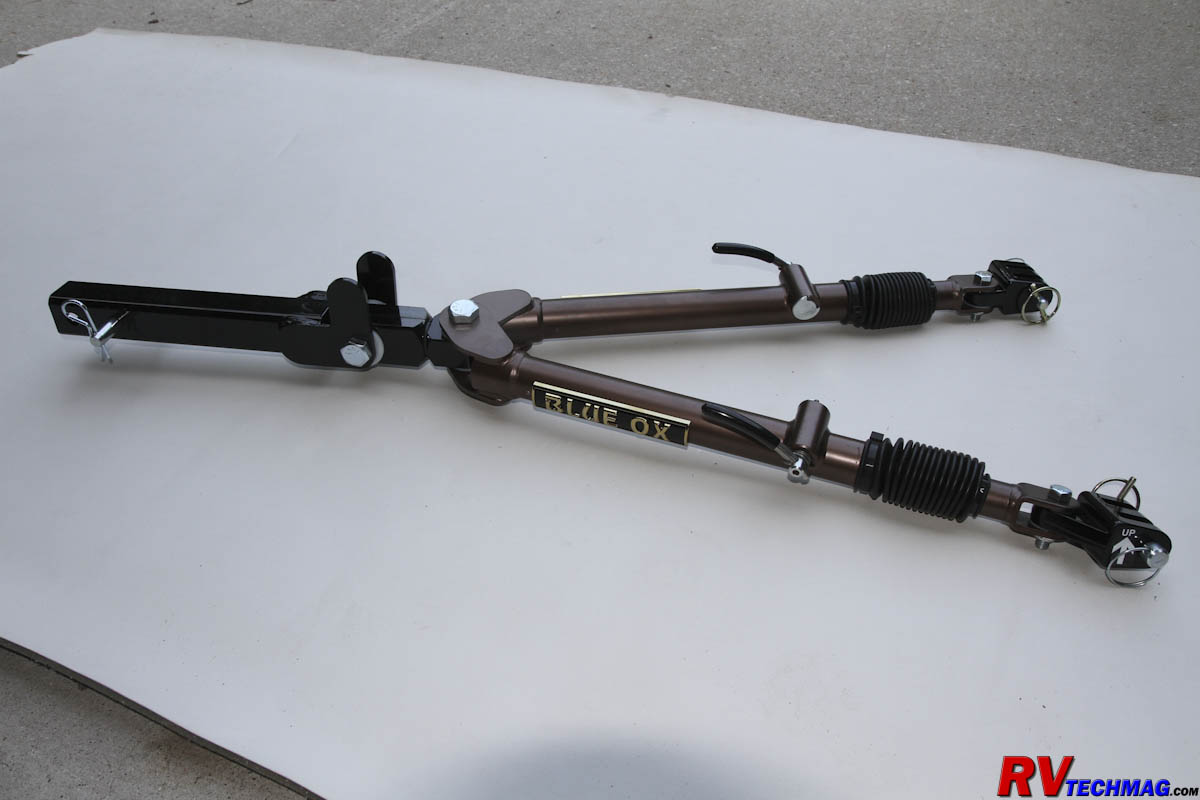
The Blue Ox Avail Tow Bar
There are a few good manufacturers of tow bars. Blue Ox, Roadmaster and Demco are the big three when it comes to choosing and there
are no bad choices among them. They all offer a wide range of tow bars so it's just a matter of picking out the one that appeals the most to you. Keep in mind
that each manufacturer makes their own baseplates so be sure to investigate them as well before selecting your tow bar. In some cases you can buy adaptor
that will allow you to mix one brand of tow bar with another brand's baseplate if you feel so inclined to do so. I've been happy running Blue Ox tow bars for
many years and am happy with them so I decided to stay with them. I will say that when I first started RVing I felt that Blue Ox had a better system than
the others, but that was 20 years ago and I feel that the others have stepped up and are of equal value and quality at this point so I would have no problem
using another brand. I just continued on with what worked for me in the past.
I should also mention that some tow bars are available in steel or aluminum. I still recommend going with steel. The aluminum bars
have a slight weight savings but if you can't handle a steel tow bar you maybe shouldn't be RVing any more. The weight savings are insignificant and the
aluminum bars cost more than the steel bars and they are rated at less capacity. For example, Blue Ox's Avail tow bar is a class IV steel tow bar that
weighs 42 pounds, is rated at 10,000 lbs. and an MSRP of $1,031.50 - although street prices are much less. The aluminum version of this same bar is the Ascent,
which is a class III aluminum tow bar that weighs 31 pounds, is rated at 7,500 lbs. and has an MSRP OF $1,139.75. So you basically pay more to get less with an
aluminum tow bar. Aluminum is also less forgiving than steel and if you ever jackknife one you are most likely going to cause more serious damage to it. Okay,
so much for my rant on aluminum tow bars.
The Blue Ox baseplates attach to the frame rails and have removable tow tabs that can be removed when not towing. This gives you a
cleaner look and pretty much hides the fact that your vehicle is towable four down. It also prevents knocking your shins against them if you walk around the
front of your vehicle. The baseplate also has attachment rings for connecting the safety cable hooks to in order to prevent a runaway and most baseplates will
have a location where you can mount your tow lighting socket that the umbilical cord from the RV will connect to. Baseplates bolt to the frame rails so there
is always the possibility that the fasteners could loosen or fail and the baseplate can fall off your vehicle. In that event you towed vehicle will become
disconnected from the RV and become a ballistic missile. For this reason, Blue Ox supplies additional safety cables or chains that tie the baseplate to the
vehicle's frame rails in the event that would happen.
|
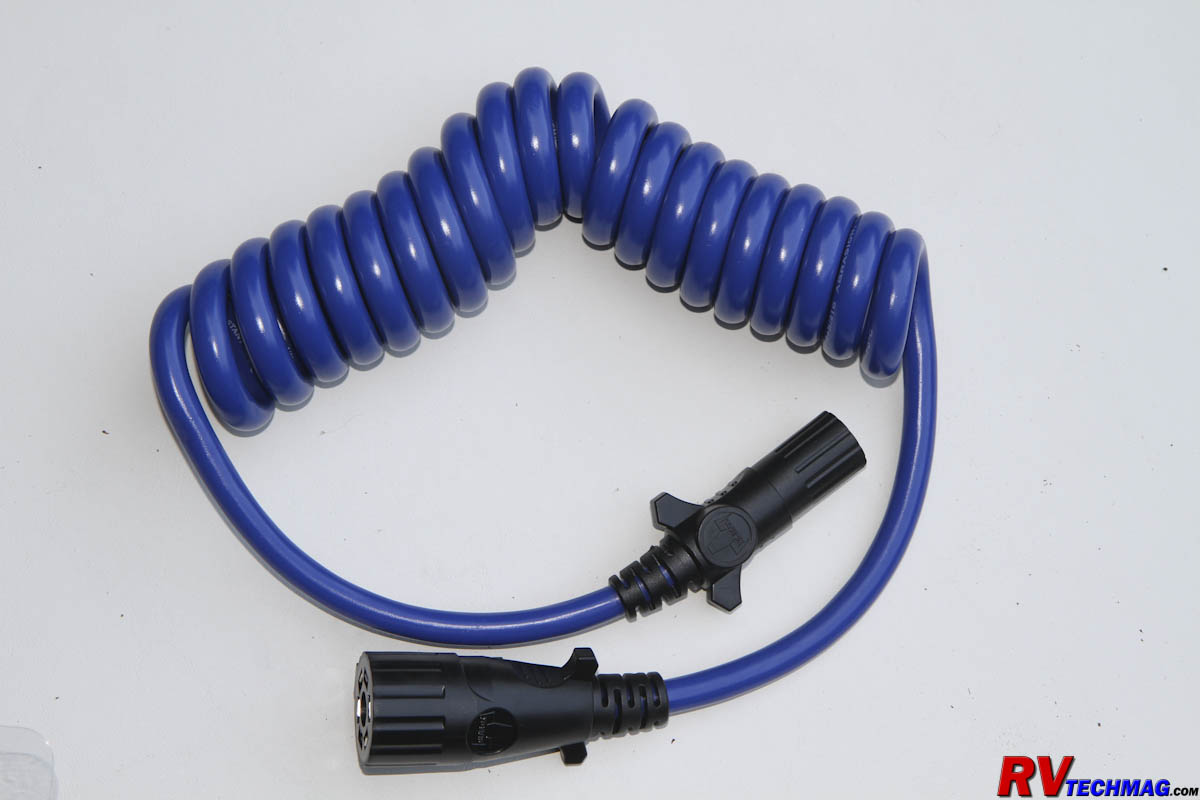
Typical Trailer Lighting Umbilical Cord
|
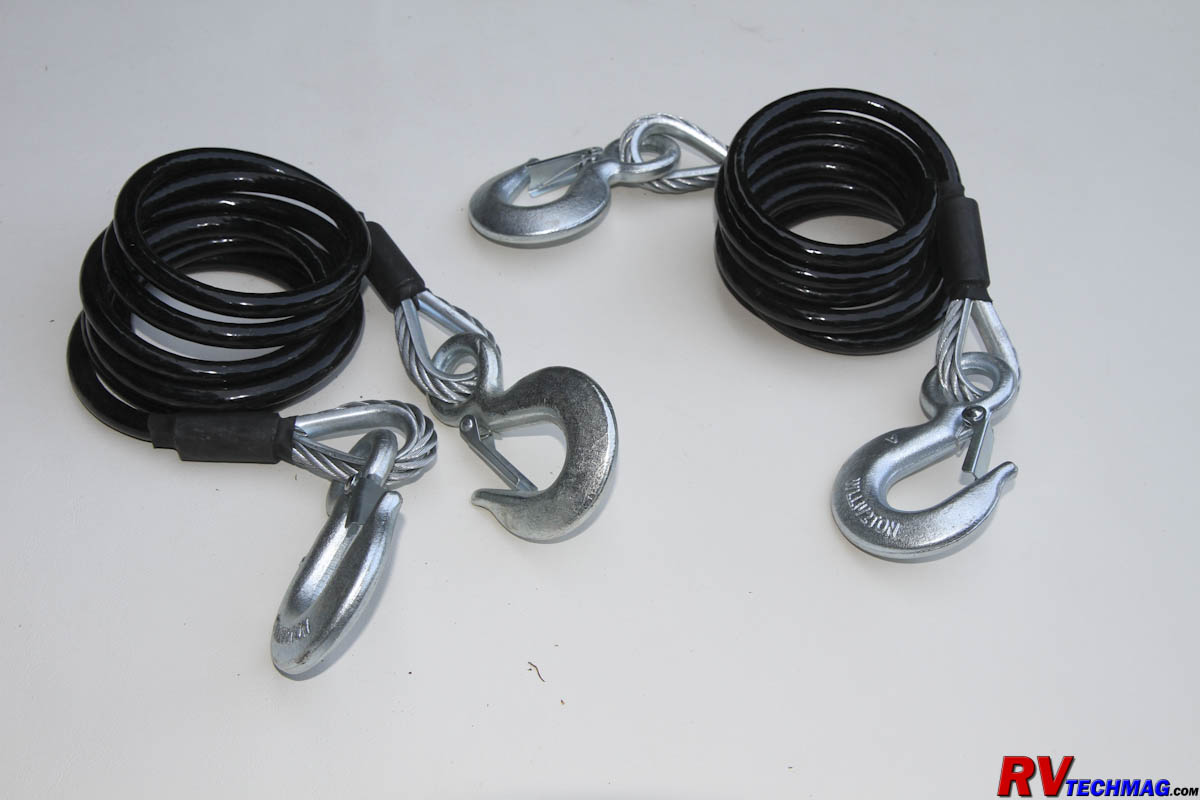
Safety Cables Prevent a Runaway Should the Vehicle Become Disconnected from the Motorhome
|
However, I have had a baseplate in the past on an earlier Jeep. Because of their design, baseplates are mounted low onto the frame rails
which is fine for street driving but can be damaged if driving off-road if they should meet up with as rock. I didn't like that so for this Jeep I choose a Blue
Ox Avail tow bar but skipped the baseplate. Instead I went with a Rockhard steel bumper, which I will cover in more detail in the Off-Road section. Rockhard
offers tow tabs that mount to the bumper so you don't need a baseplate. This keeps the tow bar attachment points up high where they cannot be damaged. It also
lets me attach the safety cables to the D-ring shackles on the front of the bumper.
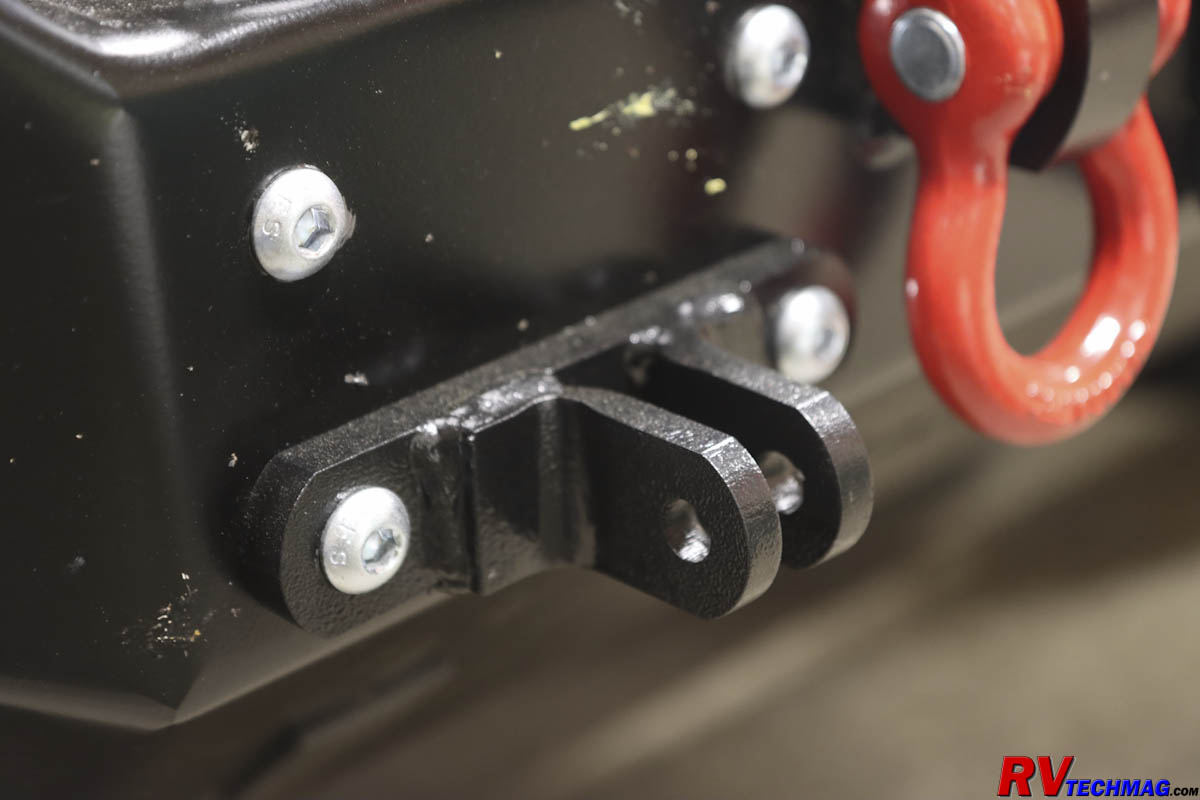
Tow Tabs on the Rockhard Front Bumper for Blue Ox Tow Bars
Tow Lighting
When towing a vehicle you need to control its lighting from the motorhome, just as if it was a trailer. The motorhome will be equipped with
a trailer lights socket, which is most often the 7 pin RV style and tow bar suppliers sell lighting umbilical cords that are used to connect to the towed vehicle.
Most towed vehicles use a 6 pin connector but cords are available with a 7 pin RV plug for the motorhome end and a 6 pin plug for the towed vehicle end. The problem
with towed vehicles is that they already have a lighting system that operates the rear lights, unlike a trailer. In order to control the vehicles lights from the RV
you first have to disconnect or separate the vehicle's light control system so that the RV can take over. There are numerous way to do this. In some cases the taillight
housings are large enough that a second set of bulbs can be installed that would be controlled by the RV. I actually used this method on a Grand Cherokee many years ago
but it's quite rare to find any tail light housings large enough anymore to be able to do this. Another method is to insert a pair of diodes in the wiring to the
taillights. The diodes prevent feedback from the RV side to the towed vehicle's lighting control. This method was very popular but vehicles have gotten more complex
and they can now report if you have a tail or turn light out and will display warnings and errors if it can't find the taillight bulb. A diode system messes this up
and can't be used in this case so diode packs are becoming increasingly rare.
The third method, which is the best, is to totally isolate the RV supply from the vehicle supply to the lights. You can buy wiring harnesses,
such as the Cooltech brand, that intercept your vehicle's wiring and install a switch that you mount in the dash someplace. When the switch is in one position the
vehicles lights operate as normal and there is no connection at all to the RV. When the switch is in the "tow" position the vehicle's lighting circuits are cut out
and the lights are now strictly controlled by the RV. This system works on any vehicle but the caveat is that it takes a bit of wiring to run a bundle of wires to
the switch. There is also the potential to drive away with no turn or brake lights if you forget to flip the switch when you hook up or disconnect from the motorhome.
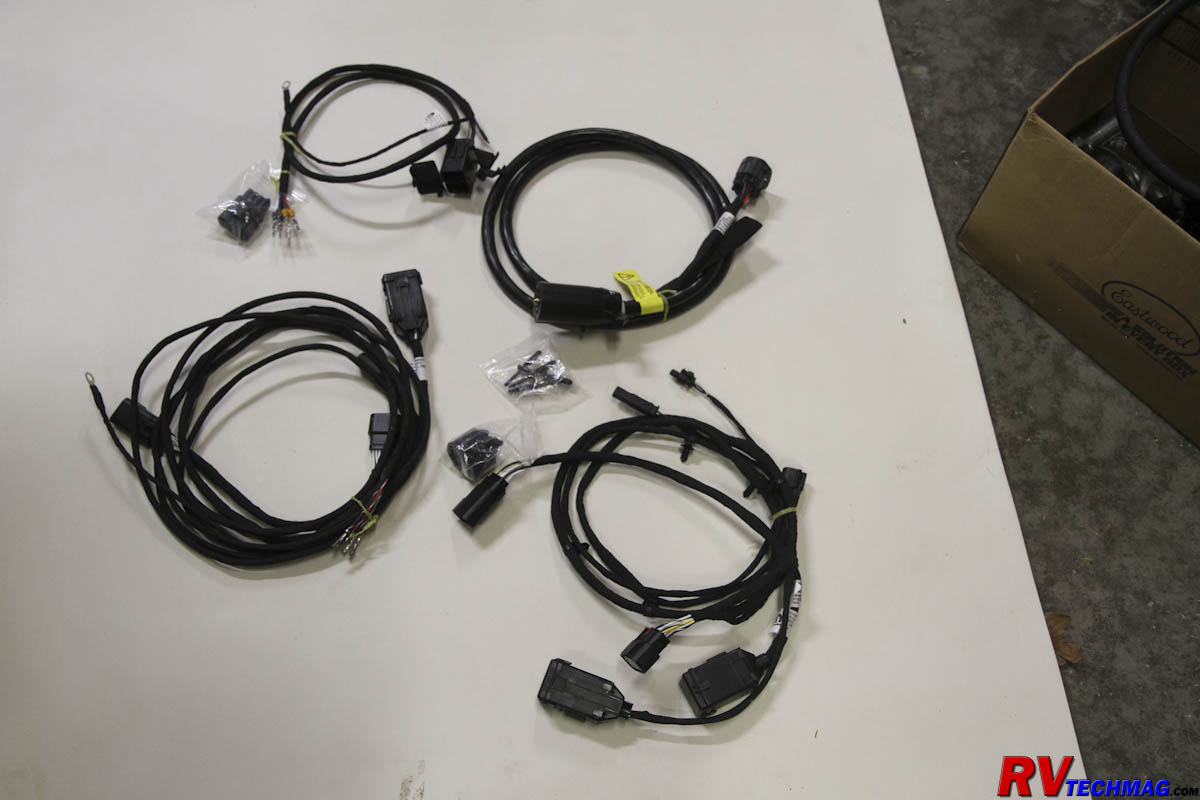
The Mopar Flat Tow Lighting Kit for Wrangler JL Series
Fortunately, there is an alternative. And even better, it's a Mopar item that is designed for your Jeep - by Jeep. This system consists of a
wiring harness that installs into your Wrangler. It's basically plug and play, although it does requi8re fishing wires from the front to the back of the vehicle.
There are breakout plugs that intercept the wiring at the tail lights. Just unplug the lights and insert the breakout plugs into the line. Under the hood is a fused
connection box that connects to the front of the Jeep, where the RV's trailer lighting cord connects to. A set of relays is used to connect the lights to the RV's
control or the Jeep's control. It works similar to the switch I previously mentioned except it uses relays which automatically engage whenever you plug the
Jeep into the RV by sensing power from the battery pin on the RV's trailer lighting cord. There are no switches to have to flip. Just plug in and it works. This
is the system that I chose.
Supplemental Braking Systems
A supplemental braking system is the third necessity when towing. Motorhomes come with a Gross Combined Weight Rating (GCWR). This rating
includes the actual weight of the RV plus the weight of the trailer or towed vehicle. But this weight assumes that you do have brakes on what you are towing. The
GCWR does not mean that the motorhome's brakes are capable of stopping any towed weight so you must have a braking system on whatever you are towing. Supplemental
braking systems come in many different designs. Some are portable units that are placed on the floor by the driver's seat and use an arm to connect to the brake pedal.
Accelerometers detect when the vehicle is decelerating and applies the brakes by depressing the pedal. This method allows for easy portability from one vehicle to
another and in theory do not require any installation, however you still need to connect to a breakaway switch at the front of the vehicle so some installation is
required. These systems require a calibration or setup routine when put in place plus you have to remove it and find a place to store it when you want to unhook from
the RV and drive the vehicle. The accelerometers will also detect when you are descending a grade and may apply the brakes when you don't really want them to when
traveling in the mountains.
A better solution is a permanent installation. While these systems require some installation labor, they are ready to go when you want to tow
and don't take up any room on the driver's floor. Most of these systems utilize a control module underneath the hood that actuate a cable that passes through the
firewall and pulls on the brake pedal arm to actuate the brakes. Some of these systems are electrically actuated while some are pneumatic. The electric systems can
be used on either gasoline powered motorhomes or one with air brakes. The pneumatic systems are designed for diesel powered coaches with air brakes although you can
get an auxiliary compressor system to operate them on a gasser as well, albeit at a larger cost. Most of the electric systems utilize accelerometers to determine
when to apply the brakes but the pneumatic system utilizes an air hose that connects to the coach's air brake system. This system is ideal because the only time the
vehicles brakes will apply is when you step on the brake pedal in the motorhome. This also results in totally proportional braking, which is the best way.
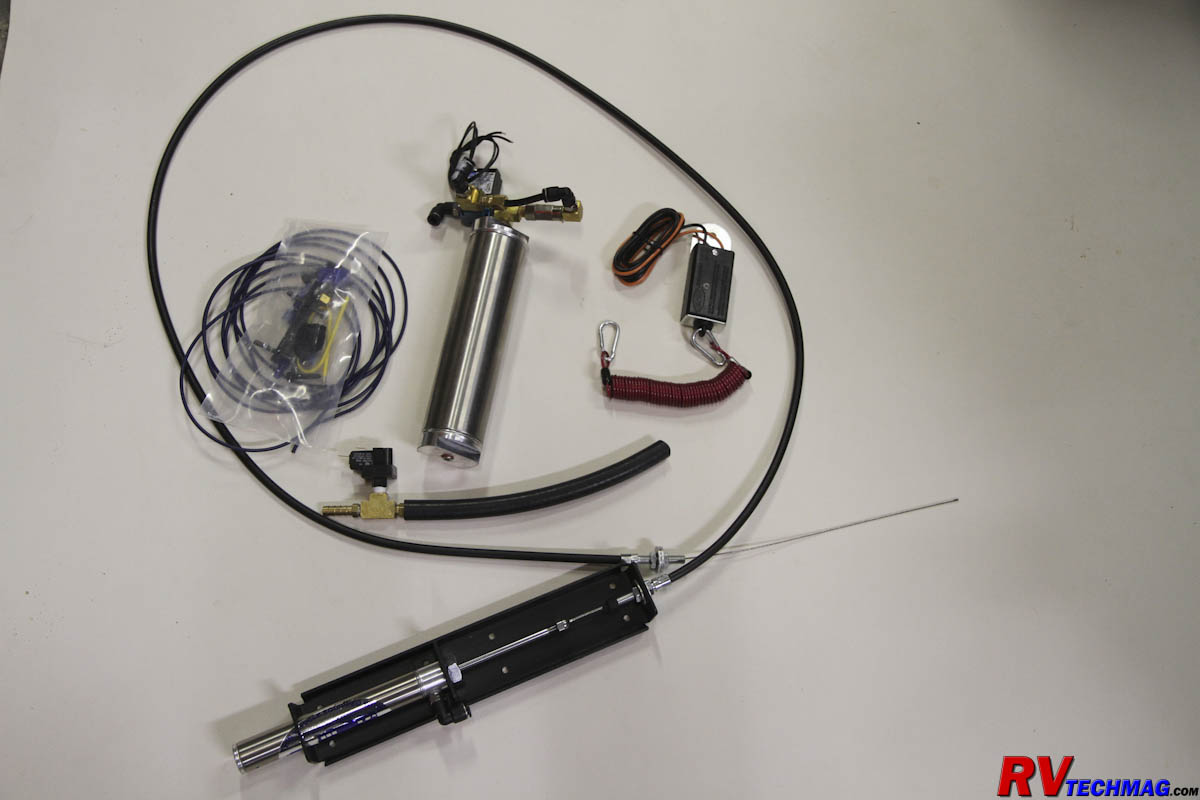
The M&G Engineering 2.0 Supplemental Braking System
Our motorhome is a diesel pusher with air brakes so I chose the
M&G 2.0 Brake System. I've used M&G systems in the past, both the original and the 2.0 systems and am convinced that they are the best choice. The 2.0 system utilizes
the coach air supply, which is tapped into the coach's braking system, to operate a pneumatic cylinder. A stainless steel cable assembly runs from the air cylinder,
passes through the firewall and attaches to a bracket mounted on the brake pedal arm. A quick-disconnect air hose connects the coach to the front of the Jeep. Whenever the
coach's brakes are applied a proportional air feed passes through the hose to the cylinder, applying the Jeep's brakes proportionally to how hard you are stepping on the
brake pedal in the coach. This system requires that the vacuum booster for the power brakes is charged with vacuum. An auxiliary 12 volt vacuum pump is available from
M&G to provide this but most Mopar products already have a 12 volt vacuum pump in them so it's just a matter of tapping into the Jeep's vacuum pump wiring and connecting
it to the hot battery line from the motorhome.
Regardless of what supplemental braking system you have, you do need to install a breakaway system that will apply the vehicle's brakes should it
become disconnected from the motorhome. In theory, your safety cables should prevent the vehicle from running away if the tow bar connection fails but in real life that
isn't always the case and a runaway vehicle could cause damage or even death to another driver should it get loose. A breakaway system will prevent that. Even if the
safety cables do contain the vehicle during a breakaway event, the vehicle could impact the rear of the motorhome, causing damage to both vehicles. I have experienced
just such an event.
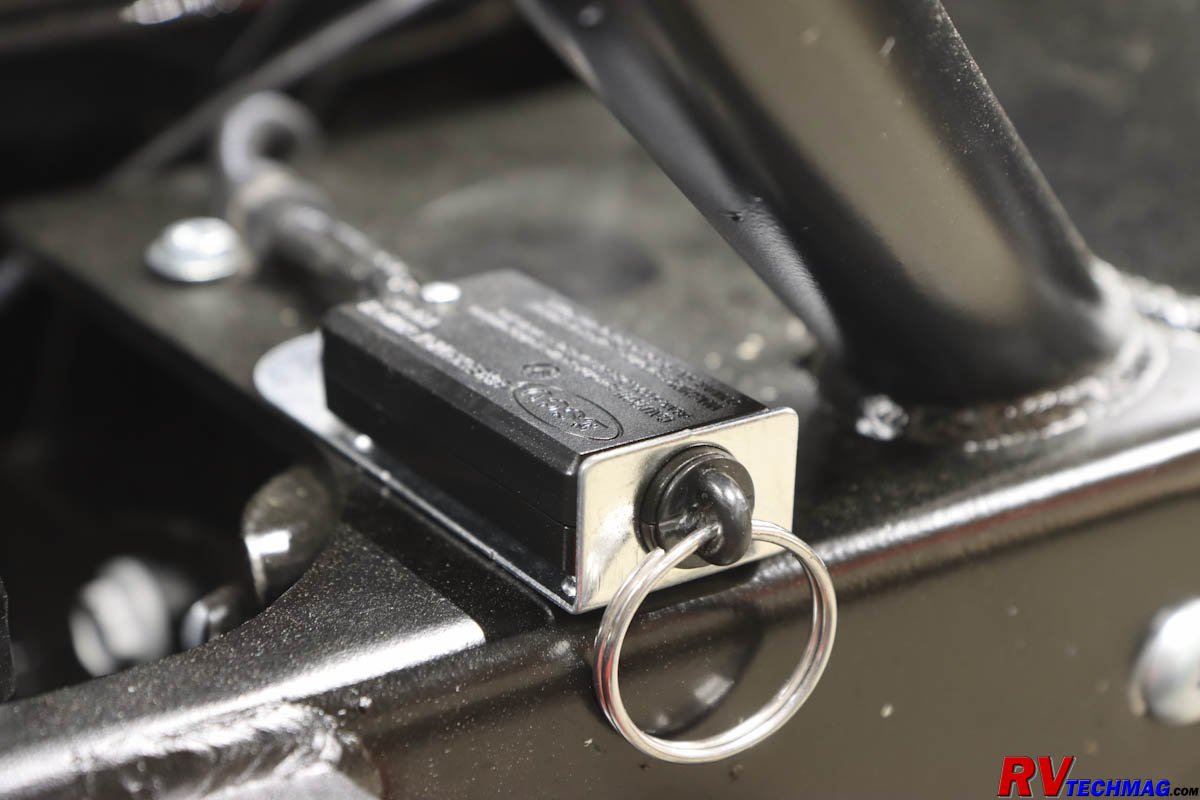
The Breakaway Switch Mounted on the Front Bumper is a Key Safety Component
Just prior to one of our trips I had rebuilt my Blue Ox tow bar, which had plenty of miles on it. I decided to replace the locking pins as well
seeing as how everything else was like new. We left for the trip and after we driving for a while I felt a lurch and looked in my rear view camera surprised to find my
2012 Wrangler following me about 10' behind the motorhome. I knew something was wrong so I pulled over to the side of the road and inspected the tow bar setup. I found
that my brand new 5/8" locking hitch pin that held the tow bar into the motorhome's hitch receiver had sheared, allowing the tow bar to pull right out of the receiver.
The safety cables held fast and prevented the Jeep from running away while the breakaway cable had applied the Jeep's brakes. Had I not had a breakaway in place the Jeep
would have slammed into the rear of the motorhome as I tried to slow down and pull over, damaging both the Jeep and the RV. I simply put everything back together with
a spare pin that I had along and went on my way uneventfully.
All of the above choices will allow me to safely tow our Jeep behind our motorhome. But part of the reason we wanted a Jeep was to do some
off-road travel and the motorhome is merely a way to get to those great destinations. The next step was to make our Jeep ready for some serious off-road wheeling.
Building a Rock Crawler
Bumpers
Towing a Wrangler behind a motorhome works great as long as you don't break or bend your Jeep while enjoying off-road trails. It's pretty hard to
tow a vehicle that's bent or has a hole in the oil pan or transmission and your local repair shop is a long way from where you are right now. While the Rubicon is very
capable of going to many places, it can use a bit of body armor to prevent any damage. My previous experience with
Rockhard 4x4 made me a true believer that they make the toughest stuff that is perfect for Jeeps.
My first choice was a heavy duty front bumper. Rockhard offers them in lighter weight aluminum or heavy steel plate in various configurations.
I chose to install their Full Width Patriot Front Bumper with Lowered Winch Plate. This
bumper is made from 1/4" thick steel and has mounting points for D-ring shackles. It accepts the original Jeep fog lights and has a steel hoop with mounting locations for
auxiliary LED lighting. It also has a lowered winch mounting plate so that the winch isn't mounted up high, blocking any airflow to the radiator. Everything is heavy duty
and I've even hit a deer with one of our 2012 Wranglers and, while the deer wasn't very lucky, this bumper prevented any damage to the Jeep. The Patriot series bumpers
also have a tapered flat steel plate beneath that protects the sway bar disconnect motor on Rubicons and also has a pair of laser cut square holes for use with a HiLift
jack.
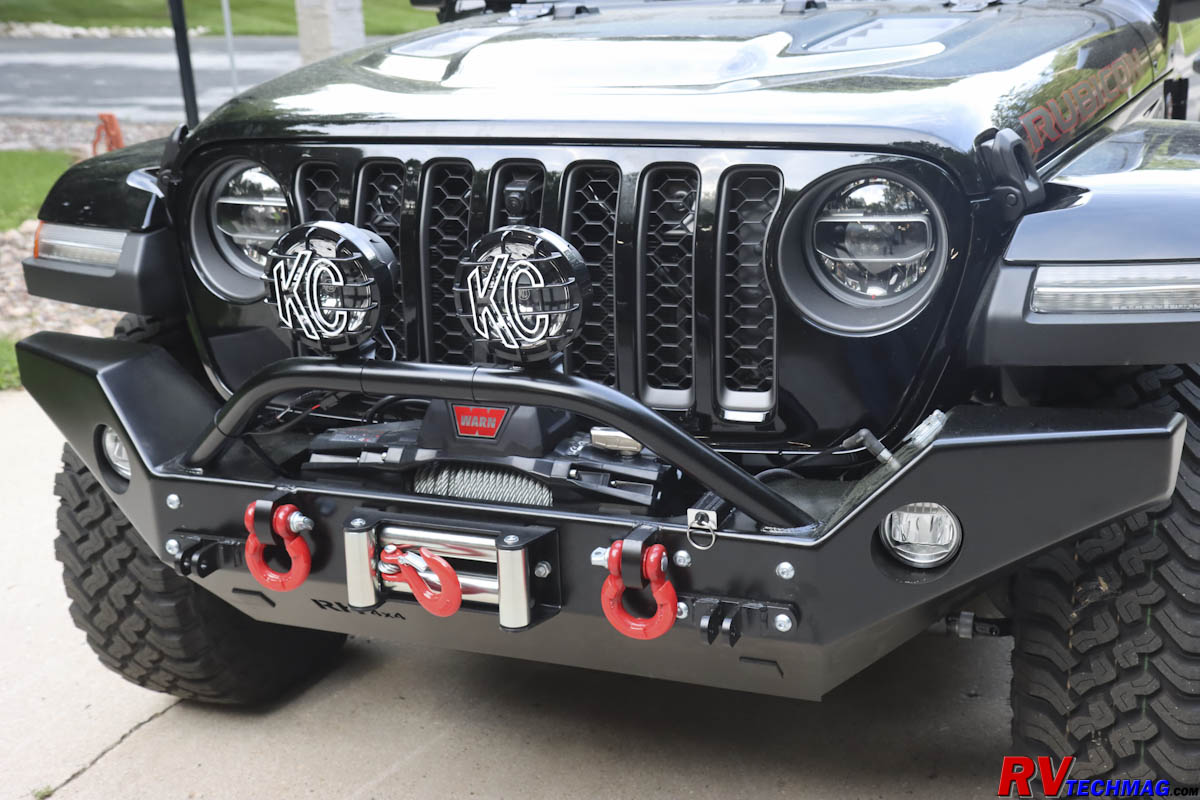
The Rockhard Patriot Series Full Width Front Bumper
Another huge benefit to using the Rockhard bumpers is that they are perfect for flat-towing behind a motorhome. Rockhard offers a set of towing
tabs for all of the major tow bar manufacturers. These tabs bolt to the front of the bumper and, rather than just mount to the bumper some place, the bolts run all the way
through to the factory bumper mounting points on the Jeep's frame rails so that the towing forces are supported by the Jeep's frame and not just the bumper. The tow tabs
are mounted on the front of the bumper which means that you won't need a low slung baseplate for your tow bar, which could get damaged when wheeling off-road. The 1" thick
recovery tabs accept 3/4" D-ring shackles so that the Jeep can be retrieved if you go someplace you shouldn't have gone. These shackles are also the perfect place to
attach your tow bar's safety cables. As I proved earlier during my breakaway event, these tabs will easily withstand the shock of a breakaway. The steel bumper has plenty
of room to mount your tow lighting socket and an air hose connector for an auxiliary braking system. I chose to mount a Warn 12,000 lb. winch on this bumper and a pair of
K-C Hilites LED driving lights on top of the hoop.
The next step was to choose a rear bumper. The factory bumpers are poly and won't hold up if you have to drag them over rocks so selecting a good
steel bumper was the next step. I chose the Rockhard Patriot Series Rear Bumper for our
Wrangler. This bumper is also made from heavy 1/4" steel plate and accepts the factory license plate light as well as the rear parking proximity sensors. Like the front
bumper, it has 1" thick retrieval tabs for mounting a pair of 3/4" D-ring shackles. It also has an integrated trailer hitch receiver, which replaces the low slung factory
trailer hitch so that it can't get damaged on trails. A spot for the Jeep trailer lighting sockets is also provided and the beveled corners of the rear bumper provide extra
clearance when off-roading.
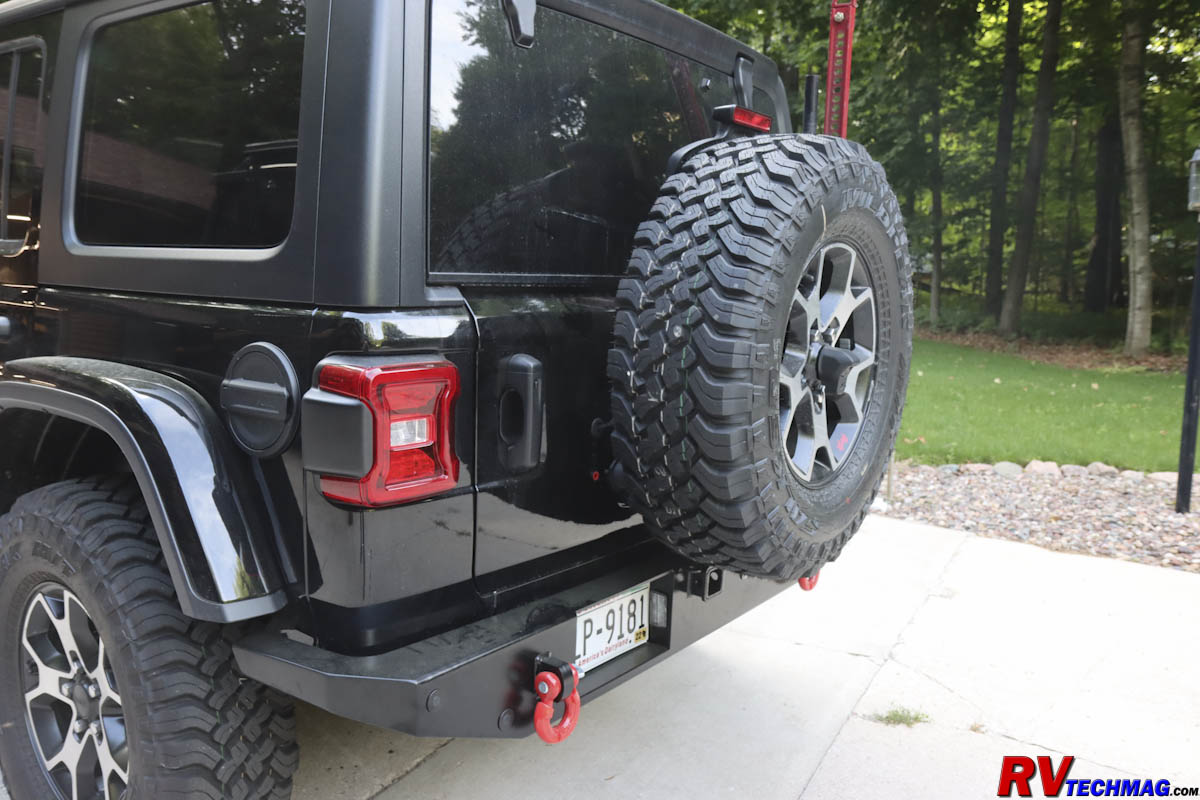
The Rockhard Rear Bumper
Both the front and rear bumpers are simple bolt-on applications and Rockhard provides all of the necessary hardware. The original plastic rear
bumper had a cutout for the spare tire, which the Rockhard bumper does not have. The raised height of this bumper provides for more clearance than the OEM bumper but this
does require the installation of a spare tire relocation bracket which raises the spare
tire slightly to clear the bumper. This bracket also includes a mounting location for the Jeeps rear backup camera.
Lastly, unlike our Gladiator, the Wrangler's transverse muffler is right behind the bumper where it too can be
subject to damage if it is dragged
over rocks or steep embankments. So I selected Rockhard's muffler skid plate to prevent
that from happening. This skid plate hangs from the frame rails, and not the bumper so it can be used with the stock or any brand of aftermarket rear bumper.
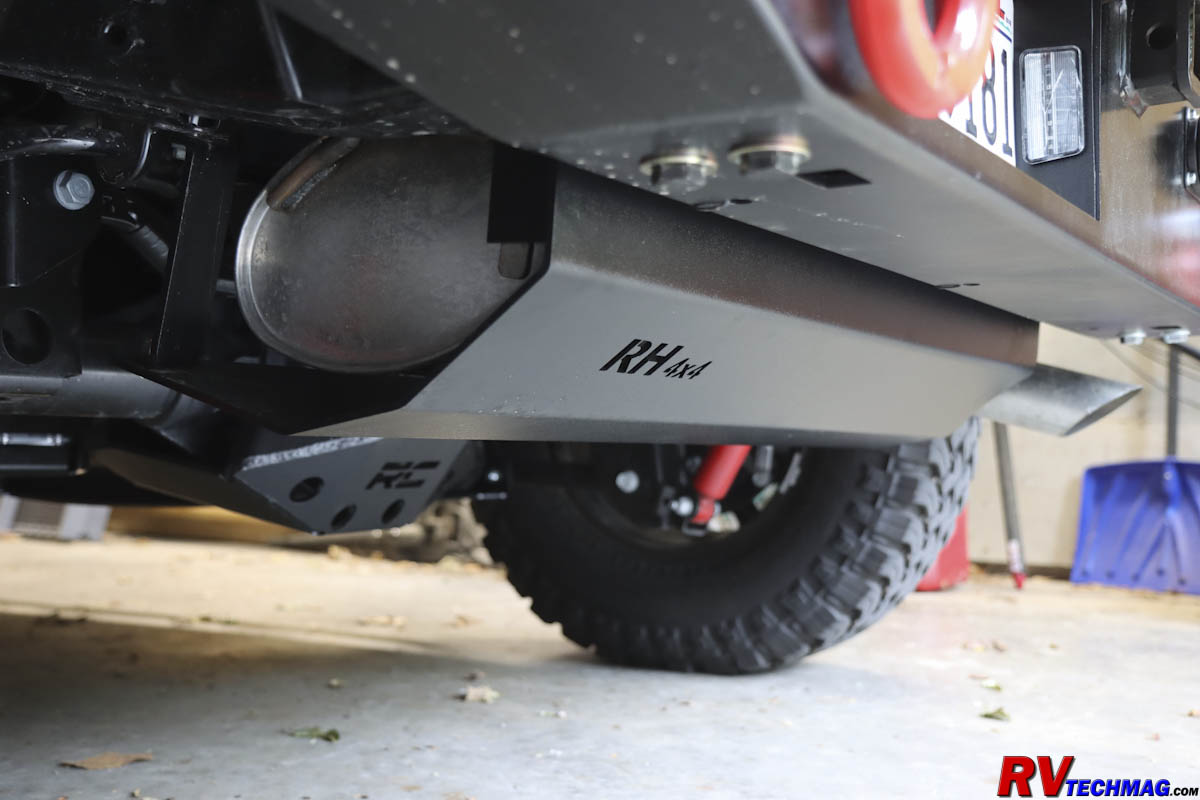
The Rockhard Muffler Skid Plate Protects the Muffler from Damage
Undercarriage Armor
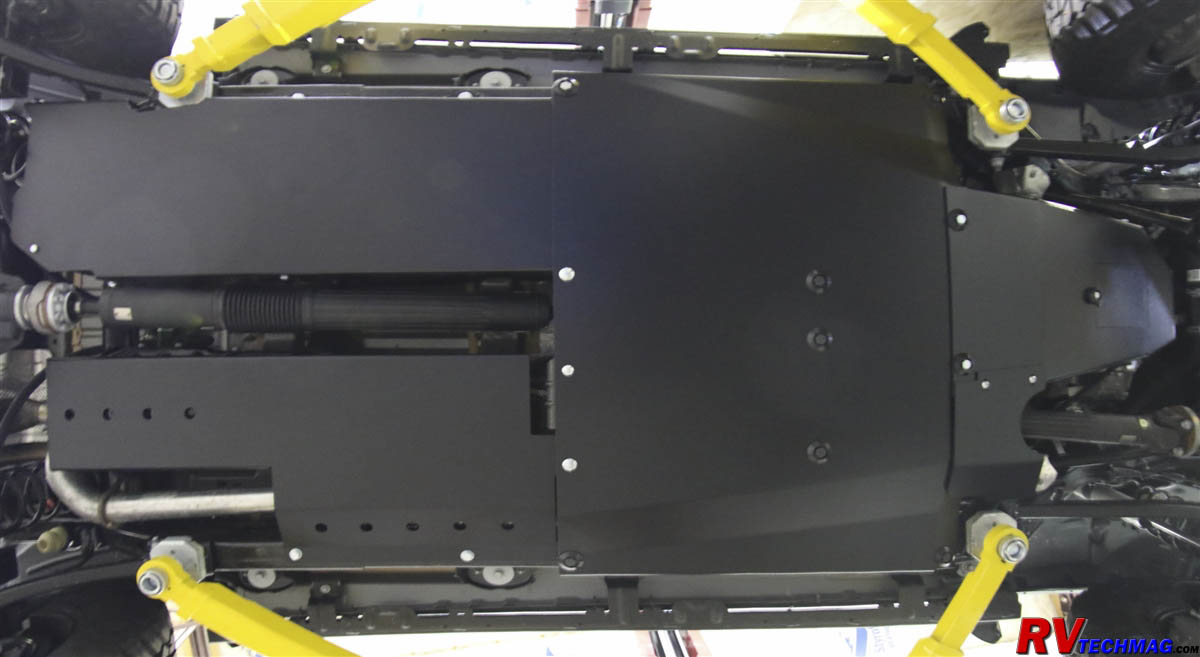
The Rockhard Complete Bellypan Skid Plate System
There is a lot of stuff underneath a Jeep that can get damaged when wheeling off-road. Puncturing an oil pan or automatic transmission pan or fuel
tank will leave you stranded quite quickly. I selected Rockhard's Complete Bellypan Skid
Plate System for our Wrangler. These plates are made from heavy 3/16" thick steel. A pair of additional crossmembers helps to eliminate the frame from twisting. A large
center section covers the long 8-speed automatic transmission and transfer case, while the front section protects the engine oil pan and includes a small removable hatch
panel for easy access when changing your engine oil. A fuel tank skid plate covers the fuel tank while another plate covers the
resonator and battery pack for the 3.6
liter E-torque V6 engine. Rockhard offers other models to fit other engine choices.
I also chose to protect a few other sensitive areas. I selected Rockhard's front and rear lower control arm skid plates to prevent impact damage
from rocks as well as a Front Axle Disconnect (FAD) skid plate to prevent damage to that sensitive area. I also ordered a set of Rough Country differential skid plates to protect those expensive axles.
|
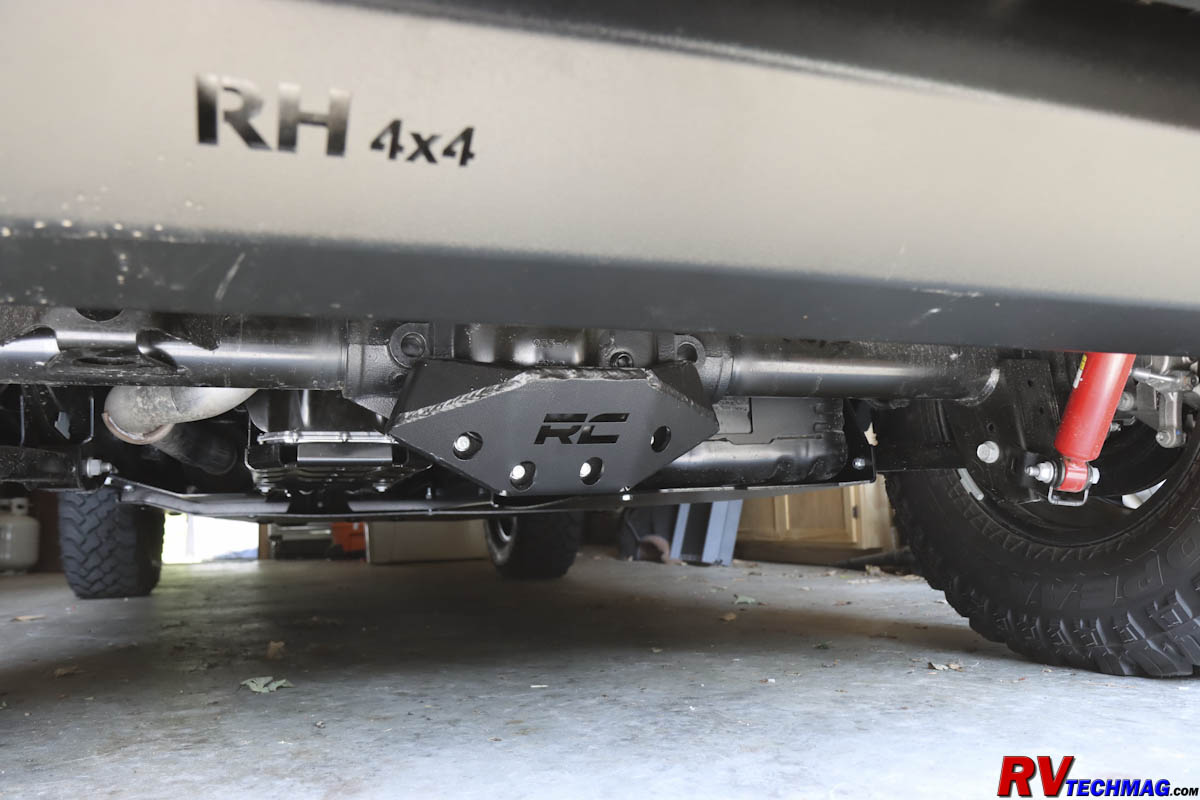
The Rough Country Rear Differential Skid Plate
|
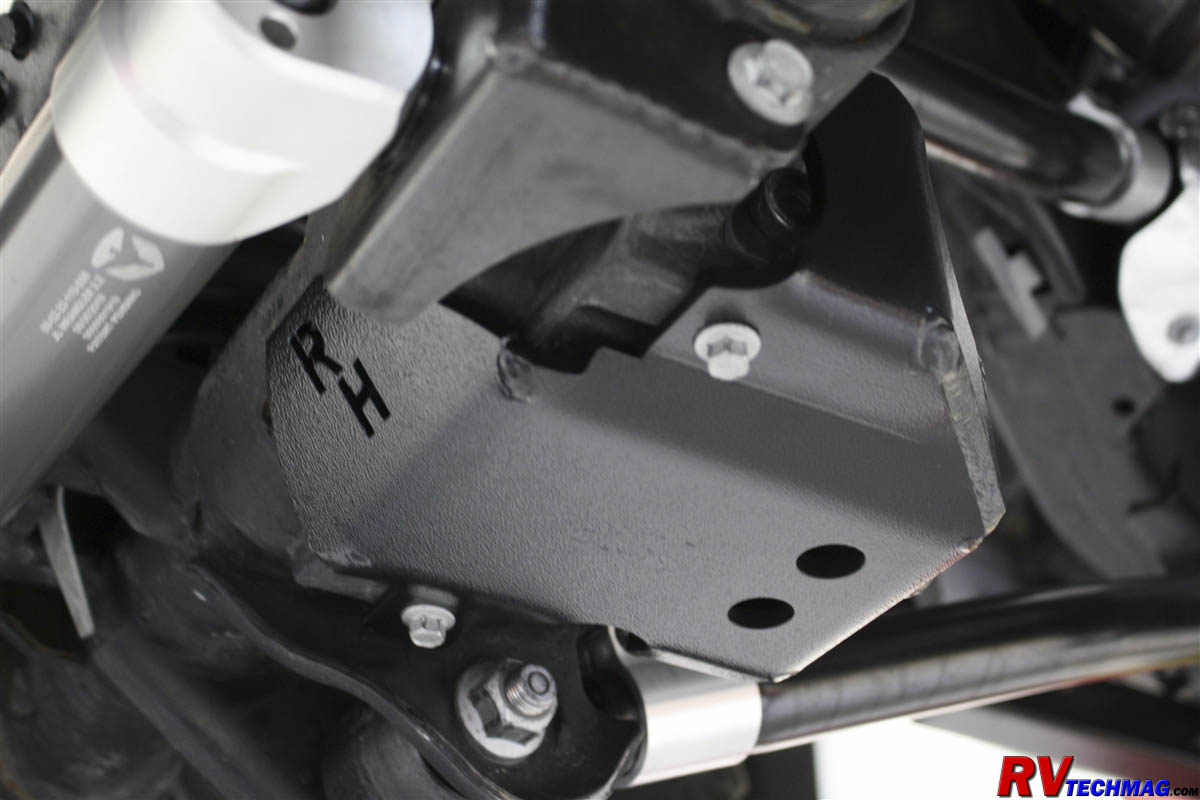
The Rockhard Front Axle Disconnect Skid
|
|
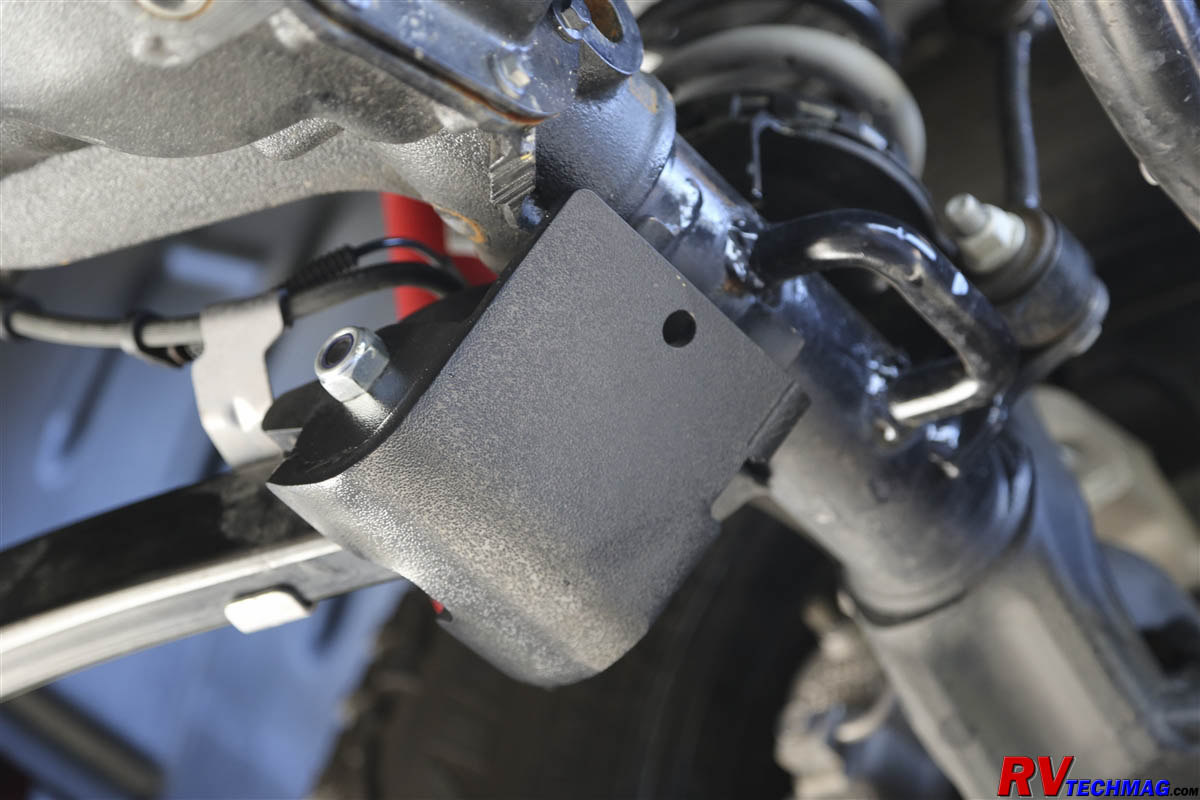
One of the Rockhard Front Control Arm Skids
|
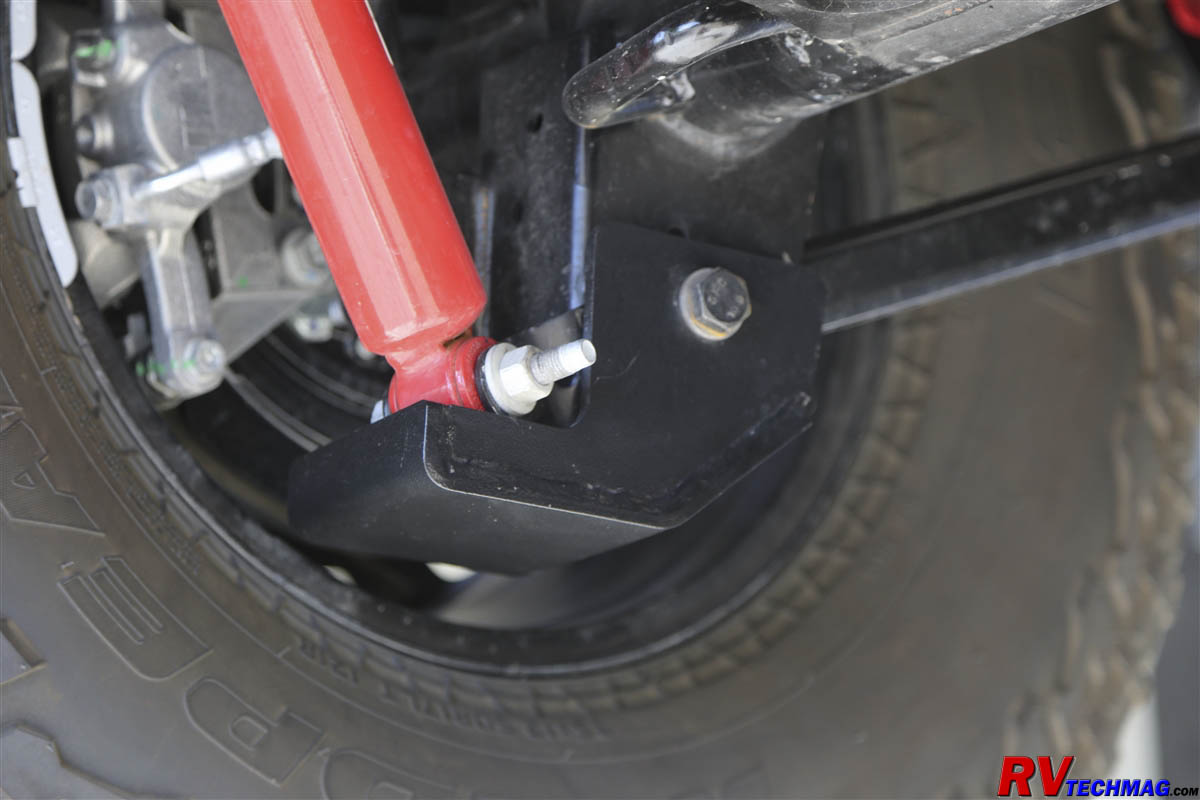
One of the Rockhard Rear Control Arm Skids
|
Finally, I added a set of Patriot Series Tube Sliders to protect the rocker panels from damage. It also helps in parking lots to prevent door dings from neighboring parked cars
owner by lazy and inconsiderate drivers and acts as a step assist for anyone with short legs to climb in and out of a tall vehicle.
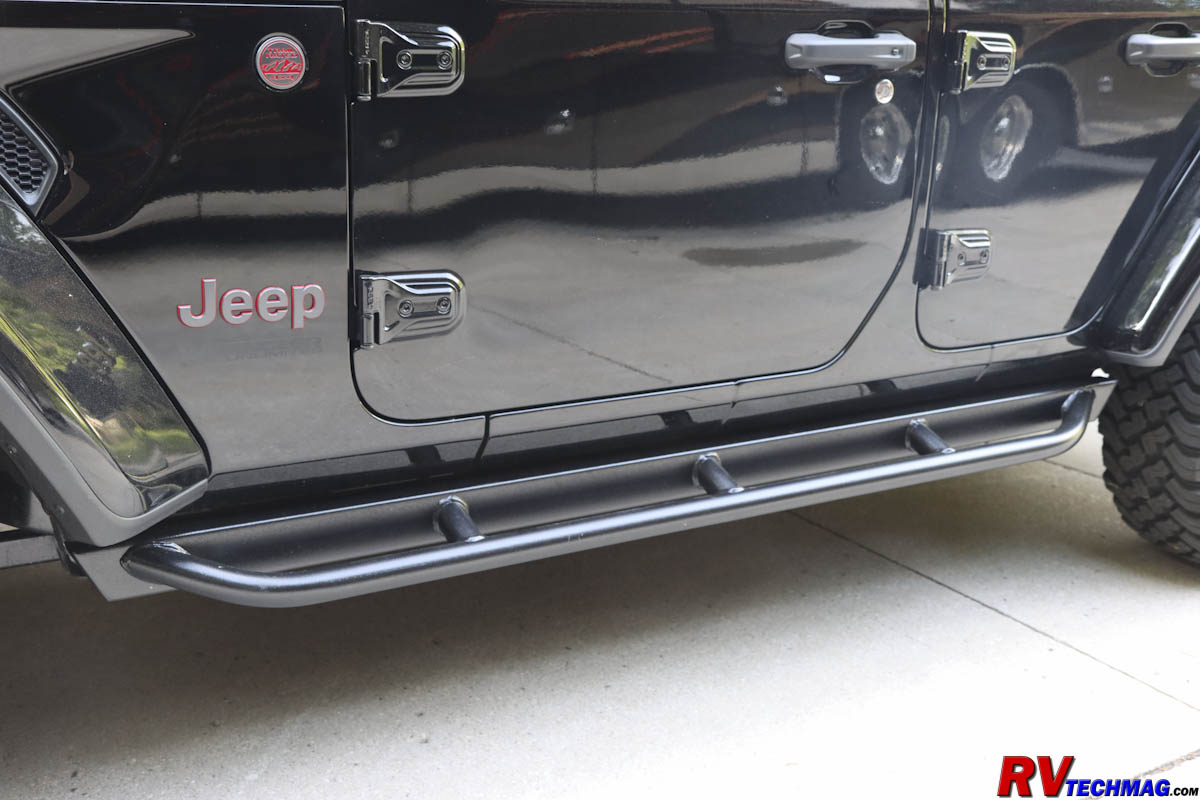
The Rockhard Tube Slider Rock Rails
Misc Accessories
Naturally, a few other accessories were required. After all it's a Jeep and most owners can't stop customizing them, at least until the
money runs out. Traveling off-road requires traction and climbing over terrain with tires all pumped up to highway pressures leads to less traction and a bumpy ride. By lowering
the air pressure in the tires you'll get more surface area on the ground for better traction and a less bumpy ride. You can go extreme with bead lock rims to prevent the tire
from popping off the rim but even if you go down to around 16 PSI you'll still experience a big improvement. Once you're done wheeling and want to return to the highway you'll
need those tires pumped back up though so carrying an air compressor of some sort will be required. I've used portable 12 volt compressors in a carrying case in the past and they
work well for this task but do require storage space in the Jeep, which can be at a premium. For this Wrangler I chose a kit from
Innovative AT Products that
includes a twin ARB compressor and a special mount that locates the compressor underneath the copilot's seat where it is out of the way. A complete wiring harness was included,
as well as an illuminated switch but I simply connected mine to Jeep's optional Auxiliary switches that were in my Wrangler. A complete accessory kit provides all of the
necessary hoses, tire fillers and bleed-down valve.
|
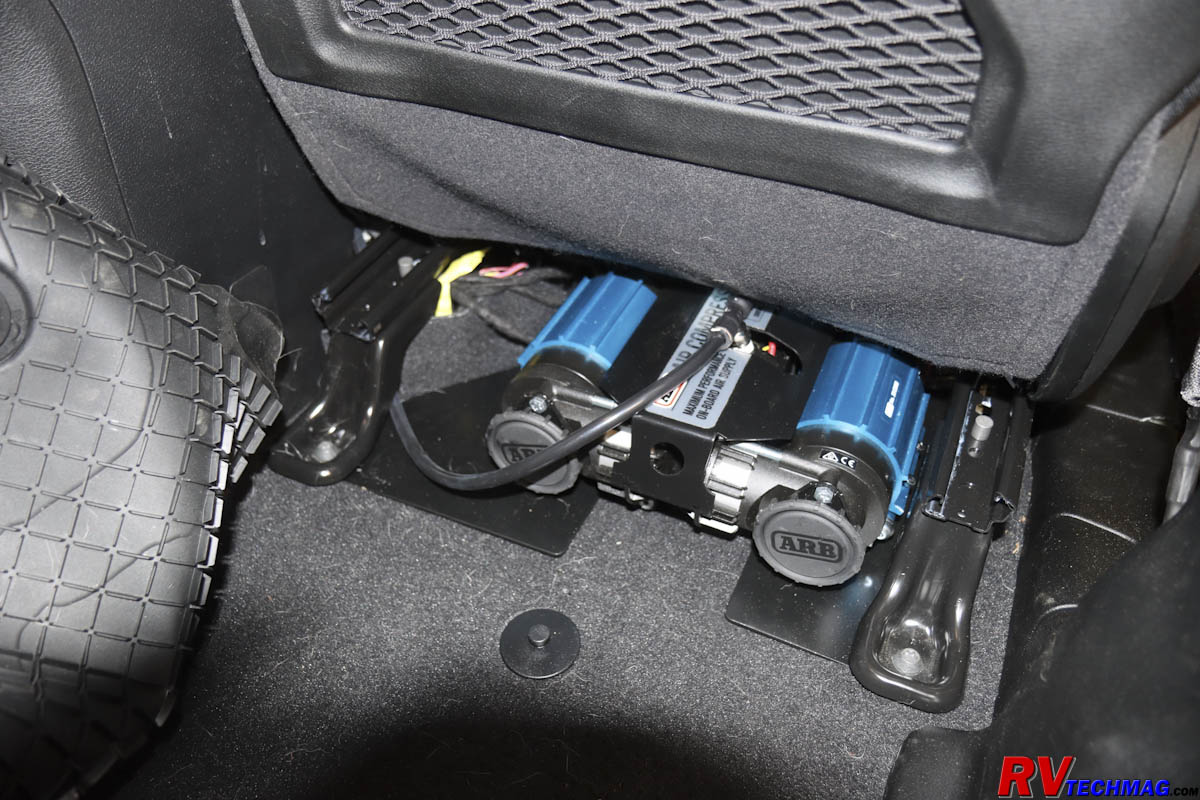
The ARB Compressor From AT Innovations Mounted Beneath the Passenger's Seat
|
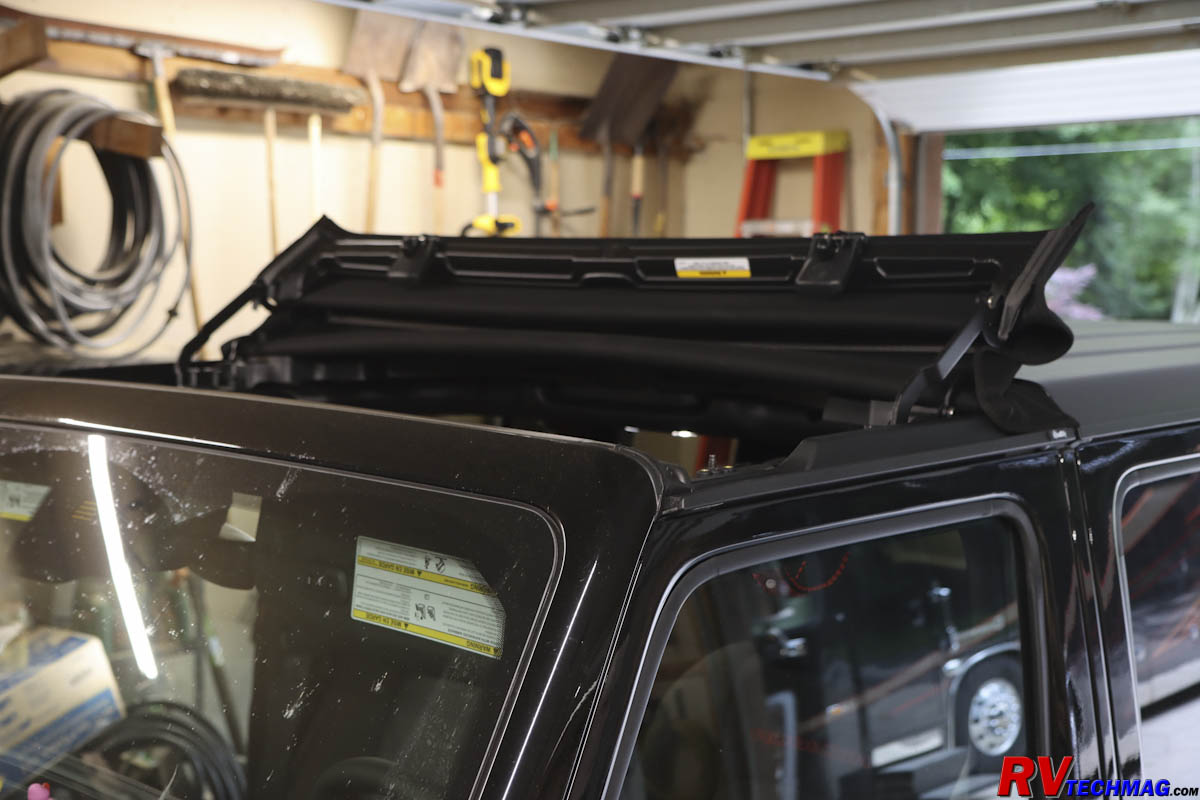
A Bestop Sunrider for Hardtops Replaced the Hardtop's Freedom Panels
|
I added a few other accessories as well. I forgot to include the factory hardtop headliners when I ordered our Wrangler so I bought a set of
Hothead hardtop liners to keep the interior warm in winter and cool in summer. I was annoyed by Jeep's automatic
stop-start feature that shut off the engine at every stop light and got tired of trying to remember to turn it off every time I started up the Jeep so I installed the
Smart Stop-Start module that remembers the position of that switch so that you don't have to keep turning it off
whenever you start the engine. I added the usual shorty antenna that everyone changes too and a
Bestop Sunrider to allow fast changes between
open-air travel or all closed up. Finally, an RVI Towed Vehicle Battery Charger to keep the Jeep's battery charged
while towing and prevent any discharge or backfeeding when parked. This was also necessary to properly connect the Jeep's 12 volt vacuum pump and Mopar wiring harness to
allow battery charging.
Installation
I found that the flat towing portion of the installation somewhat depended on the rock crawling portion. For instance - the Mopar wiring harness
was originally designed to connect with a plastic plug that attaches to the original urethane bumper and then a special whip hose connects to the motorhome's 7 pin
lighting socket. But this whip has a special connector that attaches to the Jeep's bumper and if this cord is ever damaged, good luck finding another. Seeing as how I
was replacing the bumper with the Rockhard steel bumper anyway I simply cut the oddball connector off of the Mopar wiring harness and wired it into a standard 6 pin
lighting socket commonly used in the RV industry on towable vehicles. This allowed me to use a nice slinky cord, which is available at any place that sells RV accessories,
to connect the RV to the Jeep. This meant that I could not complete the Mopar wiring harness installation until the new front bumper was installed. In addition the M&G
supplemental brake system also needed to be connected to the coach and I decided to install a standard Milton quick disconnect fitting on the bumper to accommodate this.
The Mopar wiring harness also required running some wire loom through the frame area to get from the front to the rear of the Jeep. The skid plates would make that a
difficult task so they would have to wait until the wiring harness was installed. So the front bumper became my first installation task, followed by the rear bumper,
then the wiring harness, then the braking system and finally the skid plates and rock rails.
Front Bumper
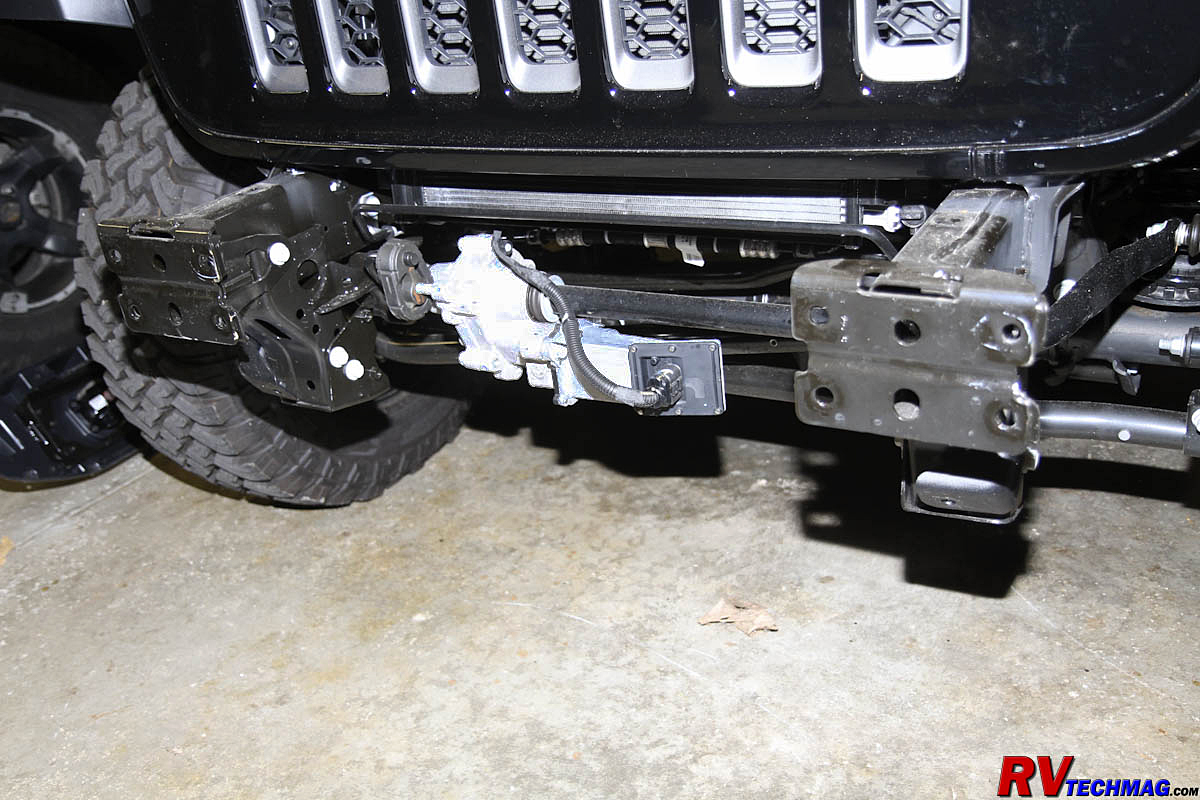
Bare Frame Rails After Removing the OEM Bumper
Removing the plastic Jeep bumper was easy enough. Much of it was held together with nylon push pins so I removed the mounting bolts and misc splash
panel trim to take the bumper off. I still needed to take the bumper apart though in order to retrieve the original LED fog lights so that I could relocate them to the new
bumper. That wasn't hard but it took some time and when I was done I had a pile of pieces and lots of small screws and nylon push-pins all over the floor. Once the bumper
was off the lower front portion of the Jeep was open and the frame rails exposed. It was now time to prepare the new bumper for installation.
|
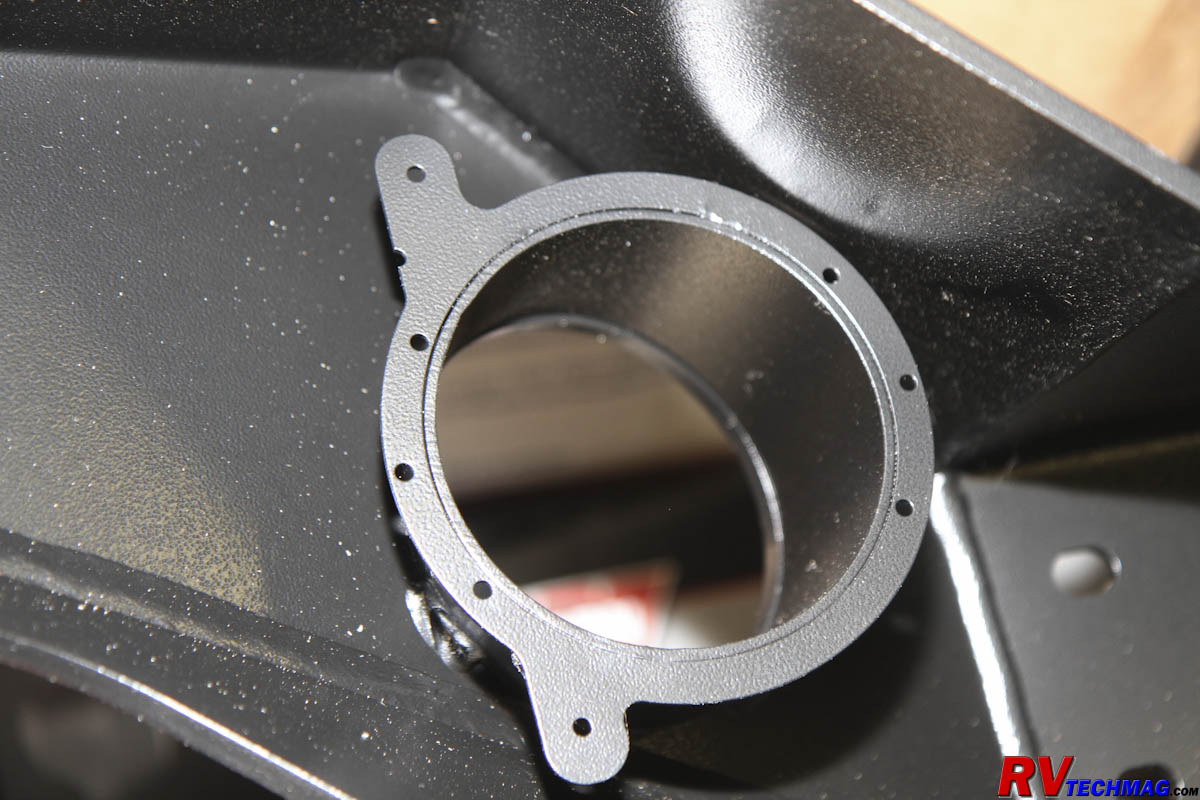
The New Bumper was Prepped for the Jeep's Fog Lights
|
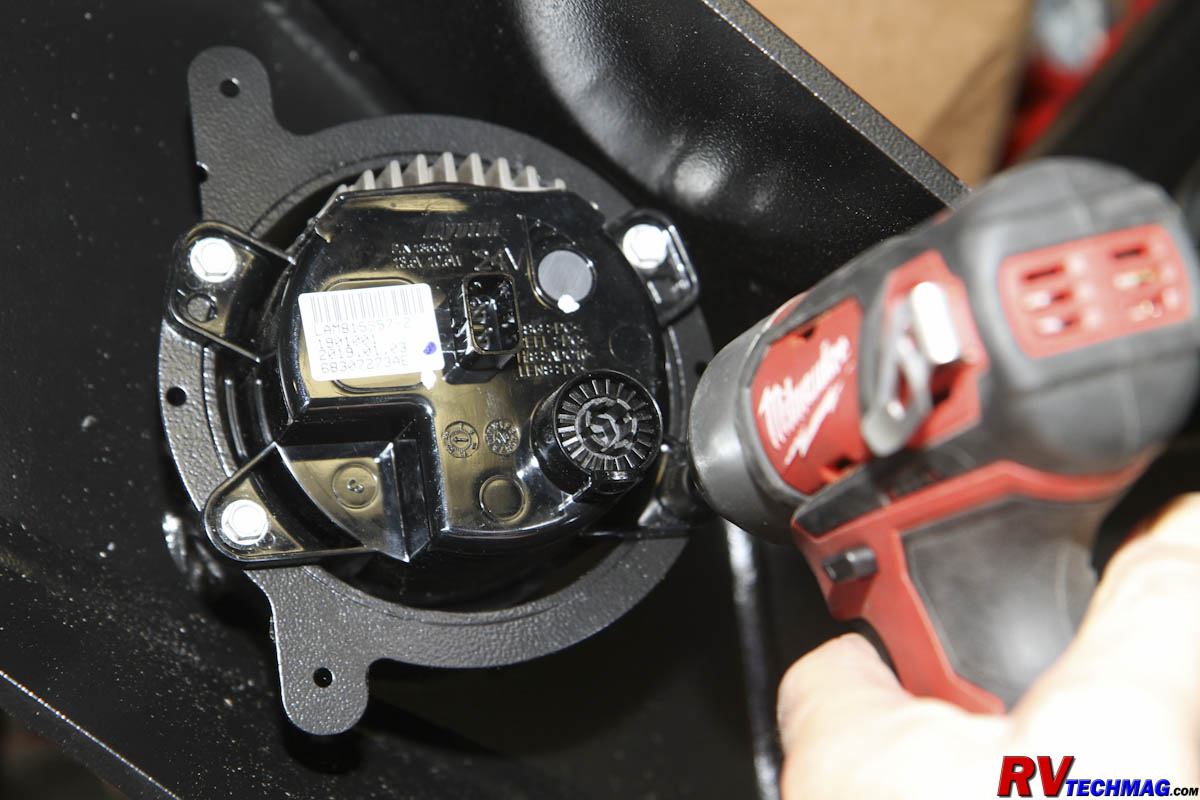
Installing the Fog lights into the Rockhard Bumper
|
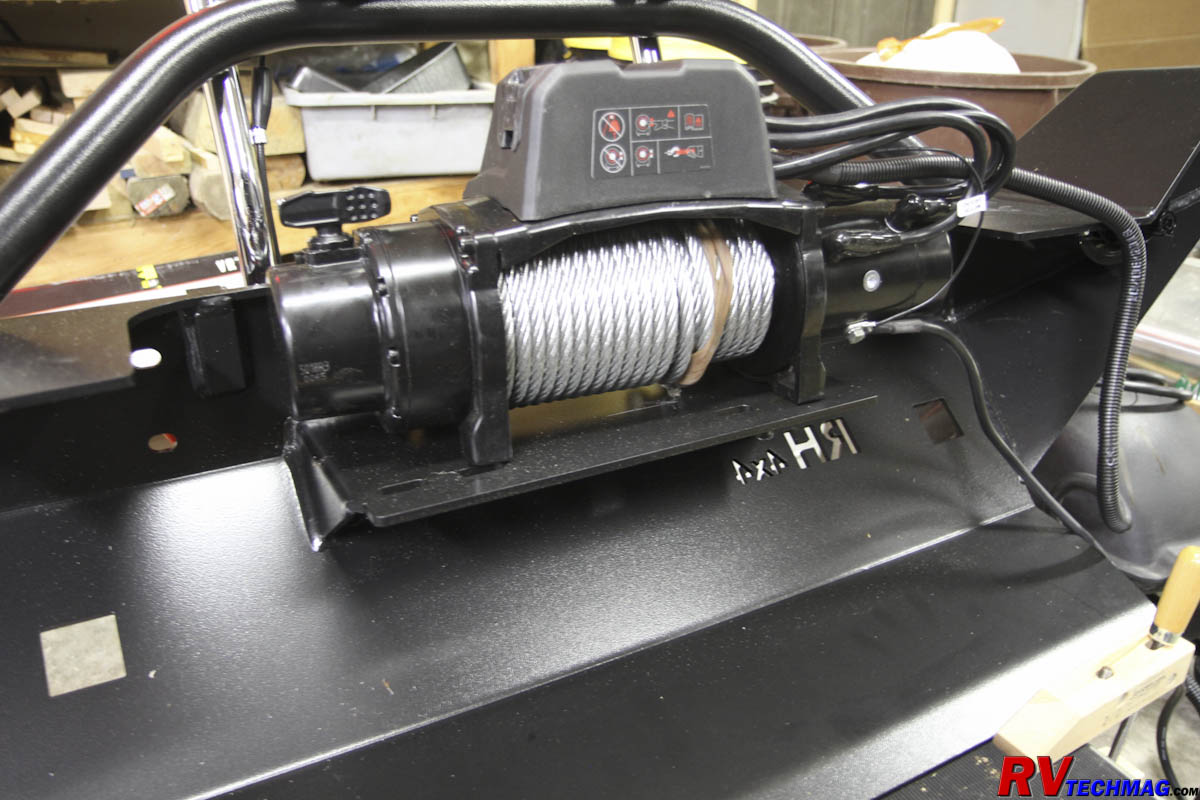
At 137 lbs. the Rockhard bumper was heavy. Fortunately I had a small hydraulic lift cart so I picked up the bumper and set it onto the cart so
that I could easily maneuver the bumper into position on the Jeep. My Warn winch fit nicely into the bumper's winch tray but that added even more weight to the bumper
and it was near impossible to get to the winch's mounting bolts to tighten them after the bumper was installed so my best choice was to mount the winch to the bumper prior
to hanging the bumper on the Jeep. My first step was to install the LED floodlights that I had previously removed from the original bumper. Rockhard's floodlight mounting
locations were perfect for accepting the factory lights without any drilling or fabricating and the lights easily mounted with the self-tapping screws provided with the
bumper.
|
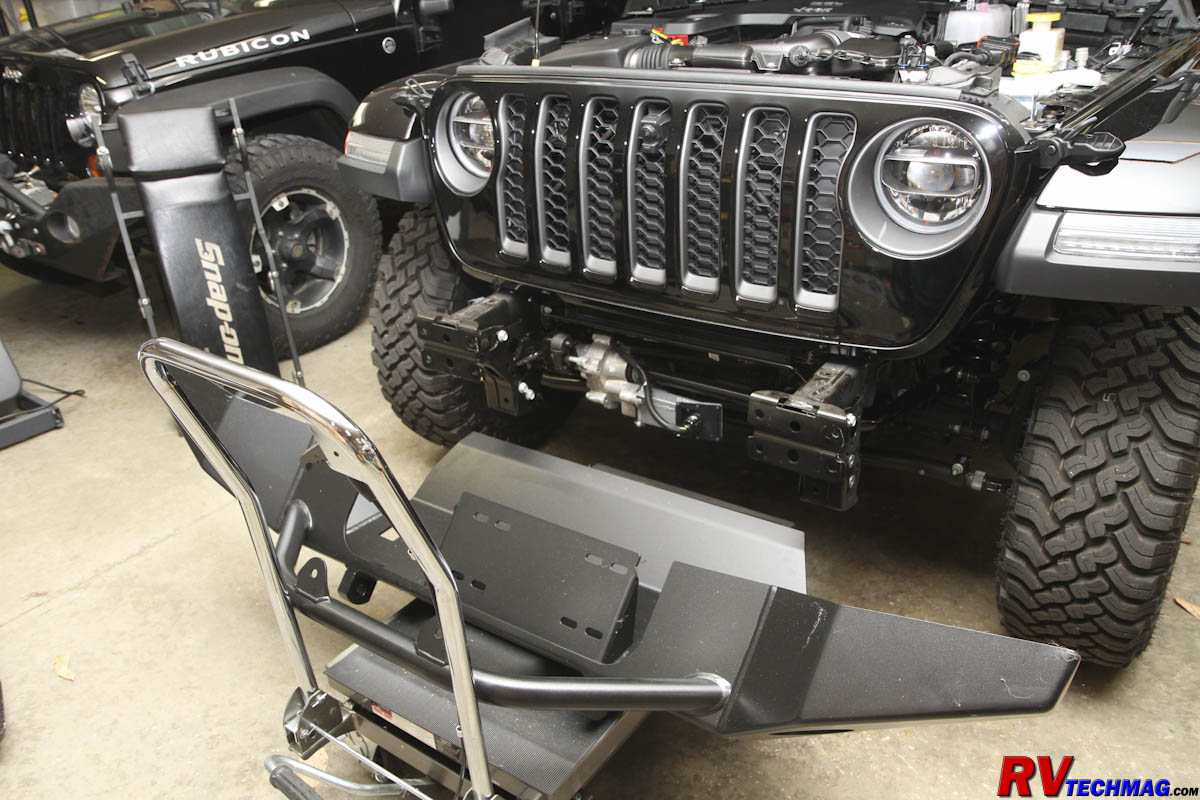
A Hydraulic Lift Cart was used to Make the Heavy Bumper a One Man Installation
|
The Warn Winch was Pre-mounted to the Bumper Before Mounting the Bumper on the Vehicle
|
The Rockhard Bumper Came with a Complete Set of Fasteners
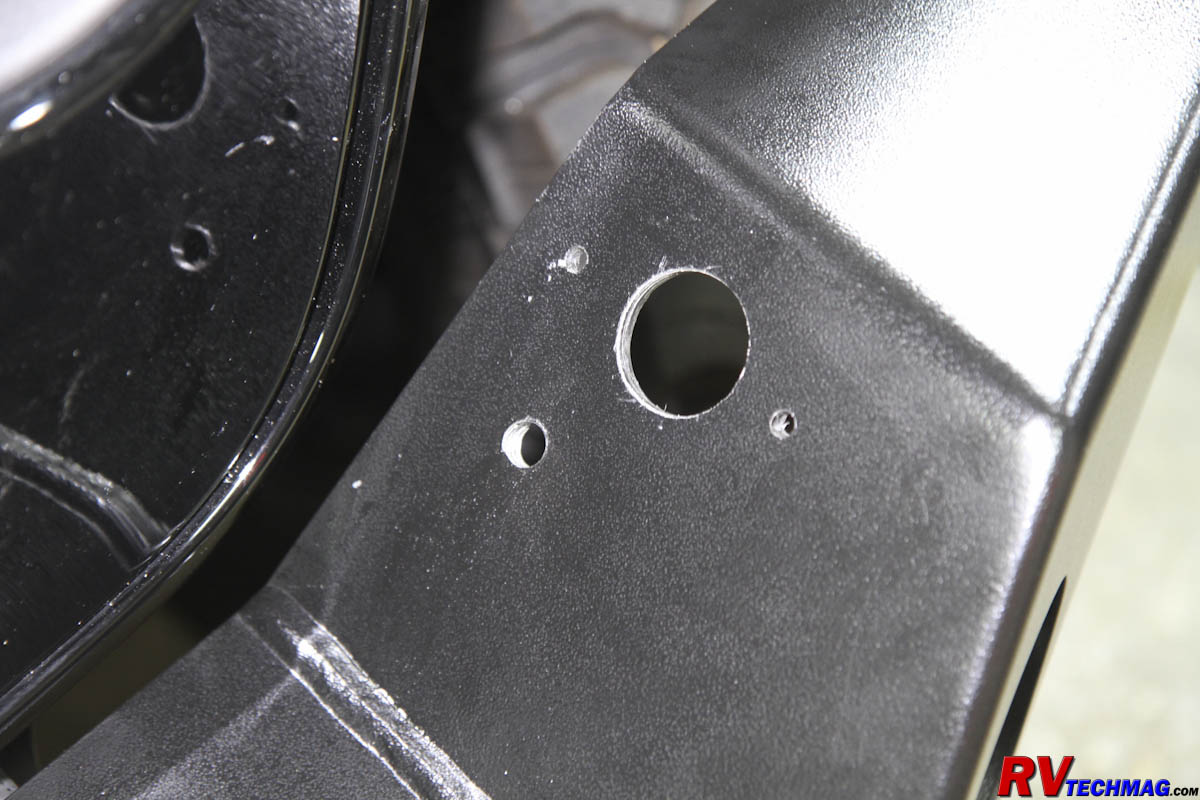
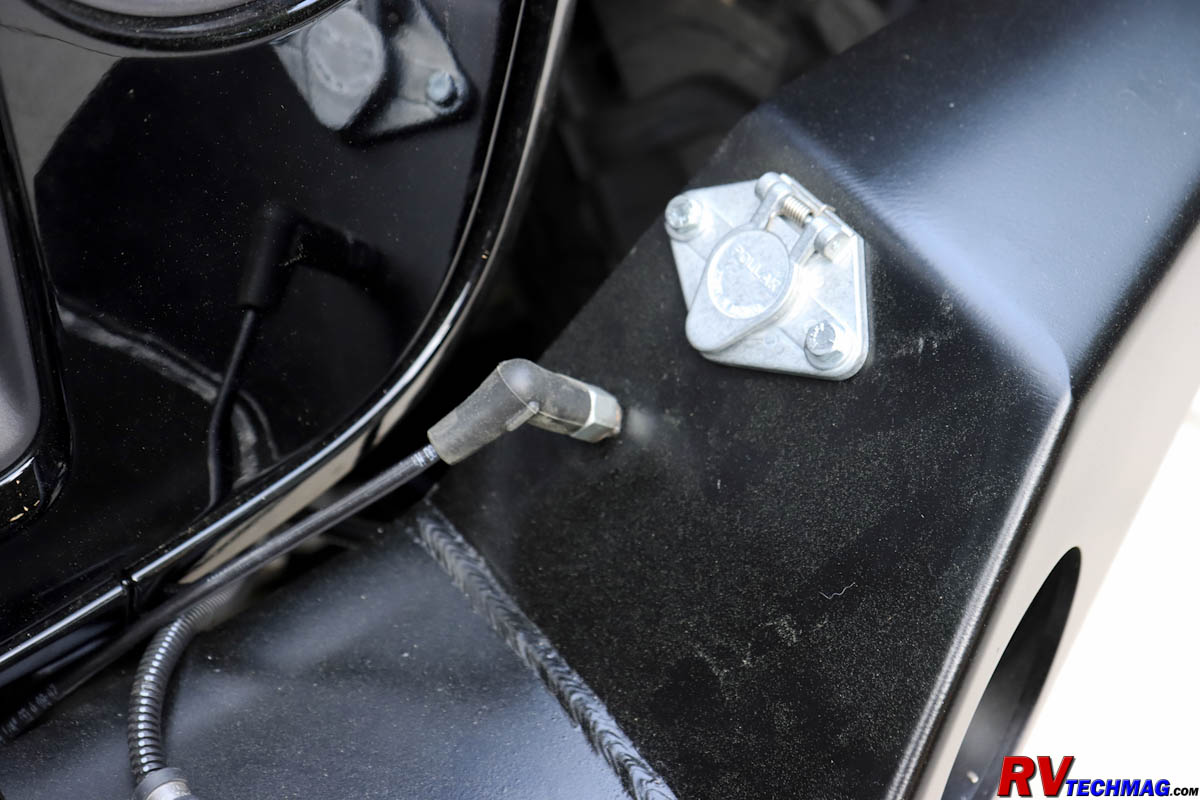
I also needed to find a place to mount the tow lighting socket, the breakaway switch and the air hose connection for the M&G
supplemental braking system. There were plenty of flat spaces on the Rockhard bumper which gave me a number of choices. I decided to mount them on
the top of the bumper, off to one side. This left me with plenty of room to make my connections without having to crawl on the ground to connect to
a lower location. This location was also fairly well protected from any off-road damage or dragging of the cords when towing and the lighting cord and
air hose were of sufficient length to easily reach that location. I also made a dust cover for the air hose connector to prevent any dirt from entering
the air line to the supplemental braking system. The under-hood air line cannot be tightly capped off or else the air in the line will expand and apply
the brakes as the under-hood temperatures rise so I used a right angle rubber spark plug boot and inserted an 18" piece of poly air line hose into the
boot to allow the air in the system to vent as it expands. The air line simply hangs behind the bumper and is removed and kept inside the Jeep when
connected to the motorhome's air hose when towing.
|
Pre-Drilling Holes for the Lighting Cord and Brake Hose
|
Lighting Socket and Air Hose Connectors Installed
|
Rear Bumper
The next step was to install the rear bumper. Removing the existing plastic bumper was easy enough but once again, it had
to be disassembled so that I could remove the parking sensors that were mounted in the bumper. Once I removed a ton of screws and nylon push-pins
I could access the sensors. They simply popped out of their holders and I could insert them into the new holders that came with the Rockhard bumper.
Rockhard pre-drills locations for these sensors and also supplies plugs to fill those holes in the event the owner does not have the parking
sense option on their Jeep. The biggest issue was that the original Jeep bumper has sensors mounted evenly across the width of the bumper. The
Rockhard bumper has an integral trailer hitch in the middle of the bumper and relocated the license plate to a safe spot just off-center of the
bumper while still allowing locations for the retrieval D-rings at the strongest point of the bumper, which is close to the frame rails. This places the
sensors further apart and closer to the ends of the bumper. This method works fine but the original Jeep wiring harness won't reach all four of
the sensors. The solution was to cut into the harness and extend the two middle connectors so that the harness will reach all four of the sensors. The
wires were of a small gauge and wrapped in a protective nylon mesh loom so it took a bit of effort to cut through the loom without damaging the wires
so that they could be lengthened and soldered when modifying the harness. Once that was done, the rest of the task went easily. The original
trailer hitch is removed because the new bumper has one built into the bumper. I installed the license plate, the license plate light, the trailer
lighting sockets and hung a pair of red D-ring shackles on the retrieval lugs.
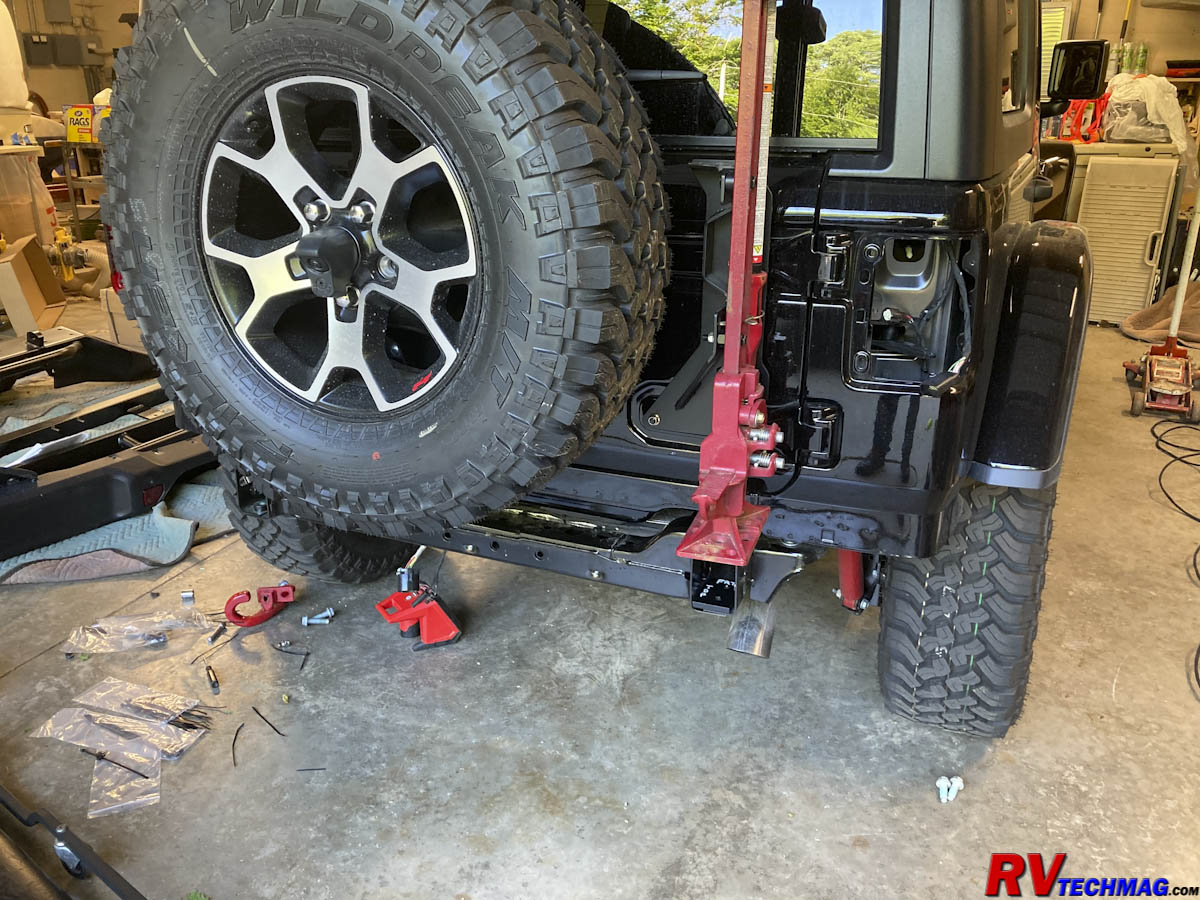
The original bumper removed
The original bumper also had a dished cutout to allow the spare tire to be mounted low enough on the tailgate. The Rockhard bumper is
designed with higher ground clearance and is stronger so the tire does not have a cutout to drop down into. This requires raising the tire up a bit to
clear the bumper. Rockhard offers an adjustable spare tire carrier that can raise the tire up to 6" and can handle a 35" tire if necessary. The carrier replaces
the factory tire carrier and does not require any drilling to mount, using the original mounting holes in the tailgate. It also has brackets for mounting a pair
of CB antennae if desired and will retain the factory third brake light. It utilizes the same mounting system for the rear backup camera so you won't lose
any of your original factory equipment.
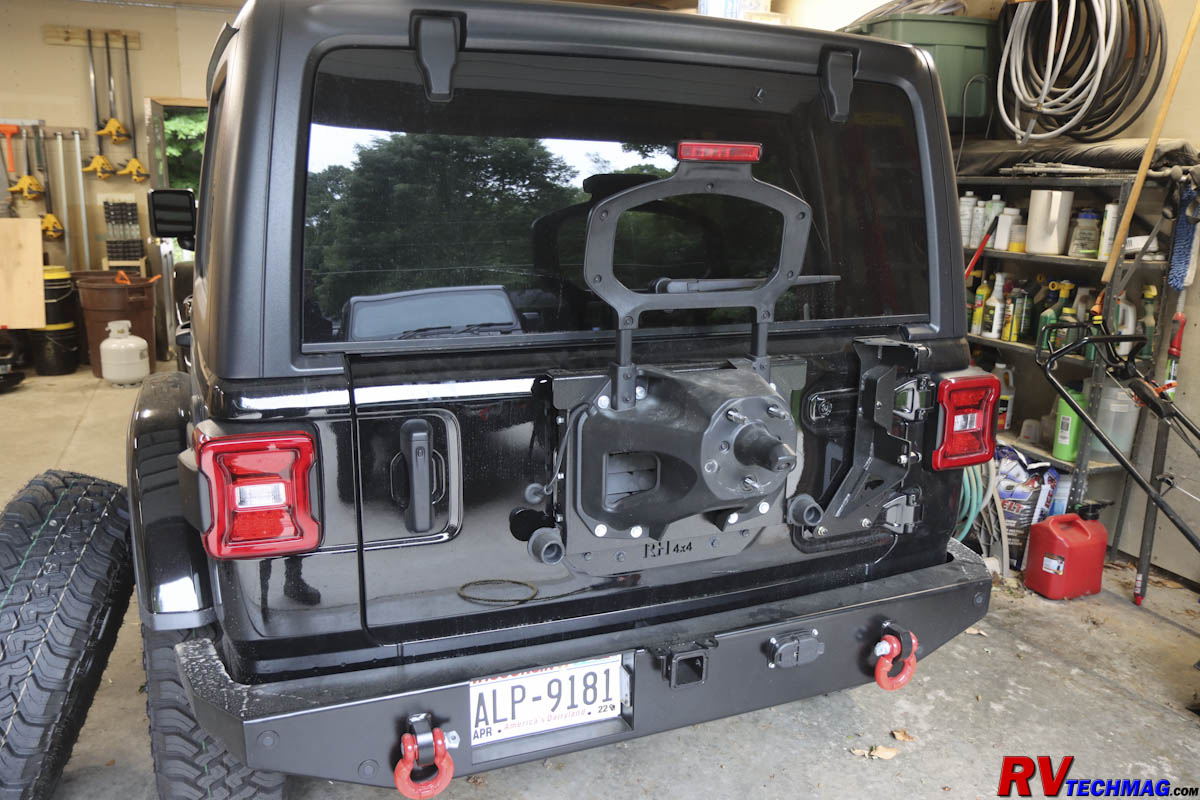
The Rockhard Spare Tire Carrier and Terraflex Hi-Lift Jack Mount Installed
I also installed a Terraflex Hi-Lift jack mount on the rear tailgate. This allowed me to carry my Hi-Lift jack in an out-of-the-way location.
The bracket mounted to the existing hinge bolt locations and will work with any rear bumper. In fact, as one of the above photos show, I actually installed this
prior to the rear bumper installation.
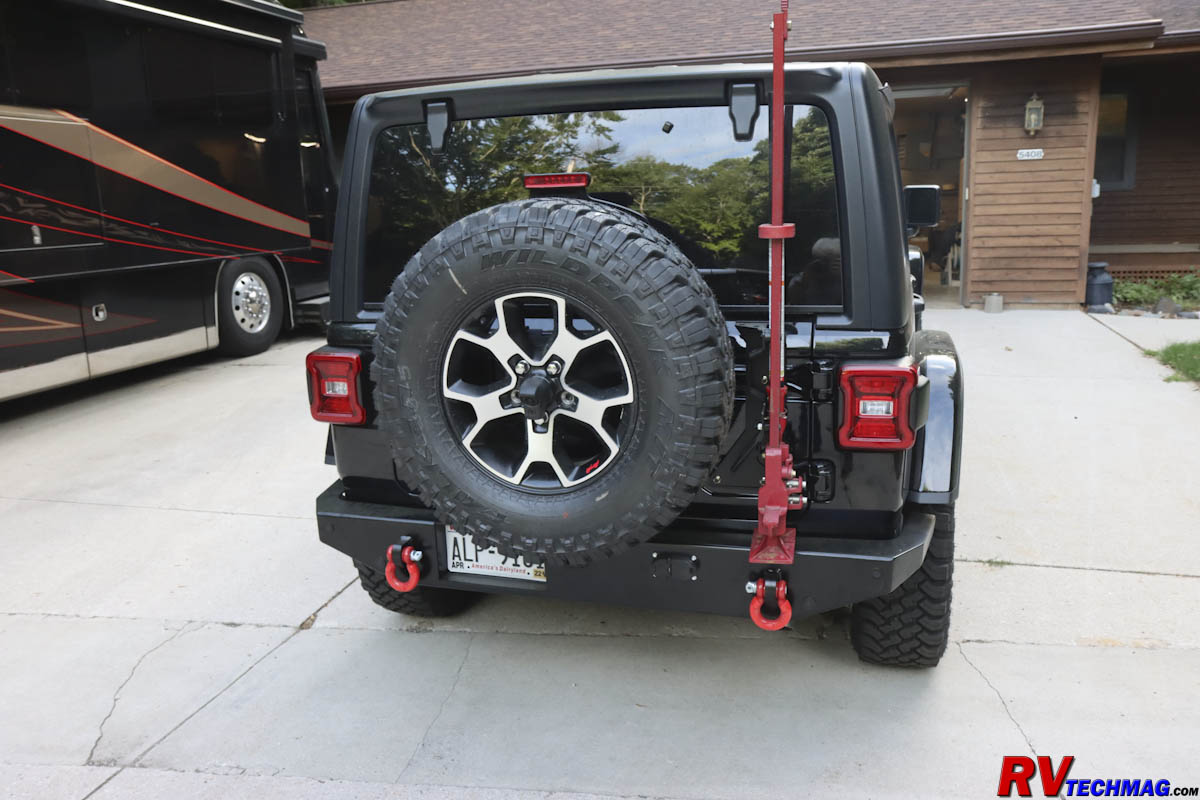
The Completed Rear Bumper and Jack Mount
Tow Lighting Harness
The next step was to install the Mopar wiring harness for flat towing lighting, which was actually 4 separate harnesses. I
began with the rear harness at the back of the vehicle. The tail lights were removed and the harness was fished between the two tail light
housings. Male and female plugs on the harness intercepted the plugs that ran to the lights. The harness also included wires for the existing license
plate lamps so that they too would operate when towing. A tail on the harness hung down from the right tail light area and connected to a second harness,
which ran from that location up to the engine compartment, terminating near the battery.
The middle harness required removing the right-rear tire so that I could access the nylon push pins in the inner fender. The harness
then passed behind the inner fender and the push-pins were replaced with new ones, which came in the Mopar harness kit. The harness then went forward inside
the frame rails and I used nylon cable ties to secure it in place, eventually popping up in the engine compartment near the battery. This was the perfect location
because there was a recommended ground stud close to the battery that the harness needed to be connected to. There was a small plastic box that contained 4 fuses to
protect the lighting system and the front harness also plugged into this connection. At this point I should mention that the relays that control the lights are
located behind the tail light housings and are part of the harness.
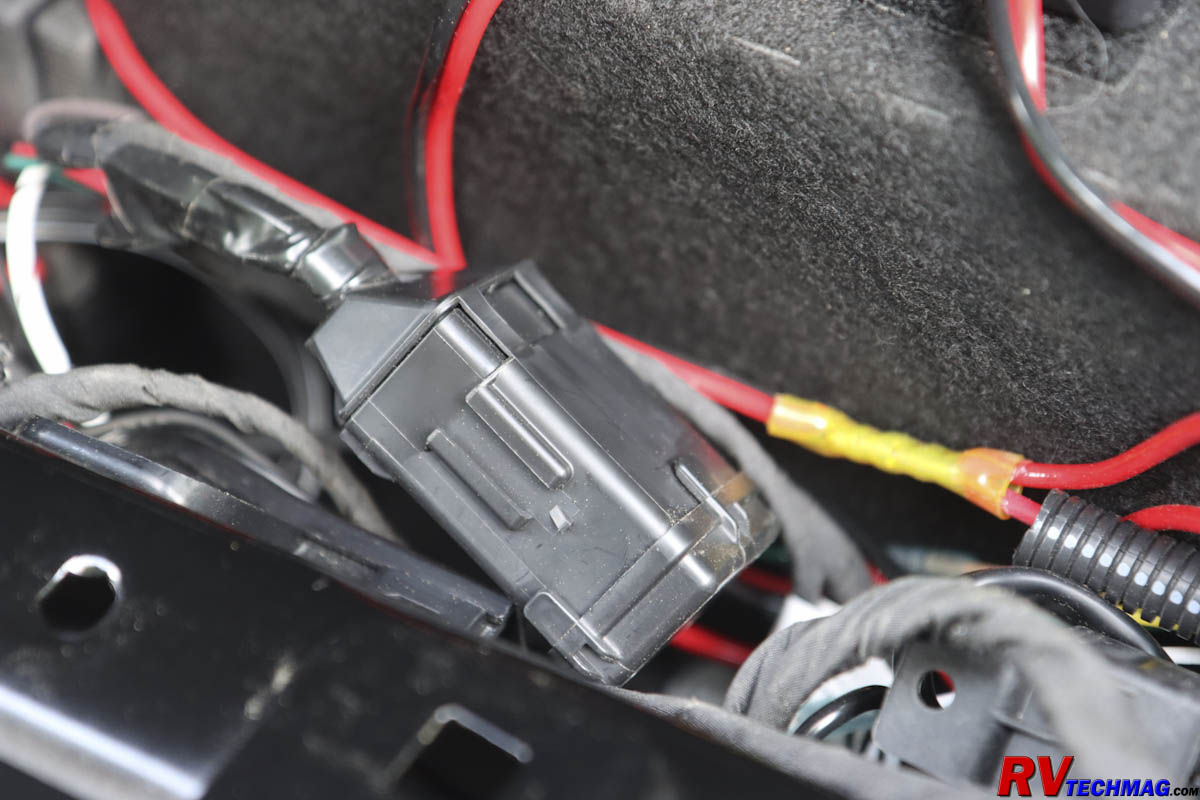
The Mopar wiring Harness Fuse and Connection Box
The next step was to install the front harness. This required a bit of modification
because the harness was originally designed for the
factory plastic bumper. A special DIN style connection was to mount to the plastic bumper and a stiff cord with a 7-pin RV style plug on the other end would be
used to connect to the motorhome. I didn't like the stiff cord nor did I want to use Mopar's funky connector, plus I eliminated the plastic bumper. So I cut the end
the front harness off to remove the oddball connector. I was then able to extend the wires slightly so that it would reach the far corner (driver's side) of the bumper,
where I had installed a standard 6-pin connector commonly used in this application. I then used standard 7-pin to 6-pin slinky cord to connect to the RV.
Once finished the Jeep's lights worked normally when driving. As soon as I plugged into the motorhome the Mopar harness knew it was connected
by sensing the 12 volts on the battery charge pin from the RV and immediately engaged the relays to switch the Jeep's lights over to the motorhome circuits. I also added
an RVI Towed Battery Charger underneath the
Jeep's hood. This allows for a regulated charge from the motorhome to the Jeep's battery. It protects the wiring from any short circuit fires and acts as a one-way
check valve to prevent the Jeep's battery from draining out and backfeeding to the coach when parked.
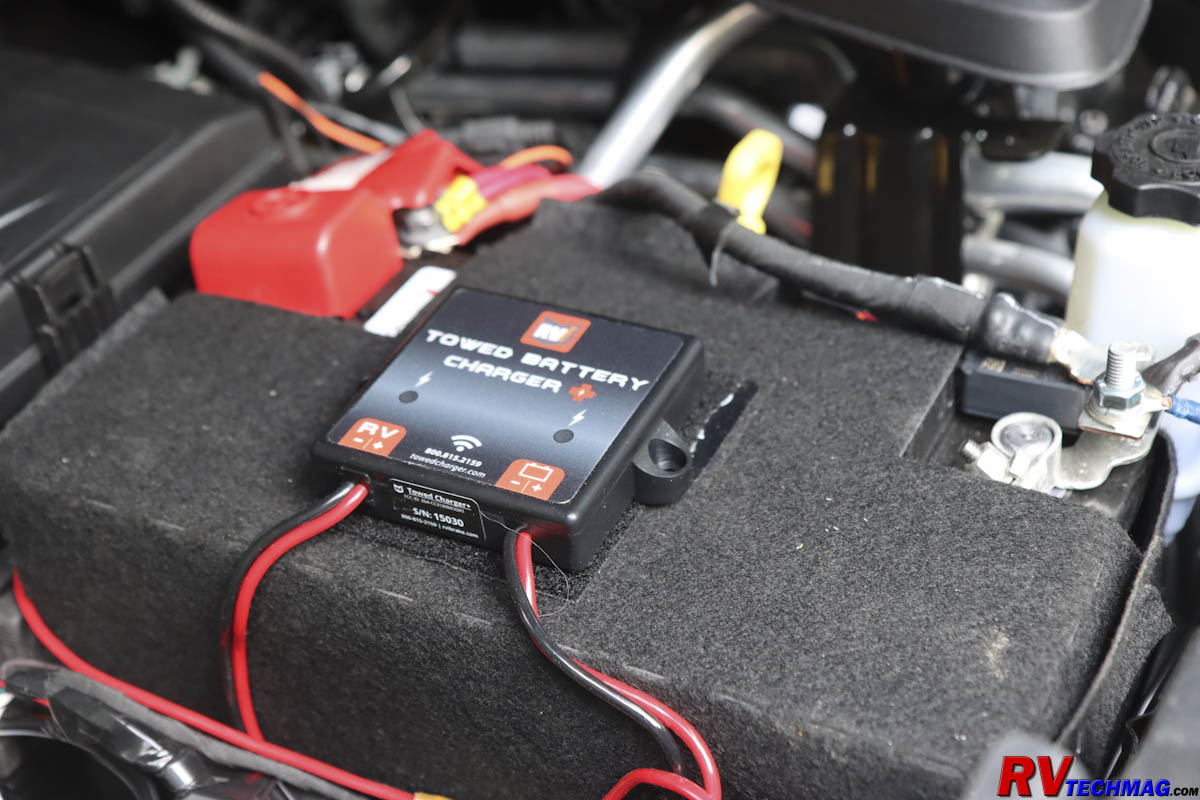
The RVI Towed Battery Charger
M&G 2.0 Tow Brake
The next step was to install the M&G 2.0 supplemental braking system so that the Jeep's brakes would operate in tandem with the motorhome's
air brakes when towing. This system utilizes an air cylinder with cable that connects to the brake pedal to actuate the Jeep's brakes whenever the motorhome brakes
are applied. This cylinder mounts underneath the hood, along with a breakaway valve that utilizes a small air tank operated by a 12 volt solenoid valve to apply the
brakes should the vehicle become disconnected from the motorhome while in transit. This valve is triggered when the bumper mounted breakaway switch completes the
12 volt circuit to the solenoid, allowing the charged up air reservoir to operate the braking system's air cylinder that operates the brake pedal.
|
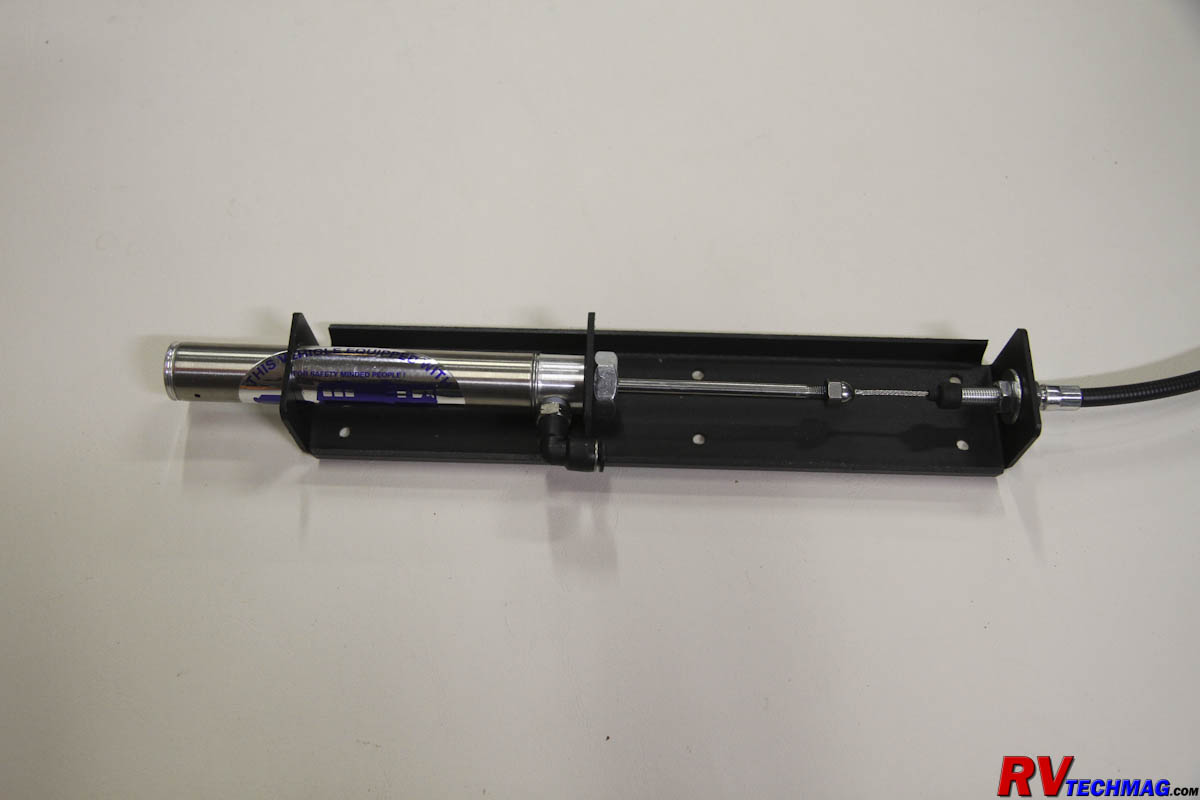
The Air Cylinder Mounts in the Engine Compartment to Control the Brake Pedal Via a Stainless Steel Cable Assembly
|
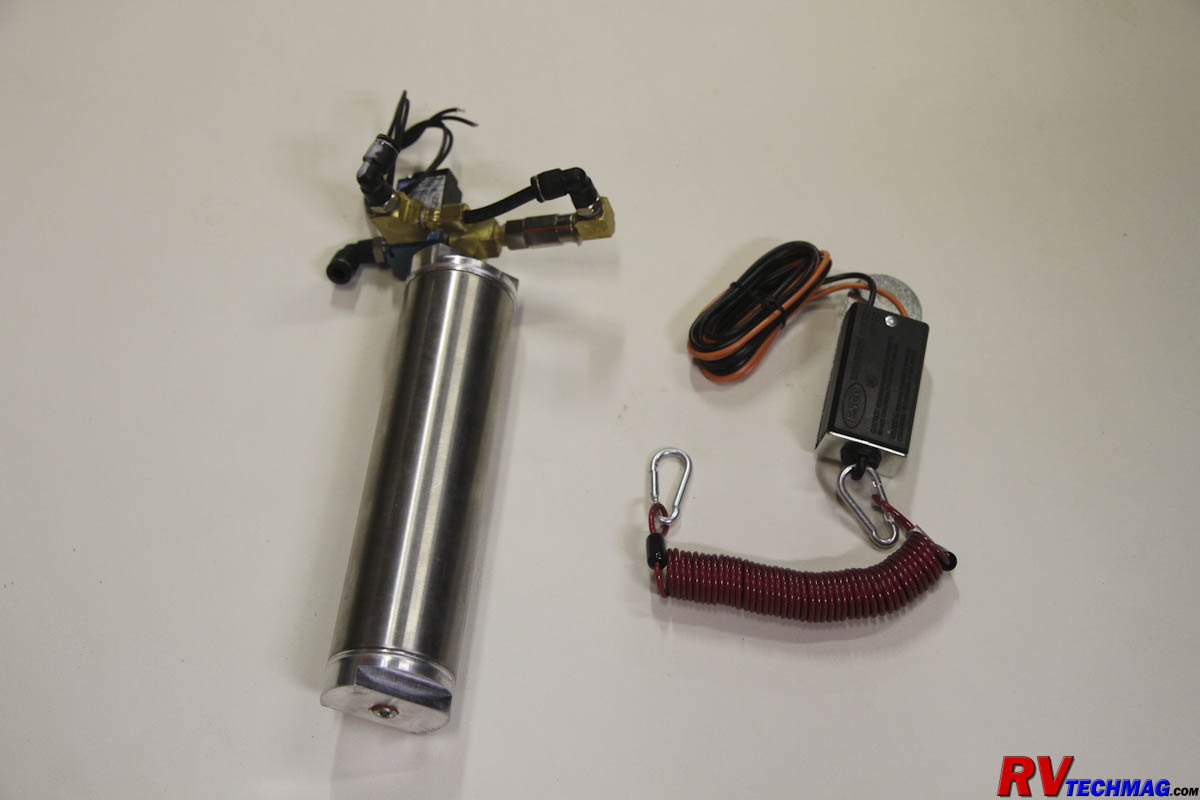
A 12 Volt Solenoid Valve, Mounted on a Small Air Tank and 12 Volt Breakaway Switch is used to Apply the Brakes in the Event of a Breakaway
|
The breakaway switch was mounted to the front bumper and wires connected it between the battery and the solenoid valve, which was
mounted under the hood on the driver's side. Room was limited and I
found the best way to mount it was to use heavy duty nylon cable ties to secure it to
existing wiring looms. Air lines were then run from the quick disconnect fitting on the front bumper and the M&G air cylinder to the solenoid valve.
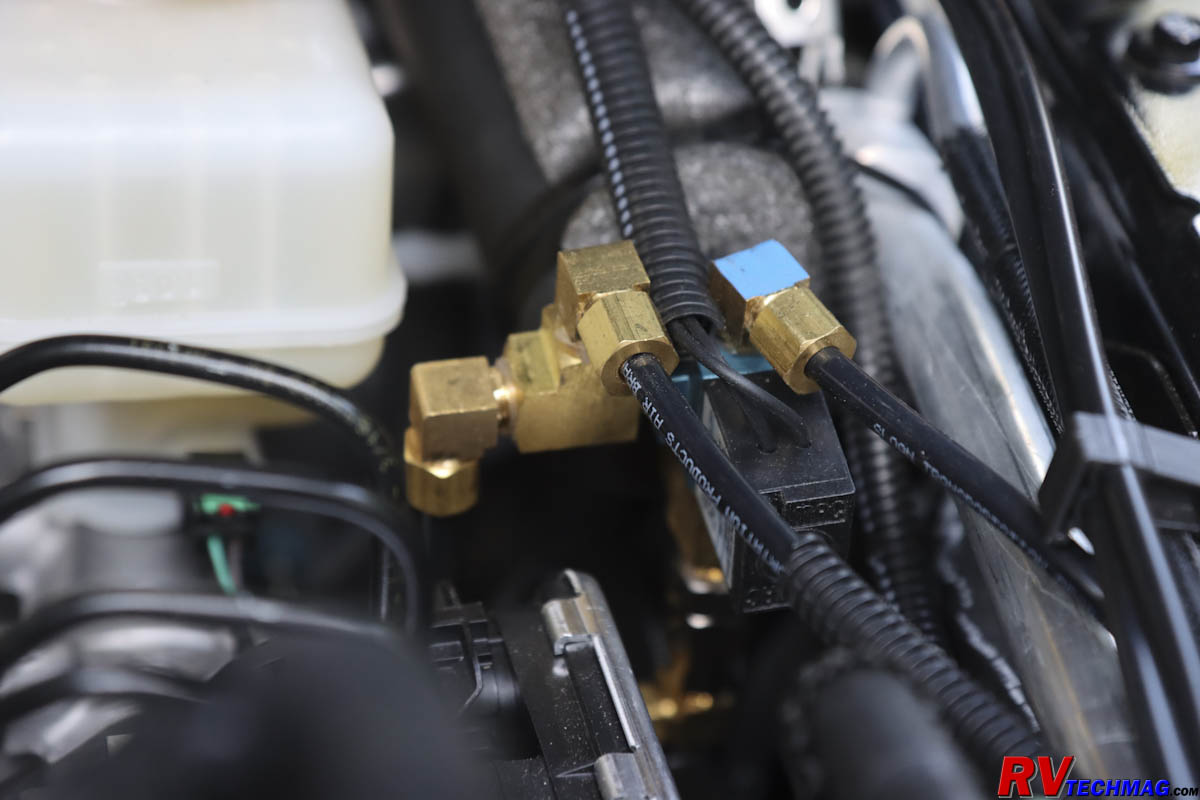
The Solenoid Valve and Tank Assembly Were Installed on the Driver's Side of the Engine Compartment
Supplemental braking systems require a constant supply of vacuum to operate the power brakes. Most Mopar products already have a
12 volt vacuum pump on board that provides vacuum when the ignition key is on so there is no need to add another but you do have to wire it so that it will
operate when towing and the ignition is not on. This entails tapping into the existing vacuum pump wiring so that the pump can be powered from the 12 volt
battery hot feed from the motorhome's trailer lights socket. However, you don't want the pump to run non-stop so a vacuum switch is provided by M&G to
allow 12 volt power to the pump only when the power brakes booster is low on vacuum. This unit gets mounted in the vacuum line by the booster and 12 volt
power is run from the motorhome's battery hot power feed to the switch and then on to the Jeep's vacuum pump,
where you tie it into the pump's existing
wiring.
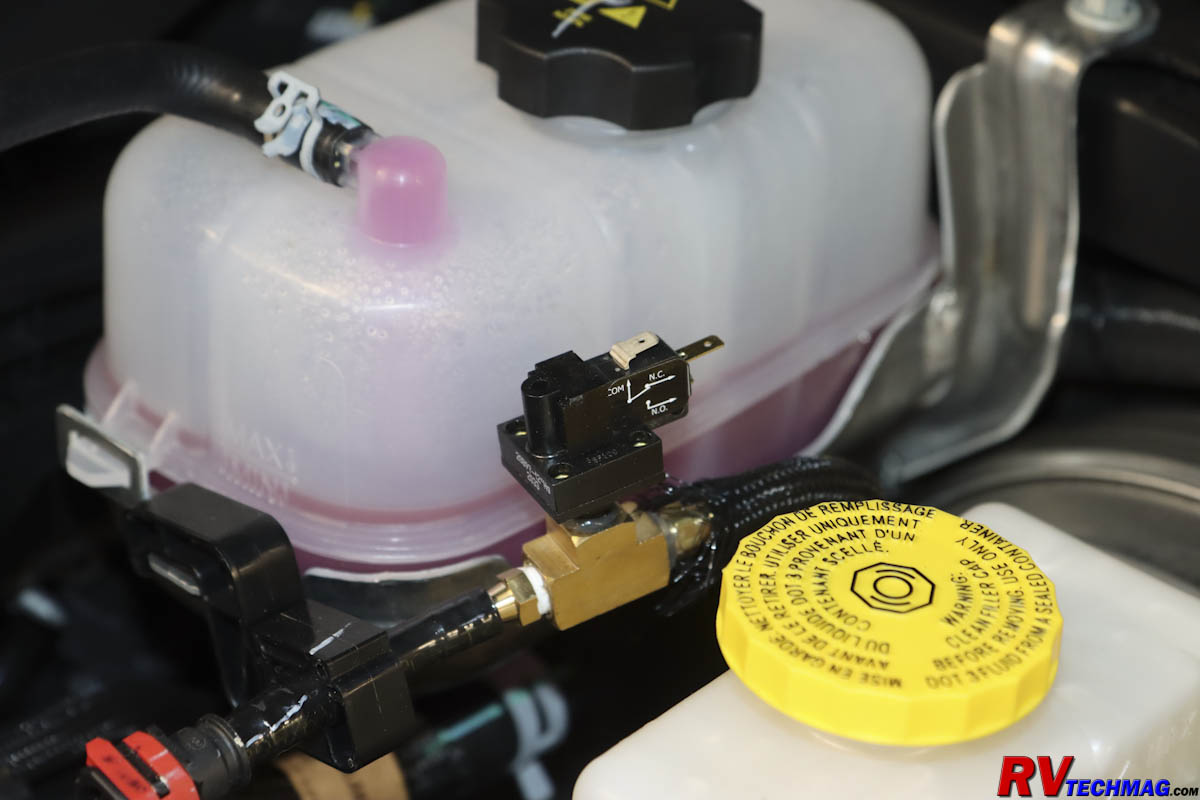
The Pressure Switch for the 12 Volt Vacuum Pump was Mounted in the Vacuum Line to the Power Brake Booster
The original purpose of the battery hot feed from any RV or tow vehicle to a trailer or towed vehicle is to allow the towing vehicle
to keep the battery on whatever you are towing charged up as you drive. You do have to prevent backfeeding or else the towed vehicle's battery will discharge
back to the motorhome when you are parked. It's also important to have a fuse at each end of this circuit to prevent burning up your wiring if a short circuit
develops in that circuit. Most motorhomes will have a fuse but a short circuit can draw power from the towed vehicle's battery as well so you need to install
a fuse on that end too. The easiest way is to add a toad charge module. I chose the
RVI Towed Battery Charger. This module
is placed under the hood and connects the Jeep's battery to the battery feed from the RV. It serves as a check valve to prevent backfeeding as well as a fused
cutout to prevent damage from short circuits. In addition it's a smart module and will regulate the voltage flow from the RV. It will also monitor the toad's
battery voltage and RV voltage and control the current flow accordingly to prevent overcharging. LED status lights on the module will inform you of voltage
levels in both vehicles.

The RVI Towed Battery Charger Was Attached to the Jeep's Battery Cover with Velcro
I mounted the RVI module on top of the Jeep's battery cover, which was sort of a fuzzy fiberboard cover. I applied the hook portion of some
Velcro to the backside of the module and it stuck perfectly on the battery cover. I then connected the wires to the Jeep's battery and the incoming battery feed from
the motorhome. This module was really required and it just would not work to use a simple 12 volt wire, fused at both ends for my application. The Mopar wiring harness
senses the presence of 12 volts on the motorhome's change wire. If that wire is also connected to the Jeep's battery it would fire the relays all the time and I wouldn't
have any rear lights when driving the Jeep. In the same manner the 12 volt signal from the RV also is used to power the Jeep's vacuum pump for the power brakes, which
would have power all the time, even when parked in the driveway. The only way around this would be to strictly use the motorhome's charge line to power these two
circuits and not connect that line to the Jeep's battery or else to insert a diode near the Jeep's battery to prevent any backfeeding. However, I did want to keep
the Jeep's battery charged while driving and I don't trust diodes because I've seen too many fail. I could just see me driving around with no rear lights because I didn't
know that the diode had suddenly failed. So I installed the RVI controller to realize all of its benefits and made sure that I connected the Mopar wiring harness hot
lead and the M&G vacuum switch for the booster to the RV side of the RVI module to isolate those circuits from the Jeep's battery.
Final Skid Plate Installation
Now that all the wiring was run it was time to close up the bottom of the Rubicon. Rockhard's complete bellypan skid plate system
consisted of a number of skid plates that were installed in steps. The first step was to remove the existing sheet metal skid plates that protected the transfer case
and part of the transmission. These were mounted on light tubular cross beams that spanned the frame rails and wouldn't be able to withstand much more than light brush
so they wound up in the scrap iron barrel pretty quick. Rockhard found out during the Moab Jeep Safari that the newer JL and JT frames are stronger but also thinner
so they would twist when under heavy off-road articulation. To combat this Rockhard added two new crossmembers to prevent twist as well as provide a strong location
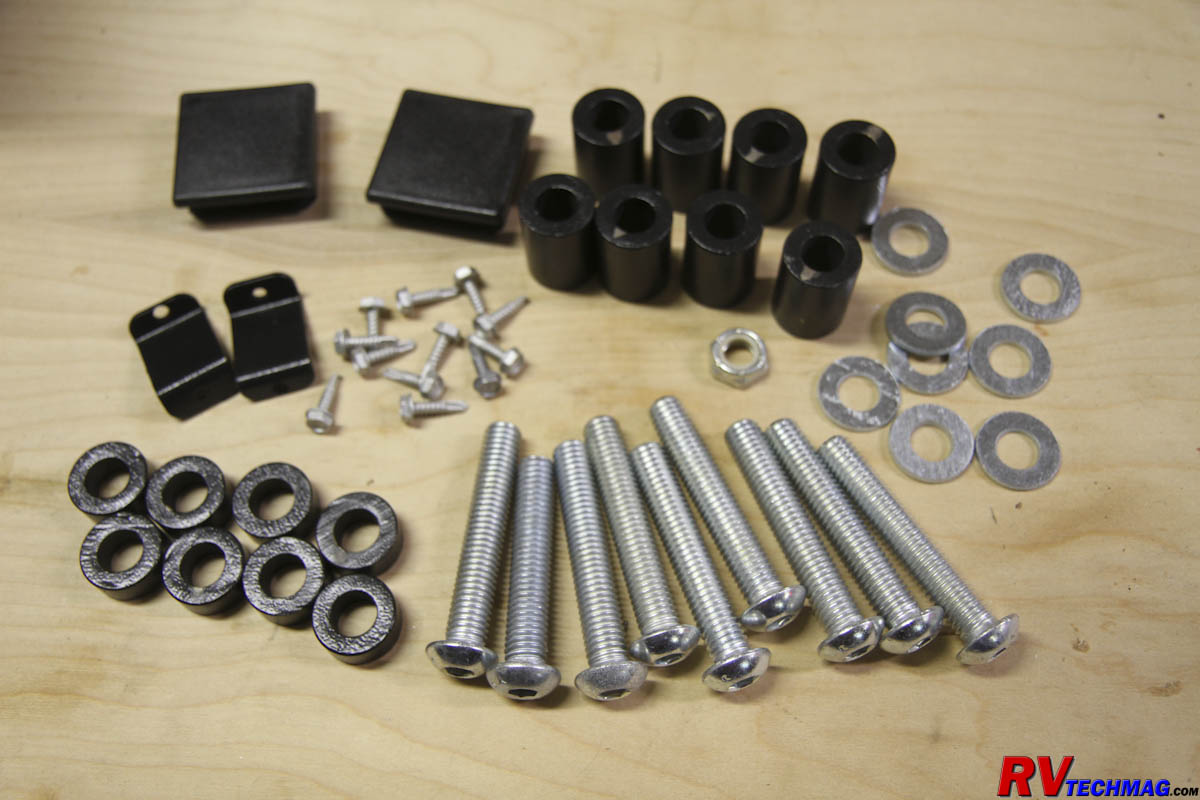
to mount the center section skid plate section too. Rockhard provided a complete set of hardware with their skid plates for places where the factory hardware could
not be used. Once the crossmembers were installed the large center section was hoisted into place with a floor jack and bolts were inserted to mount the skid to the
new crossmembers. All fasteners were left loose to allow shifting during assembly. Once all of the skid plates were mounted, the fasteners were fully tightened.

The Complete Bellypan Skid Plate System
The next plate was the fuel tank skid, which placed right over the existing fuel tank mounting tray and held in place with bolts to the existing
holes in the body and to a couple of new heavy steel braces provided by Rockhard. This skid tucked in above the main center skid plate at the front edge and was bolted
in place. A resonator skid plate was placed alongside the driveshaft opposite the fuel tank, leaving a slot for the driveshaft to pass between the two skid plates.
This plate was hung on some new brackets and also covered the 48 volt battery for the E-Torque V6 to protect it from damage. Up front the engine skid plate was added.
This skid plate mounted to the main center section plate at the rear and to a pair of Rockhard-supplied brackets that attached to the motor mounts at the front. The
oil pan skid contained a removable steel panel to allow easy access to the oil pan drain plug for easy oil changes.
While not part of the complete bellypan system, I felt it was necessary to also install the muffler skid plate. This skid protects the muffler at
the rear of the vehicle from damage and mounts to the frame and a pair of hanging brackets. At this point the bottom of the Wrangler was starting to look like the bottom
of a Panzer but we weren't done yet. I also installed the lower front and rear control arm skids, the front axle disconnect skid and a pair of Rough Country differential
skids to protect these areas from potential damage when rock crawling. I replaced the standard Rubicon rocker panel rub rails with Rockhard's tubular sliders as well.
They were a simple bolt-on except I did need to clean up the holes in the pinch rail a bit with a drill to allow the sliders to slide into place.
|
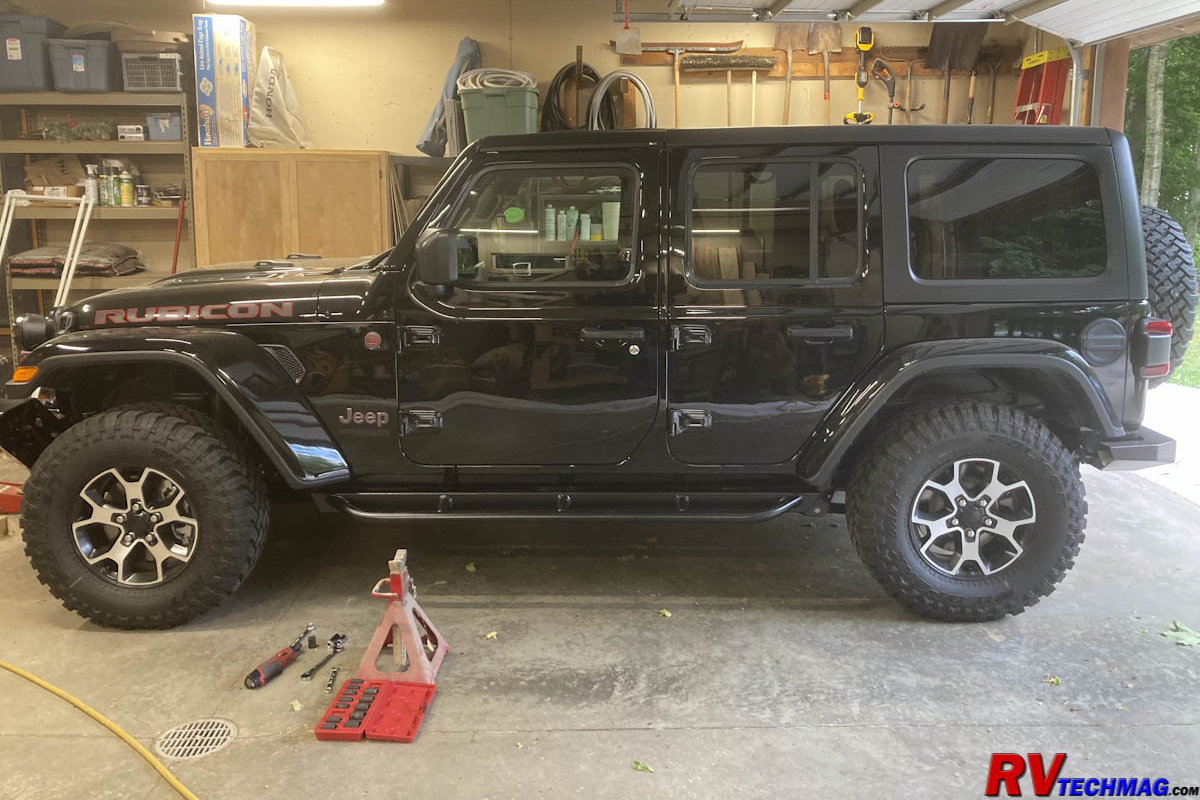
Installing the Rockhard Rocker Panel Sliders
|
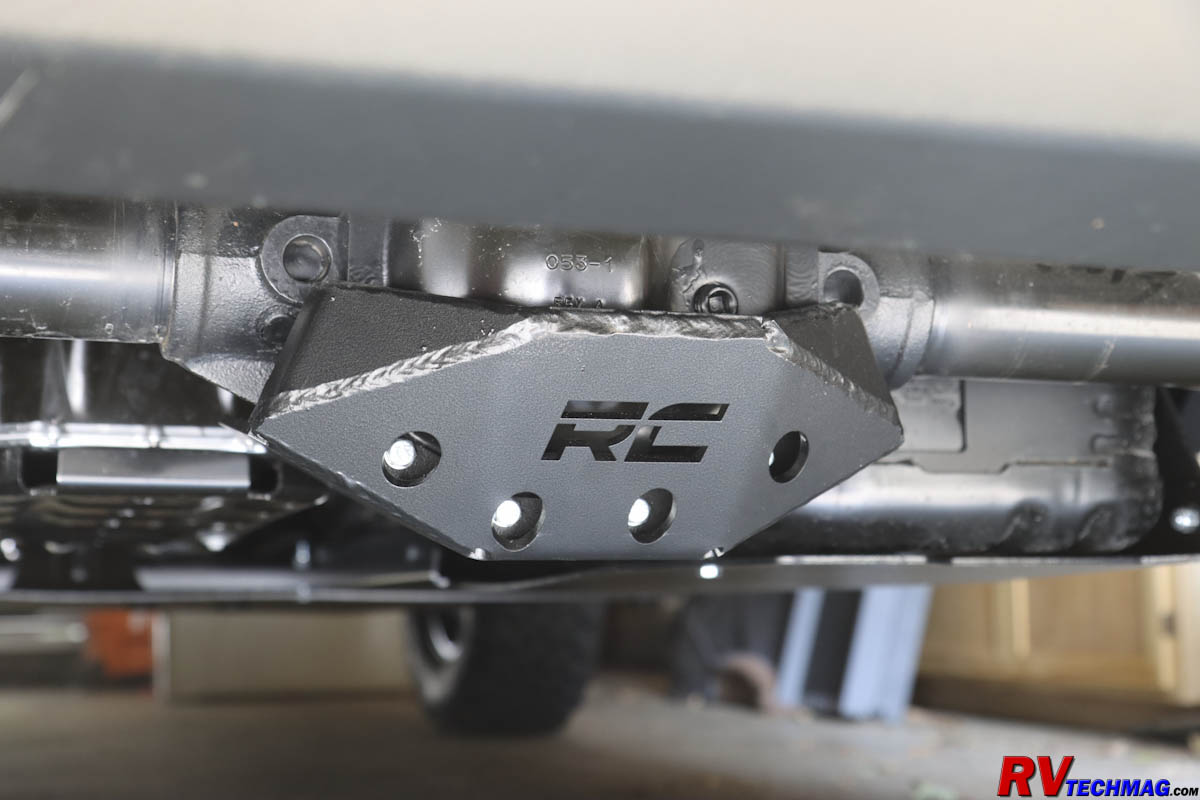
Rough Country Differential Covers Were Installed on Both Axles
|
Once everything was installed I test drove the Jeep to detect any rattles. Everything was fine and the lighting and braking systems worked
as they should but I took height measurements both before and after and found that the Jeep had settled, mainly in the front end, after adding all the extra
weight from the heavy bumpers, winch and skid plates. The end result was that the front end drooped down about 1-3/4" from it's original height and the rear end dipped
almost 1/2". To compensate for this I added a Daystar 1-1/2" front end lift kit. This kit consisted of front coil spring spacers and shock absorber extensions. I
jacked up the Jeep's front end and placed a set of jack stands under the frame rails behind the front wheels. I then disconnected the axle's sway bar and shock absorber
mounting bolts. I also removed the bolt holding the brake line's bracket to the lower control arm so that it wouldn't stretch the brake hose when I raised the Jeep and
dropped the axle to remove the coil spring. The spring came out easy enough and I added the new 1-1/2" spacers and reinserted the coil spring, using my floor jack to
raise and lower the axle.
I decided not to use Daystar's shock absorber extensions that came in the kit because I really wasn't lifting the Jeep. I was simply returning
it to its previous level so the shock absorber travel would remain as it was. Had I actually wanted to lift the Jeep I would have bought a better kit with new springs,
shocks and other components. The end result was that the front end returned close to its original height. Because I did not do anything to the rear axle the new weight that
caused it to drop 1/2" was acceptable. Wranglers come from the factory with a 1" rake to them, which might be nice for fuel economy but they look better if they sit flat.
The slight drop at the rear brought it very close to flat and the Wrangler looks better so
everything worked out just fine. And we are ready for out next trip and
off-road adventure.
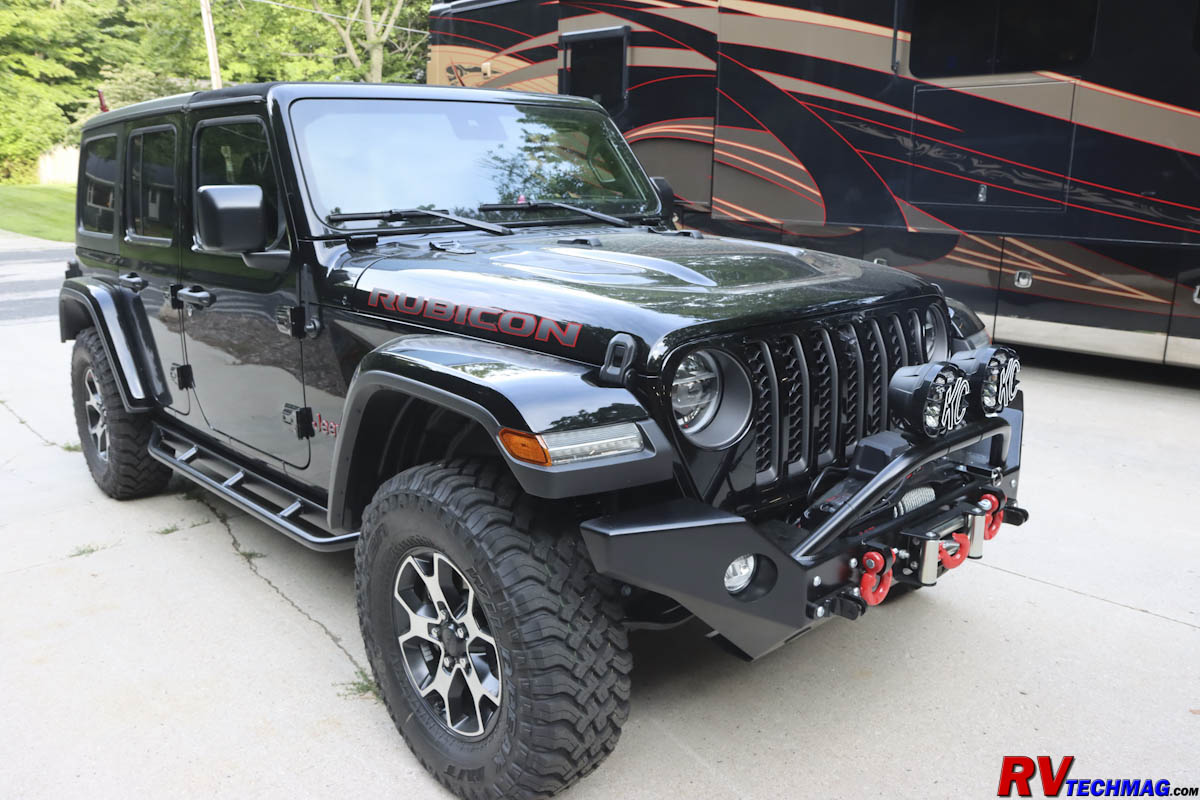
The finished project.
Sources
Return to Home Page
If you enjoyed this article be sure to recommend RVtechMag.com to your friends, like us on Facebook or Twitter
or subscribe to our RSS feed.


|
