MCD Innovations: Made in the Shade
Upgrading an RV's Pleated Day-Night Shades and Visors
Article Date: May, 2009
Article and Photography by Mark Quasius
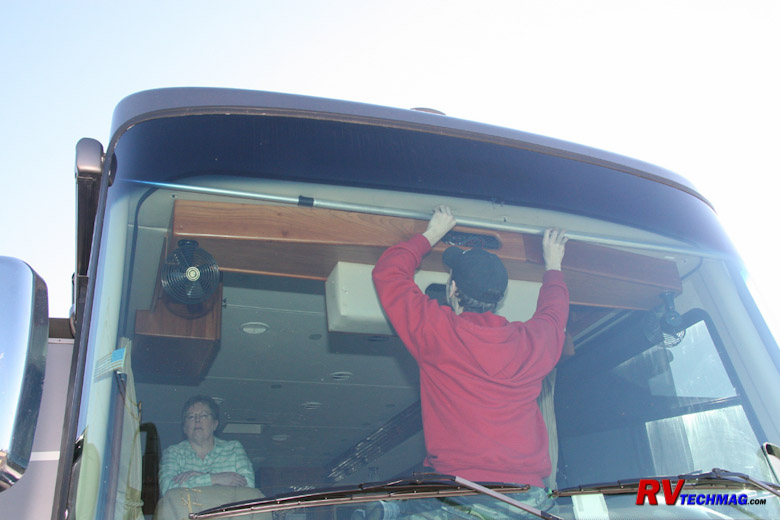
Windshield Shade Installation
Without a doubt windshield shades are an important part of a motorhome. The huge glass area allows lots of sunlight in.
When driving this can become a safety hazard so most RV manufacturers install some form of sun visors. On entry level RVs this may be a small
flip-down visor that is hard to reach from a driver's sitting position and provides very little area for blocking the sun. Larger coaches may
come with a pair of powered sun visors that are controlled by rocker switches within reach of the driver's and copilot's seats. They utilize a
black vinyl material and a scissors type mechanism to extend and retract them. This is better than nothing but there are large gaps between the
two visors as well as around the corners of them and, for some odd reason, that's always where the rising or setting sun happens to be.
When parked the powered visors can be lowered to help keep some of the sunlight from penetrating the coach and heating
the interior up. This is somewhat of a help but the heat trapped by these visors works its way around the sides so they are not 100% effective.
Also, you cannot see through them so visibility out of the coach is affected. For nighttime privacy a set of pull drapes is employed to curtain
off the windshield and cockpit side windows. The cockpit side windows on my coach came with sun screen shades that pulled down manually, then
retracted with a snap when the lanyard was pulled. The awkwardness of these shades, plus the minimal sun filtering that they provided left much
to be desired.
After seeing the MCD cockpit shades on newer Tiffin models Leann and I decided that we would like to replace our power
visors, cockpit side shades, and drapes with MCD products. We arranged to have this done at MCD's facilities in McKinney, Texas as well as
replace the pleated shades in the living area with MCD shades. The end result is phenomenal. The MCD shades provide excellent temperature control
in the coach. They filter out the sunlight but also do an excellent job at creating a thermal barrier, regardless of whether the sun is out or
not. They work equally well at keeping the interior nice and warm during cool weather as they do at keeping the interior cool during warm, sunny
weather. They are very easy to operate and when the nighttime shades are down the cockpit is much darker and has less light infiltration at night.
Overall we are very impressed with the MCD shades and find them a cut above anything else.
In the following paragraphes I'll detail the actual process used to install MCD's American Duo windshield shades in my 2007
Allegro Bus. We also installed cockpit side window shades but I will leave that for the chapter that covers powered shades because the windshield
shades have some unique features that require different installation procedures than side shades.
Product Overview
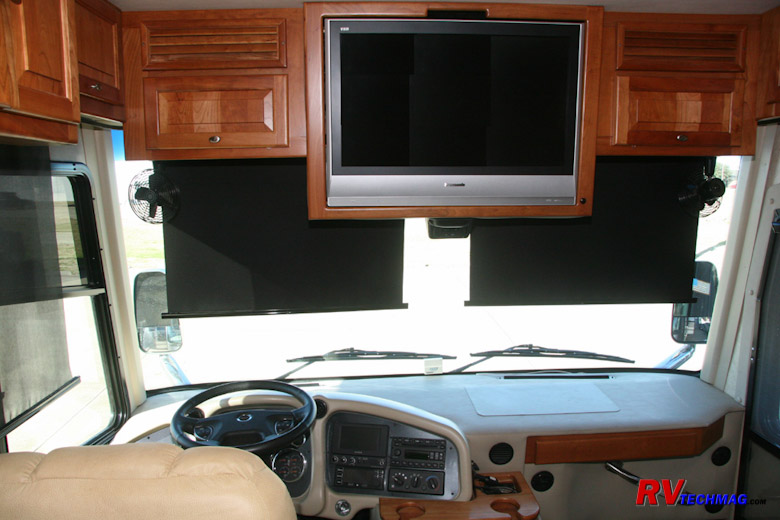
Original Visors and Side Shades
Our 2007 Allegro Bus came with the two powered Carefree sun visors as well as manual side shades. As the above photo illustrates,
there are large gaps on either end of the visors and the side shade does not cover the entire window. You have to be tall to reach the side shade in
order to pull it down when driving. In order to retract it you need to fish around in the drapery to find the pull cord. Again, long arms are needed.
Once you finally get the cord and give it a pull, the shade snaps up at the speed of light. There is no stopping it midway nor can you control its rate
of ascent - which is very fast. Also, the purported "sunscreen" material is basically fiberglass bug screen and has little to no R-value. The power
windshield visors were controlled via rocker switches. The driver's left side console had a pair of switches - one for each shade. The copilot had a
single rocker switch at her side to control her visor so the right side could be controlled from either seat. We decided to replace the power sun visors
with the American Duo full width sunscreen and privacy shades. This dual roller system could easily be powered via the existing rocker switches. I chose
the standard method, which is to operate the nighttime privacy shade from the single rocker switch on the driver's side while allowing either seat to
control the daytime sunscreen shade. That made wiring these shades a simple task.
Measuring and Planning
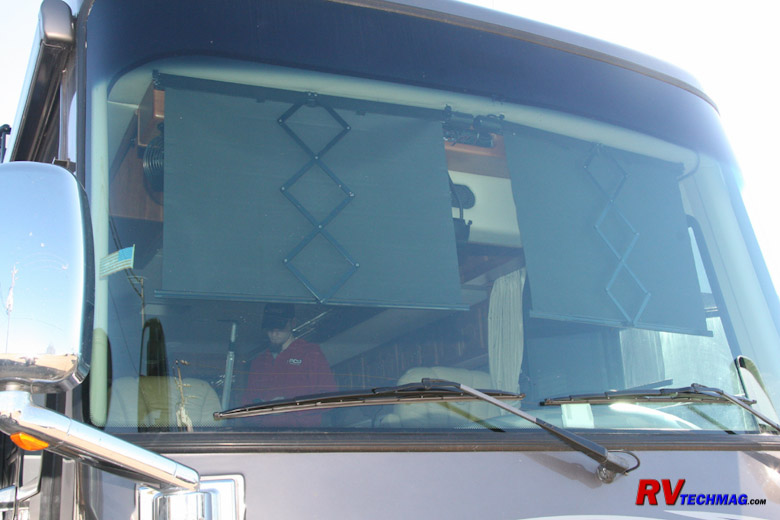
Original Visors to be Removed
Before we start mounting things it's important to thoroughly analyze just what you have and come up with a plan on how to install
the shades. Coaches vary greatly from model to model and year to year so not every coach installation will be approached the same way. The first step was
to remove the existing shades and drapery to get them out of the way and give us a clear area for the installation.

Measuring the Width
In order to properly measure the width of the windshield shades it's best not to use a tape measure. MCD installers use a
telescopic pole that has a pair of shade brackets installed on each end. This allows them to move the pole up and down within the range of motion that
the shade will operate in. The pole can be adjusted to prevent binding in any tight spots, which are generally near the top. A tape measure just isn't
capable of providing accurate measurements in this situation. If performing a do-it-yourself installation I'd recommend modifying some sort of extendable
closet pole or whatever to perform this task. The shade should have a minimum of 1/4" clearance from the windshield on either side at the narrowest spot
to prevent binding.
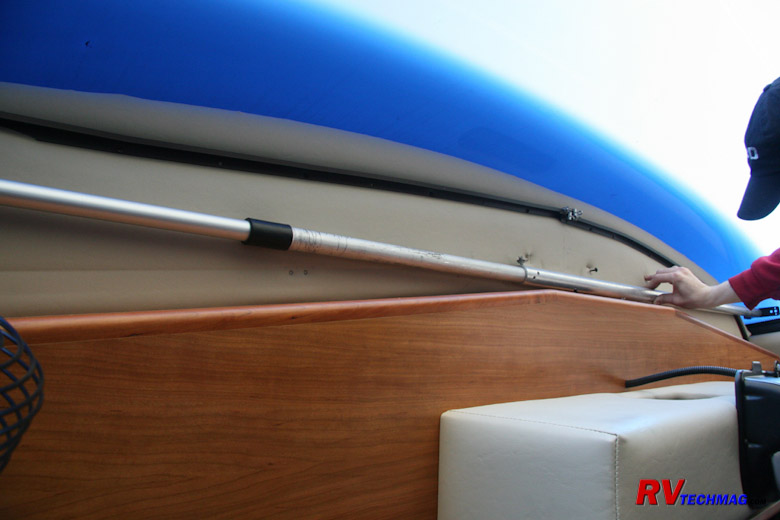
Checking For Single or Split Shade Usage
Ideally, the shades will be installed as a single shade covering the full width of the windshield. Sometimes this is not
possible, depending on the overhead cabinetry design. Some overhead cabinets have large CRT TVs in them. The extra depth of these TVs requires
deeper cabinets. In my case, I had a flat screen LCD TV but Tiffin never bothered to change the backside of the cabinet because it wasn't necessary.
They began using MCD shades the following year so at that time the bulge on the backside of the cabinet was removed. As the above photo shows, this
bulge forces the measuring pole (which represents the position of the shade) farther forward into the curved sides of the windshield. If this makes
the shade too narrow a split shade system will be required. A split shade will have a small overlap of maybe 1" where the two pieces of fabric overlap.
This will leave a small darker stripe in the middle although no additional switches will be required to operate the shades. The other alternative is
to remove the upper cabinet and modify it by trimming off the back end. Fortunately, in my case the shade roller would only be slightly forward and
we could live with that.
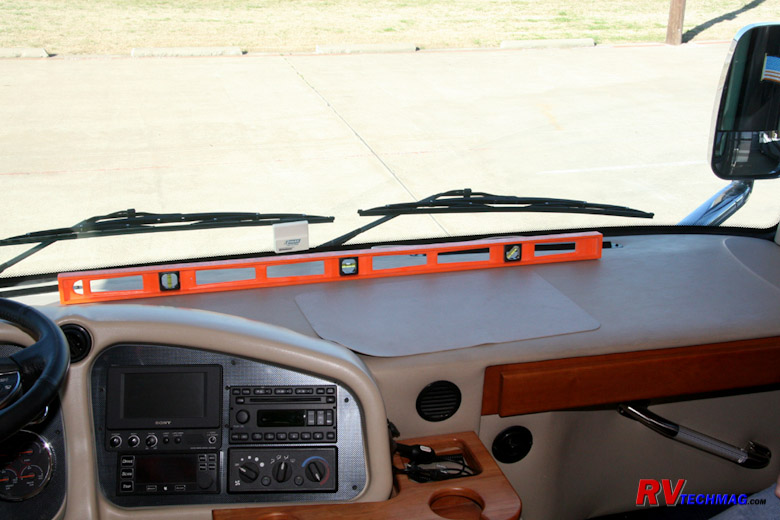
Checking For a Flat Dash
Dashes vary from coach to coach. For privacy reasons you want your shade to meet the dash, with no gaps. Some dashes are not
flat and have a fairly large hump to them. Some dashes are slightly cocked and not perfectly parallel with the ceiling. Getting a straight shade to
match a humped or slanted dash just doesn't work. Normally a shade will have a flat hem rail that does not flex. For those situations where a humped
or slightly sloped dash is involved, MCD can make a windshield shades to compensate for this. Rather than use a rigid aluminum hem rail, MCD installs
a rigid micro aluminum extruded tube inside the shade, which can be between 2" and 6" from the bottom, depending on just how much that particular
coach needs. The very bottom flap of the shade is filled with a large number of ball bearings. This allows the shade to hang nice and flat but the
base will conform to the dash when fully extended. This is not a sloppy bean bag appearance. It's a nice professional look and you wouldn't even
know it's created that way. To see if your coach needs this style simply place a large level or straight edge across the dash and check for gaps.
Also be sure to grab a tape measure and check the distance between the dash and the overhead ceiling to see if the dash is parallel to the ceiling
or has a slope to it. In my case the dash was both flat and parallel to the ceiling so this procedure was not necessary.
Modifying the Windshield Pillar Trim
|
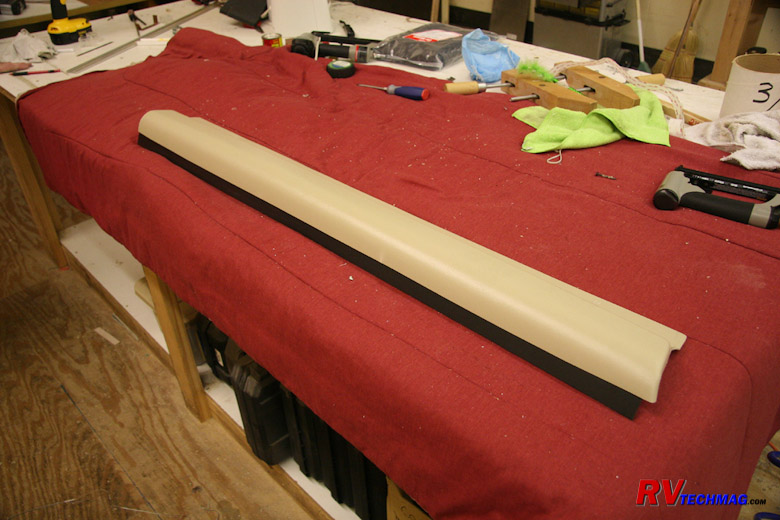
Adding A PVC Strip to the A Pillar Trim.
|
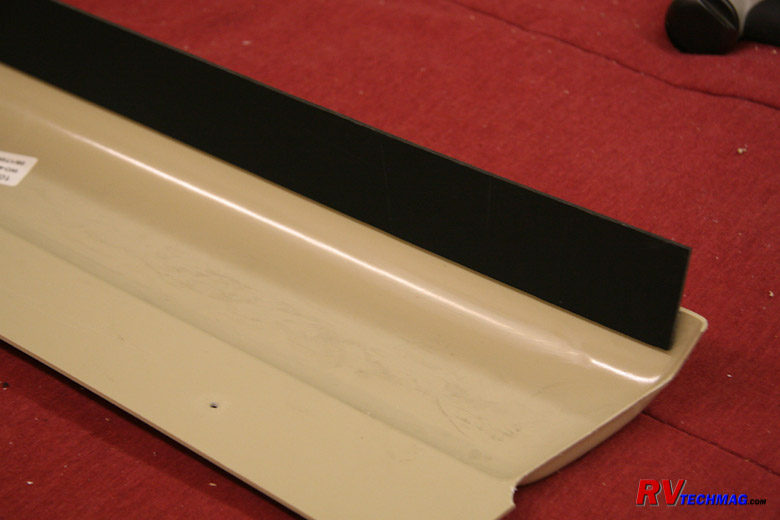
Modified A Pillar Trim.
|
Ideally the shade would drop down and rest on the front side of the windshield A pillar trim as it lowers. If the A pillar trim
is fairly curved or small, this may not be possible. In this case it may be necessary to install a track for the shade to ride in. In my case the
windshield trim was fairly flat on the front so a track would not be required. However, the trim was slightly on the narrow side and the shade would
have fallen inside the track on the copilot's side. To correct this a small PVC strip was attached to the passenger side A pillar trim to space it out
from the wall farther. A piece of strong 3M double sided VHV fastening tape was used to eliminate the waiting around for PVC cement to dry. It's
impossible to see from the coach interior and when viewed from the exterior through the windshield it looks just like its weatherstripping and supposed
to be there. This was an excellent workaround to correct a narrow trim situation. You could split the difference and add a piece of trim to both the
driver's side and copilot's side A pillars but 1/2" isn't that noticeable so it really wasn't necessary. Also, fattening up the driver's side pillar
trim would also mask a bit more of the driver's line of sight to the left side mirror so it was decided to simply modify the copilot's side.
Note that this was a 2007 Allegro Bus. Beginning in 2008 Tiffin offered MCD shades in the Allegro Bus so future years had
fatter A pillar trim and did not have to deal with the bulge on the backside of the overhead cabinet. However, if you are retrofitting an older coach
these are some of the considerations you may have to deal with. That's why it's important to take the time to analyze just what you have and plan and
measure accordingly to prevent running into any brick walls later on.
Mounting The Shade
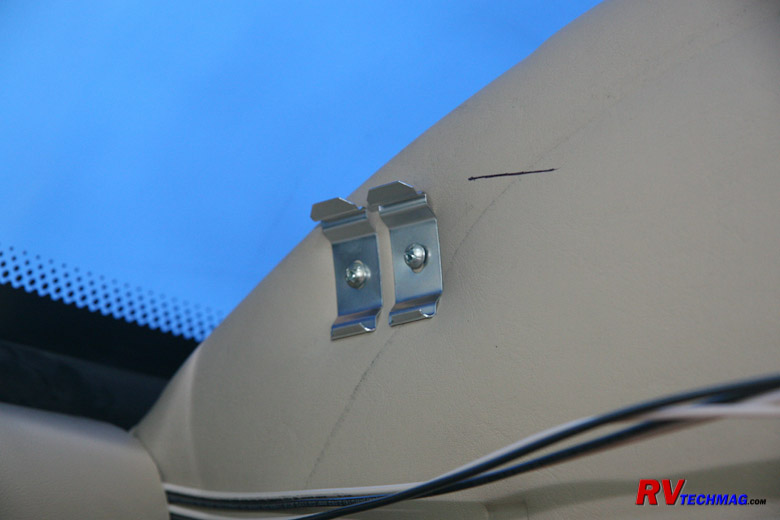
Track Mounting Clips
MCD shades come mounted via either a single roller or dual roller bracket to a mounting track. This track snaps into place on
the ceiling into a number of mounting clips. The number of clips depends on the width of the shade. Windshield shades are the most critical so they
will generally have 6 mounting clips. It's important to use double clips at each end of the windshield shades. The remaining clips get evenly spaced
out. Using double clips helps hold the larger track assembly in place and also guarantees that if a clip should ever pull out, your shade won't come
down when driving. In the above photo you'll also see a temporary mark made on the ceiling to align these clips. It's best to hold an empty mounting
track in place to mark the location of the clips. It's easier to do this than when the shades are providing additional weight for you to hold up. A
second pair of hands is helpful at this point.
Extending the Wiring
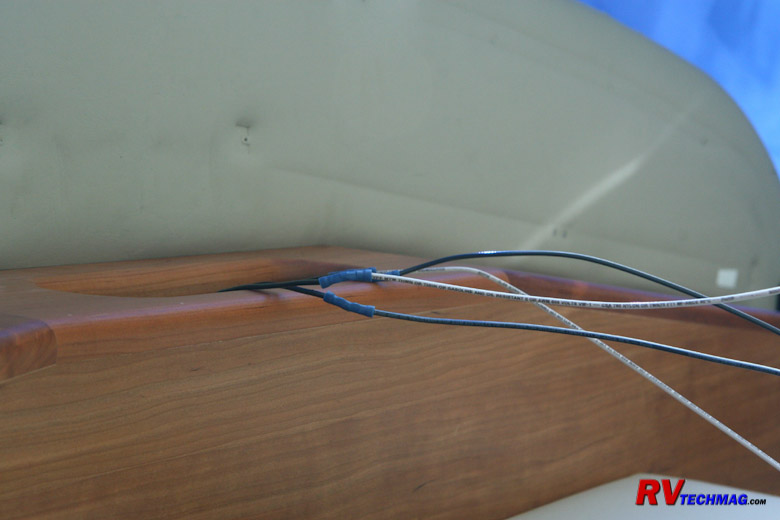
The original powered visors were fed by short wire leads coming from the center of the overhead cabinet. The MCD shades are
full width so the motors will be on the far end of the shade rollers. It may be necessary to extend the existing shade wires in order to reach that
location if there is not enough slack in the existing wires. Once installed the wires can be tucked behind the shade mounting track to keep them
supported and hidden. You will also need to access a power source that is switched hot whenever the ignition key is on. There are a number of
locations behind the dash that offer this switched power. In my case the mirror heat switch was powered via a circuit that was switched by the
ignition key. This "ignition sense" wire is necessary to operate MCD's exclusive dual range safety feature on their windshield shades.
Product Overview
Once the shade is installed and programmed it's ready for use.
In the next section we'll follow the installation process of a set of manually operated MCD shades.
Return to Home Page
If you enjoyed this article be sure to recommend RVtechMag.com to your friends, like us on Facebook or Twitter
or subscribe to our RSS feed.


|
