How To Create Great Videos
Basic Tips on How to Make Engaging Videos of Your Travels
Article Date: Dec, 2014
Article and Photography by Mark Quasius
Everyone likes to keep memories of the highlighted events in their life. Birthdays, weddings, Christmas gatherings
and family vacations are typical examples. Photography was an excellent tool for doing just that and family photo albums abound with tons of
photos that can be paged through whenever the urge to do so arises. Travel has always been one of the biggest places where photography had its
place. Technology has advanced to the point where today's automatic everything cameras have taken much of the technical skills out of the photo
taking process and many consumers can now take some fairly decent pictures.
Home movies never really grabbed hold. The cost of movie film, the inability to edit the finished product, and the need
to set up a projector and screen left most consumers less than enthused with it. With the advent of the VCR things changed however. It was now
easier for the average person to shoot footage on a camcorder, then pop the tape into a VCR and play it on their television. Technology advanced
rapidly and now we are at the point where small compact digital camcorders can capture some excellent quality footage and this footage can be
edited on the average personal computer, burned onto a DVD, and played in any DVD player.
Technology is great and affords us some great opportunities to record the things we see with sound and motion rather than
a still photograph. Some images, like a bull elk bugling or a waterfall crashing into a stream just can't be conveyed with a still photograph.
You need sound and motion. Yet there's more to making a good video production than turning on the camcorder, capturing some footage, and editing
the bloopers out. Your goal is really not to make a video DVD. Your real goal is to tell a story. All the advances in technology give us some great
tools to use but you need to go back to some film making basics to learn how to create an effective story that communicates what you want it to say.
To that end I've created this tutorial. It won't tell you how to operate your camcorder or editing system. I'm assuming you
already know how to turn the camcorder on, operate its features, and navigate through your computer's editing software. If not, there are other books,
videos, and web tutorials for that. This tutorial will help you to tell a story both visually and audibly in an effective manner.
It Begins With Planning
New videographers tend to make lots of mistakes. That's pretty much because they learn how to operate the equipment and dive
right in without learning how to tell stories effectively. The most important thing in any production is planning. A good production is created by
putting together a rough script, building a list of shots that you need, then going out and getting those shots. A common mistake is to just go out
and shoot what "looks good" then try to make some sense out of that footage later and tie them into a story. But there are generally gaps where the
storyline doesn't flow because that footage was never shot. Proper planning will give you enough time to put some thought into how your finished
production should look. You can develop that shot list and make sure you get those shots when out in the field.
Okay, this is not a Hollywood production and you're not Cecil B. DeMille so you're not going to have to write a thousand page
script. Chances are you are going to a place like Yellowstone and you'll want some good video to play when you get back as a memory of this trip. At
this point you don't have a clue exactly what you'll be seeing so it's going to be impossible to nail down an exact script. However, if you do some
research ahead of time you'll be surprised at how much you'll learn. There's plenty of information on the web that should give you a pretty good
inkling of what sort of things you'll be seeing.
Based on that you should be able to make a rough outline of the things you want to see and what kind of shots you might be
able to take. Then think about how you might best stitch them all together so that the storyline flows rather than becomes a series of unrelated
chunks. To do that you need to think about your different areas as scenes. Put it down in outline format using scenes as the major categories. Within
each scene make a list of the various shots you want to get. Then decided how to best bridge from one scene to another. You have to end the scene
somehow, begin the next scene, and try to make the transition as seamless as possible. Then list these shots in your outline and you will now have a
shot list. If you get all of these shots you can check them off at the end of the day to make sure you didn't miss anything.
Panning, Zooming and Tilting
Just because your tripod is capable of panning and tilting and your camera has a powered zoom doesn't mean you have to use
those features all the time. The best videos are done when the subject matter moves, not the camera. Granted, there are times when you do need to
pan and tilt in order to follow a moving subject. A very slow zoom can be employed when you want to use a wide shot to set the overall scene and then
zoom in to concentrate on a specific item or subject within that scene. It can also be used to retract from a close-up to a wide shot, typically at
the end of a scene, but don't overdue it. Shoot your wide establishing shot then zoom in to set up your close-up shot before pressing the record button.
You'll save tape or disk space plus make it much easier to edit later on. The zoom feature is one of the most overused features on the camera. Use
it to set up your shot and then follow it as it moves without zooming. Let the subject do the motion, not the camera.
Try to look for movement in your shots. Even if you are shooting a long shot of a mountain where there isn't much movement, see
if you can get low enough with your tripod to catch some grass waving in the wind. That will add some life to a shot that might look dead had the
camcorder tripod been set higher.
The Establishing Shot
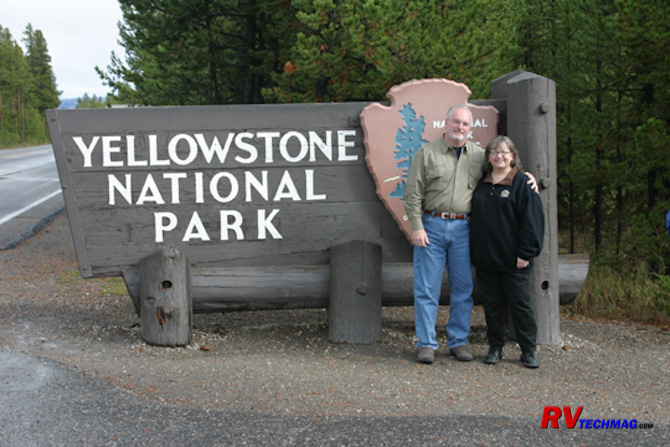
The Establishing Shot
One key shot that begins a scene is the establishing shot. You need to define exactly where the next shot is. If you begin with
a shot of someone looking at a museum exhibit, the viewer won't have a clue where this is. So you take an exterior shot of the museum and use it as an
establishing shot. Ideally the museum will have a sign across the front identifying its name. If not you may be able to back off and include a sign in
the foreground if one exists and still keep the building in the background. If neither is possible just shoot the building and then use your editing
software to add a "super", which is a graphic title superimposed over the image. More on those later. The purpose of an establishing shot is to
establish the location that the next following shots are in. Don't overdo it. Just hold the shot long enough for that idea to be cemented into the
viewer's mind. Allow the viewer enough time to read the text and then move on. Make this a static shot.
In the case of this Yellowstone trip you would have learned that Yellowstone is made up of many areas. You can take a shot of
the "Entering Yellowstone" sign at the park entrance to serve as the initial establishing shot. Then, when you get to Old Faithful, the Grand Canyon
of the Yellowstone, Mammoth Hot Springs, or other areas you can shoot some more establishing shots to help identify the various scenes or segments
within your Yellowstone production.
The Close-up Shot
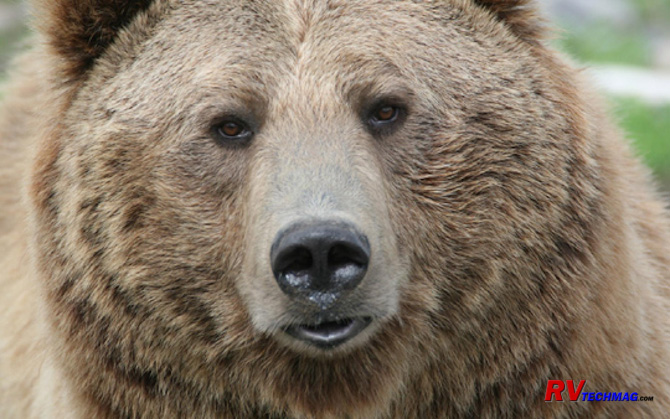
The Close-up Shot
Now that you have wide shots to use as an establishing shot it's time to center on the action. The close-up shot is what will
show your viewer the detail of your subject. Close-ups need to be as tight as possible without losing the overall reference. Close-ups of eyeballs
won't do much good unless you've preceded it with some sort of establishing shot. In our Yellowstone example the establishing shot might be a large
meadow full of bison or elk. A close-up should be relative to this so it would typically frame an entire animal or tight group of animals. If you need
to go to a tight shot of the animal eating or whatever, use a mid-shot as a bridge between the wide shot and close-up. In some of these cases a slow
live zoom between the mid shot of the group of animals and the close-up might be beneficial. Again, use with moderation.
Tripods
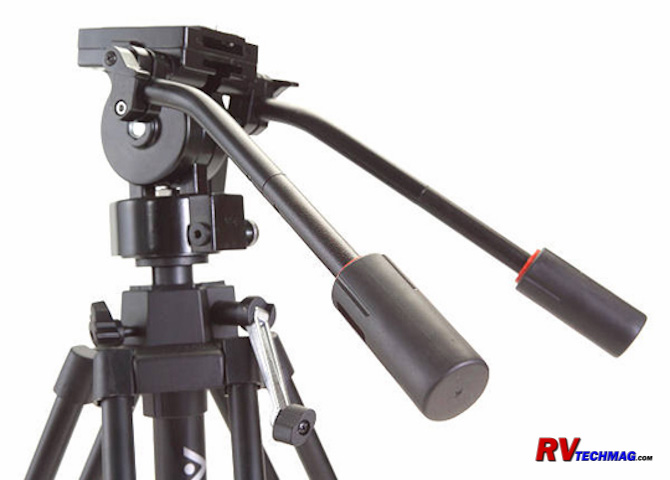
Fluid Head Video Tripod
It's very difficult to hold a video camera still. A still camera snaps an instant in time and freezes it but a video camera
records every second before and after that instant. Any motion in the camera will be noticeable in the video. If you don't want to make your viewers
seasick use a tripod to steady your shots. This movement is especially pronounced at tight zoom ratio. When you are zoomed in on a subject with a
handheld camera any motion is amplified and it will look like you are on a boat rocking on the waves. If you absolutely have to shoot a certain
subject handheld try to keep the lens zoomed out as much as possible. If you have to, move closer to get the shot rather than zoom in. Better yet,
just use a tripod. Your video will look much more professional by doing this.
Still cameras have pan-tilt heads that lock down when shooting. Video cameras need to follow action so still tripods won't work.
Tripods designed for video use have fluid heads that allow the camcorder to tilt and pan smoothly. The fluid heads are adjustable for drag so that the
various camera sizes will have smooth movement when the head is moved.
Framing Your Subject
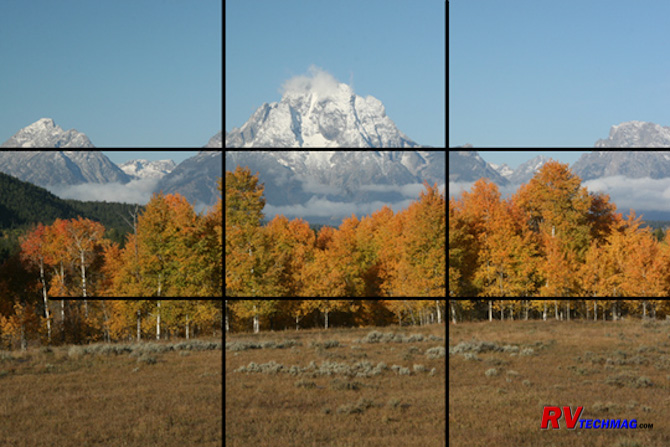
Rule of Thirds
Still photos can be in either portrait or landscape mode just by holding the camera sideways when snapping the photo. You can't
do that with video because it's always in a horizontal (landscape) format. Yet the rules of still photography still apply. After all, we are still
viewing a subject. It's just that it now has motion. The rule of thirds puts two pairs of lines across your screen. One pair is vertical and the other is
horizontal. It effectively divides your screen into 9 equally divided segments. If you place your most interesting subject matter along those lines the
image will be more pleasing. It's also helpful to place an object or person in the foreground of long, wide scenic shots. This object will help draw the
viewer into the image.
Audio For Video
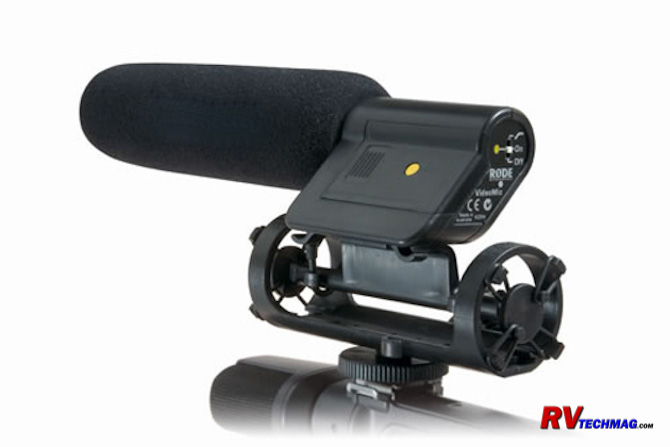
Shotgun Camcorder Microphone
So far we've only talked about the visual element of your production. Unless you are doing a Charlie Chaplin kind of production
you are going to want to add some audio because silence really kills a video production. The biggest problem with consumer cameras is their lack of
decent audio capabilities. The on-camera microphone tends to pick up more noise from the camcorder and its handler than the subject. For this reason I
recommend getting a good quality shotgun mic and mounting that to your camera. Shotgun mics function much like a telephoto lens in that they reach out
and grab audio from a distance. They can be sensitive to wind noise though so a good quality foam microphone sock is highly recommended.
Sometimes you may be capturing a scene where the audio is not what you really want. It may be a nice scenic shot but unwanted
noise, such as a passing truck may have ruined the shot. In that case just go and record a scene with your camcorder with some good clean audio in it.
During the editing process you can replace the audio from the first shot with the audio from the second shot. Naturally this only works if there isn't
some specific dialog or animal sound that can't be replaced in the original shot. You may have a number of short shots taken from multiple angles with
audio tones and levels all over the board. An audio "band-aid" shot of this sort can also help these shots together.
Music is a great addition to any production. Most everyone remembers the introductory song to a major movie. But throughout that
movie there is much more background music that is subtle but always present. This helps tie a production together but must be kept at low volume to not
overwhelm the ambient audio within the scene. You also need to pick music that fits the mood of the scene. When dubbing a sound track onto your video
production be sure that the music is free of any copyright infringement. You won't be able to show off your DVD if you're in jail.
Narration can also be added. Your typical sitcom doesn't use narration because the story and dialog carries itself. PBS
documentaries most always carry narration because the scenery is more pastoral and doesn't inform the viewer as to what is going on. You'll have to
determine whether or not you need narration. If you just want to reflect on your previous trip you won't need any. If you need the video to be
self-explanatory to others without your intervention then you may need to add narration. If it's not intended to be informative, and just a pastoral
video of scenic beauty, you probably won't need it either. Ideally you'll have the content carry the story because good narration is a skill within
itself. If you do your own narration just be yourself rather than trying to sound like Walter Cronkite or someone else that you are not. And, keep
it simple. Don't add extra verbiage just to hear yourself talk.
Editing Your Story
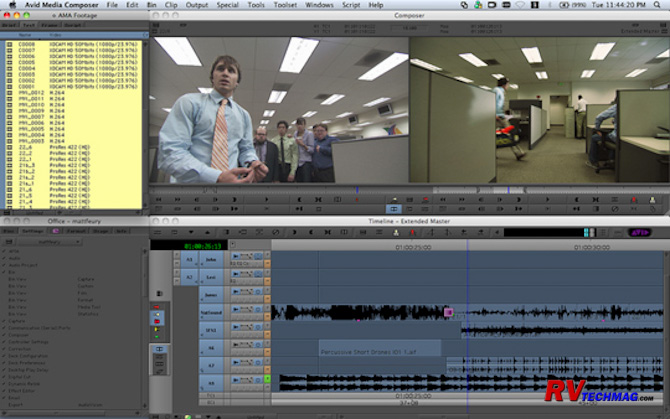
Typical Editing Software
Now that you have all of the footage shot and your music is selected it's time to begin the editing, or Post-Production, process.
You'll first need to load your footage into your computer's editing software. This is done via the capture or import procedures. You can then build it
into a story on your editing software's timeline, add titles, lay down additional audio tracks, etc. But before you can do that you need to see what kind
of footage you have and plan your layout accordingly. This is accomplished by creating a log of each shot and then deciding in which order to place them.
With a log sheet you can create a quick rough cut script that blocks out what happens first, what happens next, and so on.
Remember that you don't have to use all of your footage just because you shot it. Professional filmmakers shoot between 8 to 40 times as much footage as
is needed. Only use what is necessary to tell your story. Adding extra footage will only bore your audience and you'll lose them. Keep the shots short
and simple. One the point has been made, end that shot and move on to the next. There is no reason to make a video production a certain time length. The
correct length is the time it takes to tell your story and get out. Keep in mind the goal of this production and only use whatever footage supports that
goal.
It's impossible to maintain constant attention from any audience. What you need to do is bring them in and out of your
presentation. A nice introduction segment can feature upbeat music that fits the subject matter and a series of highlighted shots from the production. It
will build interest and get the viewer involved in the production. Then you can let it settle down into an establishing shot and the first scene. At the
very end you can create a high energy closing montage with more upbeat music. In between the intro and closing though is where you have to modulate your
energy level. Sometimes you can do this with music but often you can use the subject matter in itself to vary the energy level in your production.
In our Yellowstone example we could begin showing the animals grazing in fields, Lake Yellowstone, the mountains, etc. Then we
could go to a more active scene with the Upper Falls crashing down into the Yellowstone River. Next we could go to more laid back footage and then go
to a scene with sparring bison, a geyser erupting, or something of similar energy level. A calmer scene would follow and precede the upbeat closing.
Because it's impossible to maintain a constant attention span, this slight roller coaster will help keep an audience involved in your presentation.
Creating Titles
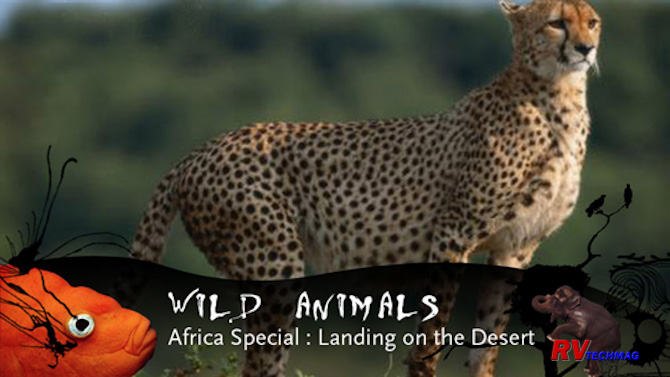
Typical Lower Third Super with Background Graphic
Occasionally a title shot will need to be created. Your editing software has this ability or you can create your own in Photoshop
and load it in as a still image. The problem with full screen titles is the background. It's tough to get a flattering background and static screens
like this are boring. One way around that is with a "super", which is short for superimpose.
A super is text that is overlaid and cut into the background video. Full page supers can be used for major titles but the most
common is the lower third super. Lower thirds use the bottom portion of the screen to overlay text into. This allows clean viewing of the main subject
while still providing identification to the main image. In our Yellowstone example we could place a super to identify the name of the geyser that is
blowing in this scene. You don't need to super everything. When someone sees a bison or elk they don't need a title telling them what it is. Just use
them for identifying subjects that are not readily identified by the average viewer.
You may want to consider a background band for your supers. You'll want to keep them looking somewhat alike with a similar style.
Some light backgrounds may interfere with a light super while others might interfere with a darker super. If your background colors vary it's recommended
to use a background color bar so that the lettering can remain a consistent color throughout the production.
Titles can be scrolled or crawled but the majority of the time this is not necessary nor is it desired. Just bring the super
onto the screen with a fairly quick dissolve, hold it up there just long enough for it to be read, then let it fade off the screen.
Transitions and Special Effects
This is another area where newbie editors go crazy. Just because your editing software lets you do all sort of fancy transitions
doesn't mean you have to use them. The basic transition is still the cut. Watch a TV show carefully once and you'll see what I mean. The majority of the
transitions are cuts. The only time that the fancy page turns, zooms, and flying logos are used is during a high energy introduction. 90% of the time a
simple cut is used. A dissolve can also be used but it makes a different statement than a cut. A cut implies that the scene is moving along. Every shot
is in the same location at the same general time. A dissolve is used to pull away from one location and segue to another location. It can also be used
to bridge time. If the next scene is supposed to occur the next day, a dissolve can separate the two scenes. Whenever you end a scene and go to the next
you will be bridging time, location, or both. That's where your dissolves go. Refrain from fading to black within the production. That is only done on
network television shows where commercials are involved. You should only use it at the very beginning and end of your production.
DVD Chapters
No one uses videotapes any more. Everything is either burnt to a DVD or streamed to a website. When creating DVDs you will have
the ability to create cheaper points. Typically you would do them at every scene change although certain key points within a scene can be used if the
merit direct access from with the DVD's main menu. Here again, less is more. If it's not something you would ever care to go directly to, don't make it
a menu selection.
Summary
Making a video production doesn't have to be overly technical. Just employing the simplest and most common techniques will
help you present your subject in the cleanest matter possible. Remember the following key points:
-
Think before you shoot. Proper planning now ensures you'll have a better production later. Once you are home it's too late to go back and shoot that one shot you really need to pull the storyline together.
-
Shoot lots of footage. Then be realistic when it's time to edit and only use those shots that help tell your story.
-
Use a tripod. Shaky video is the quickest way to ruin a good video.
-
Take it easy with your camcorder's zoom feature. Use it to frame up your shots before rolling tape. Let your subject provide the motion.
-
Pay attention to audio. Good audio goes a long way towards making good video.
-
Edit for content. Keep your shots short and too the point to keep from losing your audience.
-
Use titles sparingly, but where needed to identify something that's not self-explanatory.
-
Don't get wrapped up in the bells and whistles of your editing software. Cuts and a few dissolves make up most of your transitions. Save the fancy digital effects for promos or flashy intros.
Return to Home Page
If you enjoyed this article be sure to recommend RVtechMag.com to your friends, like us on Facebook or Twitter
or subscribe to our RSS feed.


|


