Entertainment System Upgrades
Upgrading to a Sony Blu-ray system with new LCD TVs on Our 2007 Allegro Bus
Article Date: April, 2013
Article and Photography by Mark Quasius
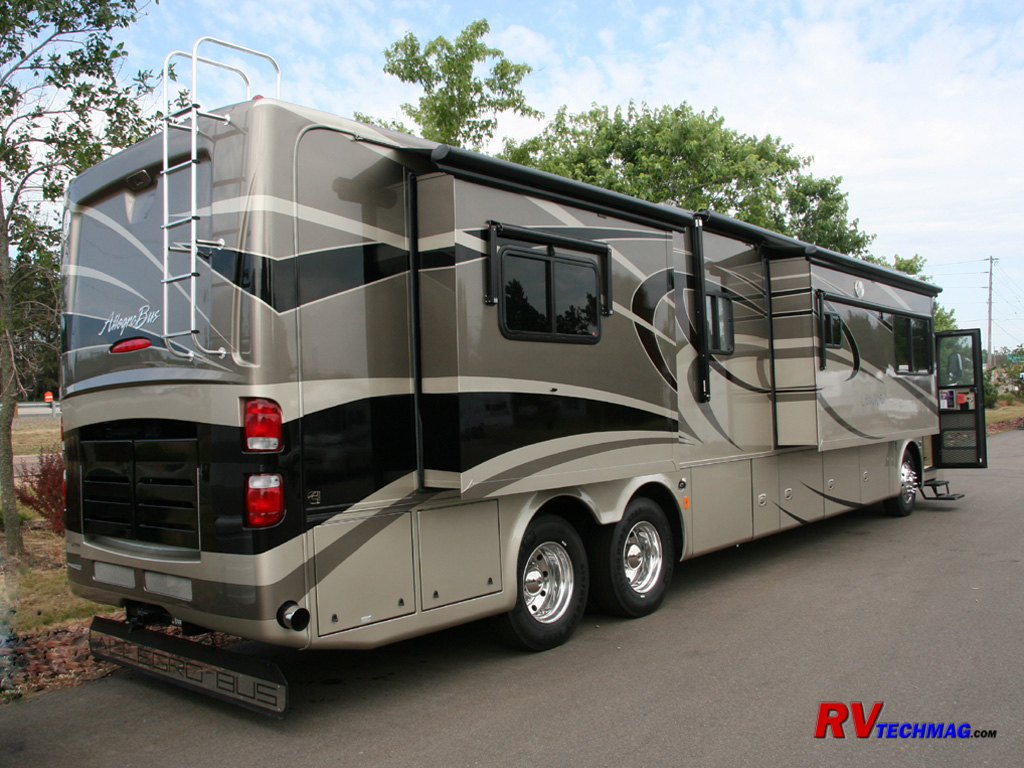
The 2007 Allegro Bus came equipped with a fairly decent entertainment system. It wasn't the ultimate for the audiophile but it's
not a plain VCR either. The system was set up for a satellite receiver up front that can be distributed to the bedroom TV as well. The DVD
player/surround sound system is front only but a bedroom DVD player is also provided at the bedroom TV. The various inputs, such as cable TV, off-air
signals via the antenna, satellite receiver output, and VCR are input to a coaxial selector switch that selects which of these signals you want to view
at either the front or bedroom TVs. This system was changed in the 2008 model year when Tiffin removed the coaxial distribution system and replaced it
with a component video and HDMI distribution system. This allowed passing high definition signals to the various TVs within the system. However, in 2007
HD capacity was limited to a component cable connecting the front TV to either the DVD player or the satellite receiver. The coax selector switch does a
nice job of routing signals but they are not the best quality.
A second consideration is the KingDome satellite dish (dome) on the rooftop. It features dual LNBs but one cable goes to a front
receiver while the second cable feeds a bedroom receiver. If you want to utilize a dual channel DVR you will have to make some changes to allow this.
To address these shortcomings I've made some modifications to my system. I desired to run a DirecTV dual channel DVR up front
and a second DVR in the bedroom. This meant I needed four feeds from the KingDome. Tiffin provides a single coax line for an external satellite dish
on a tripod that you can connect to via a basement compartment. That's nice but it's only a single cable and I needed two to connect to a dual LNB dish.
I also needed more room in the cabinet that the DVD/Surround Sound system and satellite receiver reside in because the DVR is deeper than a standard
satellite receiver and that cabinet was not quite deep enough.
I corrected those deficiencies soon after I got the coach. However, after 3 years technology had changed quite a bit. At that
time the existing Panasonic TV failed with the dreaded "three blinks" situation, which many other RVers also had experienced with that model. Seeing as
how I was always impressed with the Sony Bravia series of LCD TVs I decided to upgrade the front TV at that time and also replace the original Panasonic
DVD/Surround Sound system with a Sony Blu-ray/Surround Sound system. It worked out so well that I proceeded to upgrade the bedroom system as well. The
bedroom had a large bulky Panasonic "Triple Play" system, which was a CRT TV with a built-in DVD player and VCR player. It was not HD ready. I removed
it and replaced it with a Sony Bravia 22" LCD TV and added a Sony
Blu-ray player. Rather than cut down the existing deep cabinet, I remodeled it to give
us some additional storage space. Lastly I removed the batwing antenna and replaced it with a Winegard Roadstar 2000 omni directional antenna. This
eliminated having to crank up the batwing, aim it, and remembering to lower it. In the following sections I'll detail these modifications in case
anyone else has an interest in doing the same to their coach. Note that even though the satellite cabling modifications were done earlier and the Sony
upgrades later, I've put this all together into one common tutorial because there's really no reason to keep them separate.
The Original Setup
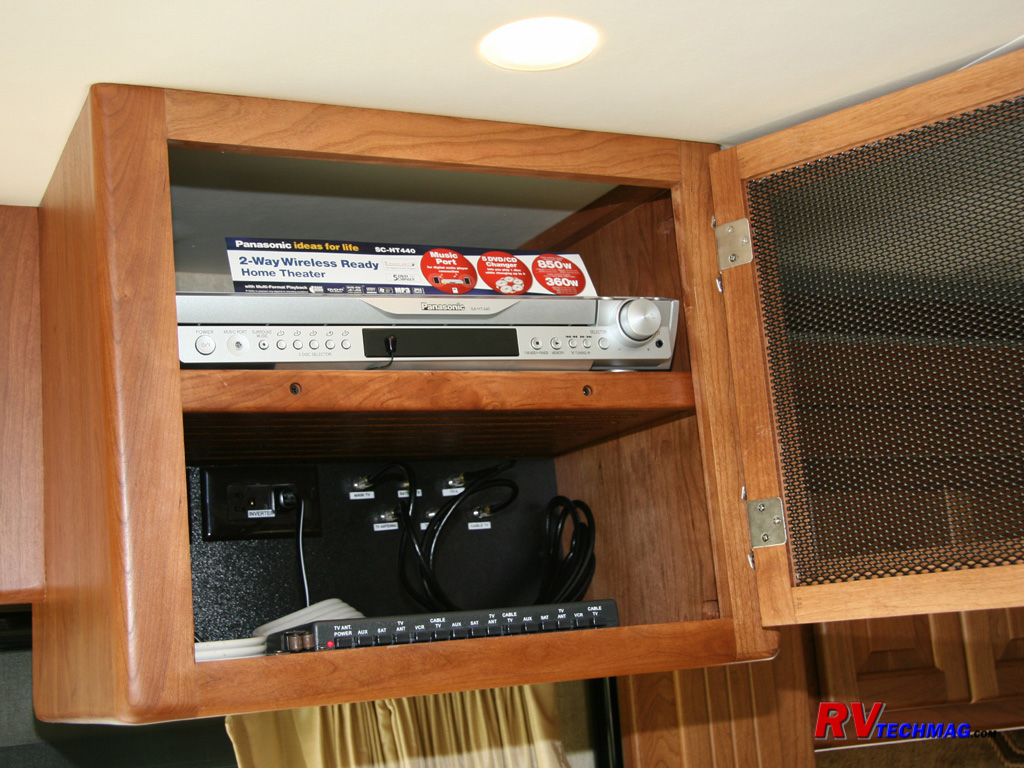
This is the original front cabinet as it arrives from the factory. This cabinet is located right over the passenger's head.
The area above the shelf is very deep but the area underneath the shelf is not very deep, therefore the deeper DVD player must reside on the top shelf.
In the bottom of the cabinet is the video selector switch. This switch takes coaxial cable feeds from the TV Antenna, cable TV jack, VCR, satellite
receiver, and an auxiliary input. It then sends them to the inputs of the front TV, bedroom TV, and VCR. In addition to serving as a routing switcher
it also contains the preamp for the batwing antenna on the roof. Because these are coax cable RF connections, they are not the best quality. Therefore
the DVD player does not interface with this selector switch but instead feeds component video to the front TV directly for a cleaner picture. The extra
room in the lower cabinet can be used to place a VCR if desired as well as a satellite receiver. The KingDome on the roof does feed the SATV signal
down to the receiver via another coax cable, which is also found in this cabinet.
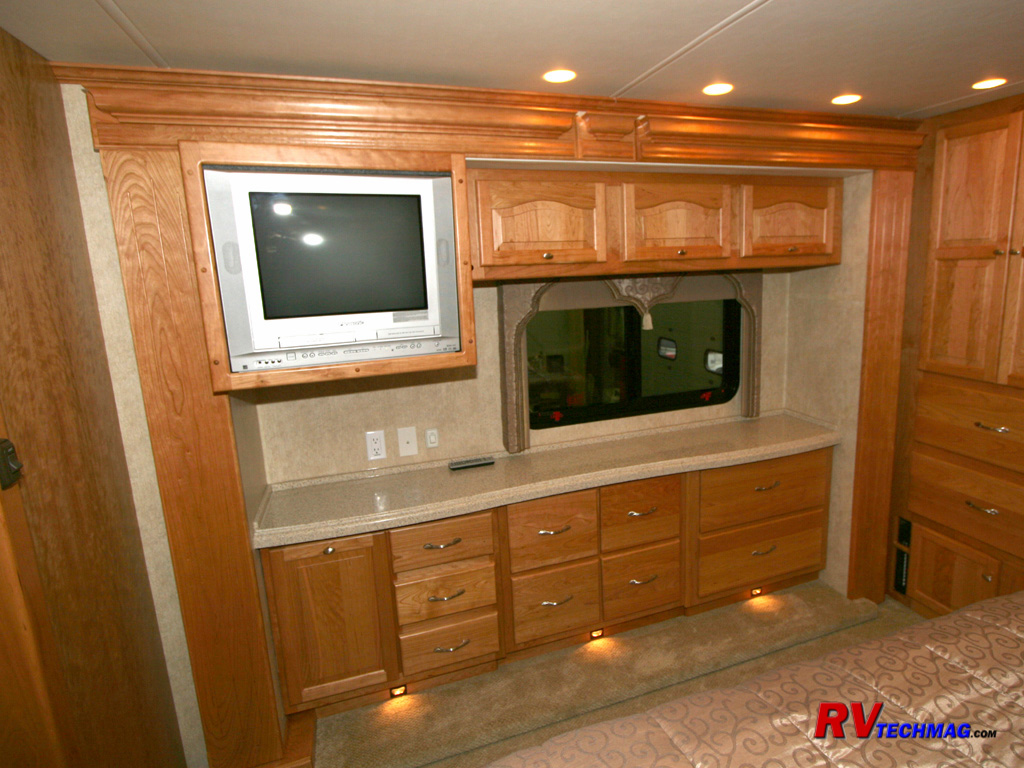
The bedroom TV was a Panasonic Triple Play unit. This is a heavy and deep CRT TV that has an integral VCR player and DVD player
built right into the unit. It's a nice convenient all-in-one unit but it was not HD ready and would require a digital converter in order to receive
any off-air TV stations via the antenna now that the conversion to digital had taken place. It also had a pair of small speakers that did not provide
very good sound and required cranking the volume up every time the rear air conditioner kicked in. In order to add a second satellite receiver in the
bedroom, cable connections and an electrical outlet were provided in the upper cabinet immediately next to the TV. However, you would need a very small
satellite receiver if you wanted to fit it into that shallow cabinet.
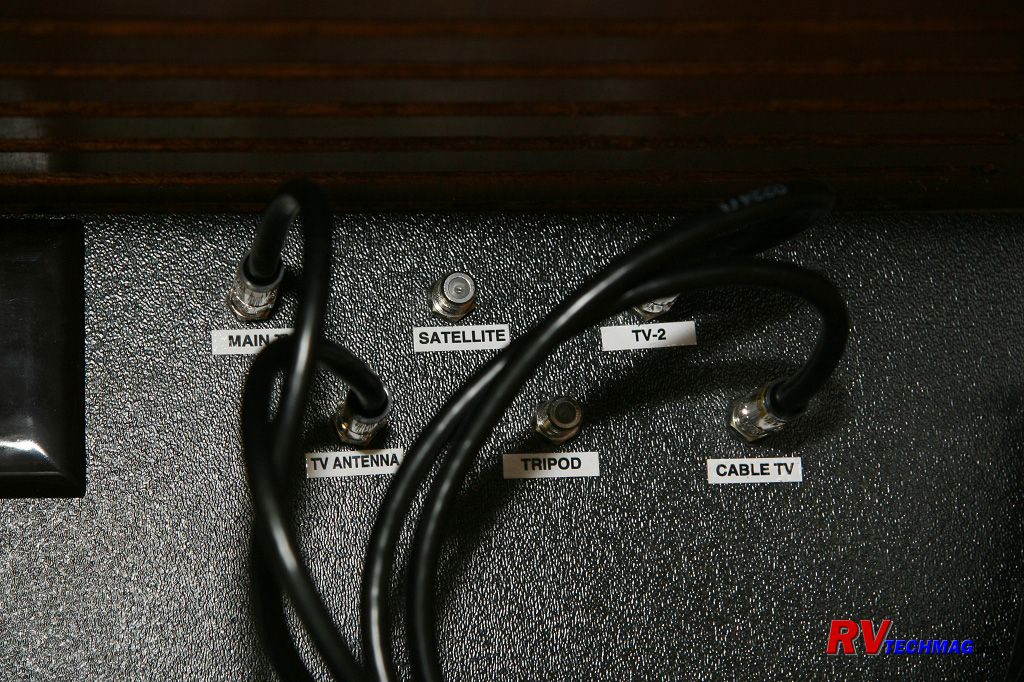
In the lower portion of the front cabinet is a black plastic panel. This panel contains a pair of 120 volt receptacles as well
as a number of coax jacks to connect components to. This makes it easy to plug things in and out all the time but it does take up valuable room.
The Problems
I have a pair of DirecTV DVRs. For those who are not familiar with DVRs, a DVR is a satellite receiver that also has a hard drive
installed within it that is used to record programs. It features dual inputs so that you can watch one show while recording another. This of course
requires two coax cable feeds from the dish - one from each LNB of a dual LNB dish. The DVR is also a larger unit than most simple satellite receivers.
I found my DVR to be about 1" too deep to fit into either the lower compartment or the bedroom cabinet so that was the beginning of my problems.
The second issue was that I wanted to place one DVR in the front cabinet and one DVR in the bedroom. This requires 4 feeds from
the KingDome in-motion satellite dome. But, the system was set up so that one LNB fed the front satellite receiver while the second fed the bedroom
receiver.
Next, I wanted the ability to feed satellite signals from an outside dish as well as from the KingDome. The way it is set up,
there are two coax jacks in the basement water service compartment. One is for campground cable TV, and feeds the video selector switch, while the
second is for a remote satellite dish and runs to the black panel so that the RVer can swap cables from the KingDome to the outside dish. In my case
I needed two satellite feeds, one from each LNB, or else we would all be watching the same channel. I also wanted to eliminate the cable swapping and
install some sort of switching system.
Lastly, after three years of use the front TV failed. I then decided to upgrade to Sony Bravia LCD TVs that were HD capable as
well as switch over to Blu-ray players. I also wanted to eliminate the batwing antenna on the roof. We don't watch off-air TV all that much and having
to deal with cranking up and aiming the antenna just wasn't very convenient so we installed an omni directional unit instead.
The Solutions
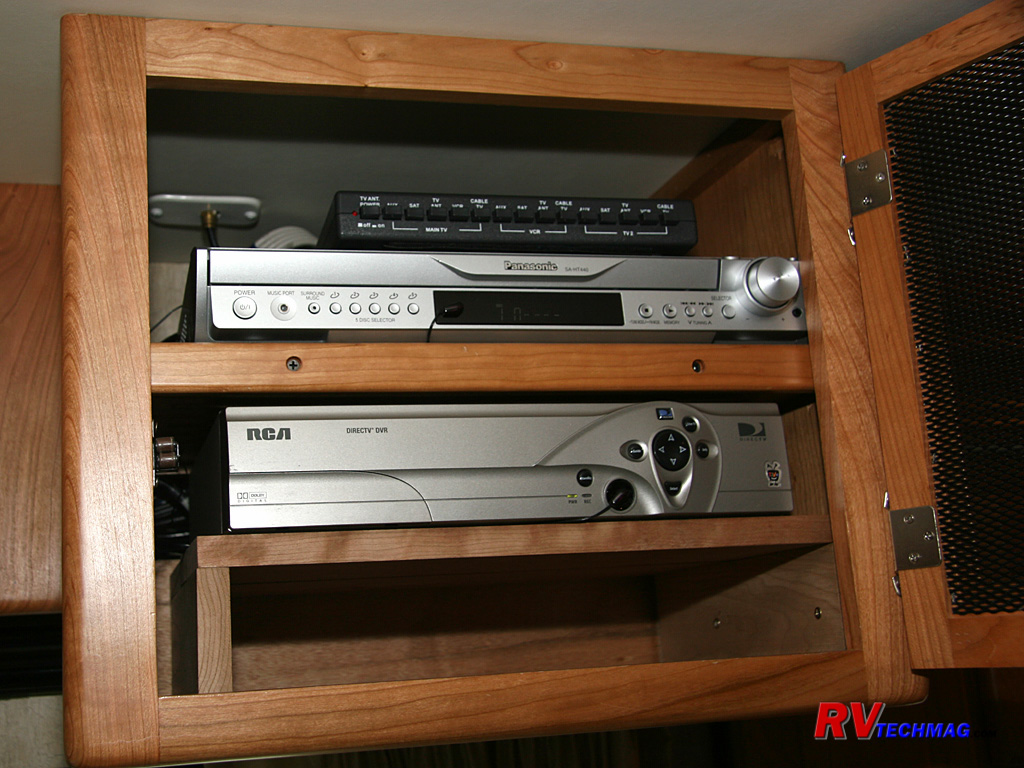
The first thing to tackle was the depth situation in the front DVD player cabinet so that I could install my DirecTV DVR. The
rear bedroom TV was fairly simple - I could make my own shelf and mount it underneath the TV cabinet and place my bedroom DVR in there. That way I
could forgo using the upper cabinet, which was too small and better suited for storage anyway.
The front cabinet was a little more problematic. Part of the issue was that the coax cable that connected to the black junction
panel stuck out an inch or two before they could bend. That in itself ate up 2" of room behind the DVR. So I removed the black panel to see how I could
gain some space. I found that the top half of that area was fairly deep, and was part of the area behind the deeper upper shelf. The bottom half was
not very deep because the cabinet was made shallow at that point so that the cockpit side shade mechanisms had room when retracted. However, that back
partition extended up an inch more than it needed to. I reasoned that if I cut off that extra inch I would have enough depth to fit the tail of the
DVR into that area.
The first step was to relocate the two electrical outlets previously installed in the black panel to the top half of the
cabinet. I did this by replacing them with surface mount receptacles that I mounted on the back wall, just above and behind the DVD player. That was
easy enough. Next I removed the coax lines from the backside of the black panel and ditched the panel. I would then connect these cables to the proper
connections on the DVR or video selector switch. The only time I would ever need to remove any of them is if I removed the DVR from the coach so the
panel really wasn't necessary. I then used a jig saw to remove the extra 1" of height from the back wall so that I had enough cavity height to allow the
tail of the DVR to fit into that space.
The second step was to build a cherry shelf to support the DVR. Because the cavity was only open near the top of the opening
it wouldn't be possible to set the DVR on the cabinet's floor so it needed to be raised up so that the tail could stick into the deeper cavity. Once
finished, the DVR slid right into place and I connected the various A/V wires and cables to it. I also relocated the selector switch to the upper
cabinet and Velcro'd it to the top of the DVD player. This leaves me enough room for a VCR underneath the DVR should I decide to add it later or else
just a spot for remote controls and DVDs. The results are pictured above.
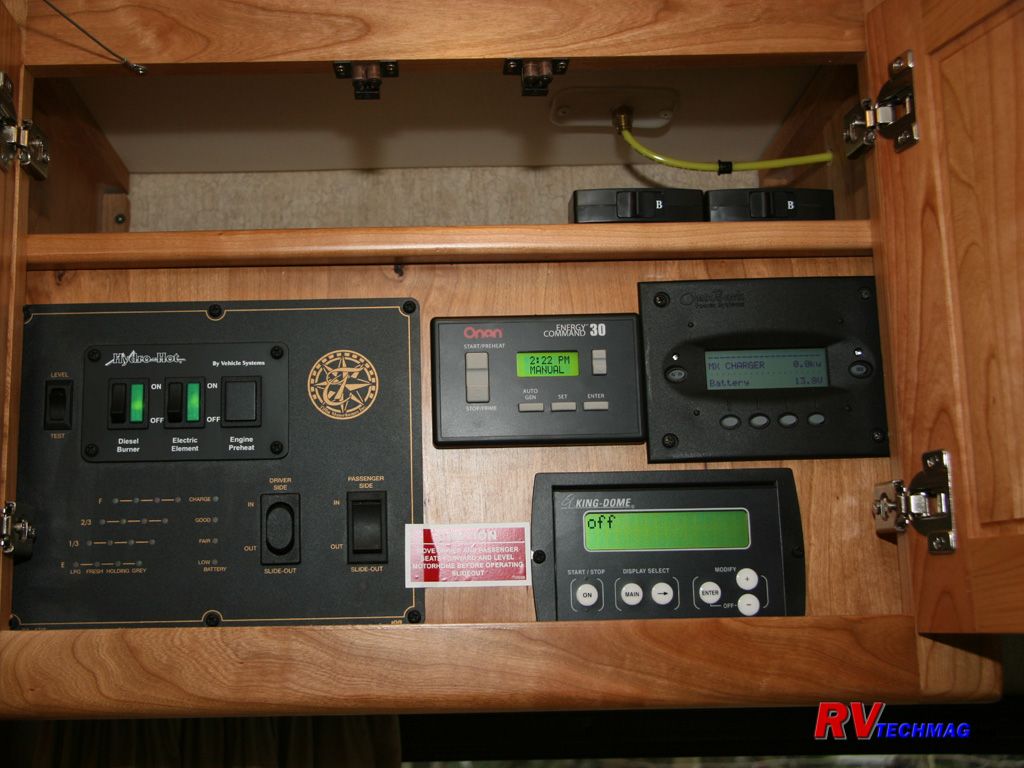
The next task was to add some more satellite feeds so that I could run both DVRs as well as get them to the right place. I also
needed to incorporate some switches to select between the outside dish feeds and the KingDome feeds so that I wouldn't have to swap cables around on
the back of the DVRs. While it's not all that hard to run cables within the front end of the coach, it's virtually impossible to run new cables to the
bedroom TV, at least not in a very neat fashion. Fortunately, there were two cables already run to the bedroom TV, one was for the satellite receiver
and the other was from the video selector switch to the bedroom TV's RF input jack. By using a pair of diplexers I was able to utilize the TV cable for
two purposes so in effect I had three "virtual cables" while physically there were only two.
For those who don't know what a diplexer is - it looks like your basic cable TV splitter except it will separate RF signals
from the higher band SATV signals. They also can be used as combiners when installed backwards so you can install one on each end, in effect creating
a single cable with a wye at each end. You connect a satellite feed and an RF feed (from an antenna or cable TV) on one end and then separate them at
the other end. So, these two little items kept me from having to string a third coax cable for the second LNB input on the satellite receiver.
I also needed to get an extra SATV feed from the basement compartment to the receivers as well. In the same manner as the
bedroom TV, I utilized the basement cable TV line with a single diplexer up in the RV. I can now use the cable TV line for my second satellite feed
and the diplexer will separate the two signals up top, saving me from once again having to run another coax cable.
Now my luck ran out. It was time to run some new cables. Fortunately, it was all in the front of the coach so it wasn't too bad.
Step one was to decide where to mount my A/B selector switches so that I could select between the KingDome and outside dish feeds. I needed two of
them, one for each LNB feed from the dish or dome. I decided that the best place would not be in the DVD/DVR cabinet because it would add clutter to
an already congested area. I also reasoned that when switching to or from the outside feeds I'd be turning the KingDome on or off at the same time.
So, I decided to mount my pair of A/B switches (one for each LNB) on the small shelf directly above the KingDome's remote control panel on the opposite
side of the cockpit. This was pretty much wasted area anyway so it made the most sense. In the image above you can see the A/B switches mounted right
underneath the yellow hose to the air horn. The hardest part was cutting a 2" hole behind the A/B switches in order to run 6 coax cables through to the
switches. I couldn't get a drill in there so I used a 2" hole saw with a ratcheting box end wrench and that took quite a while to do while turning the
hole saw manually by hand.
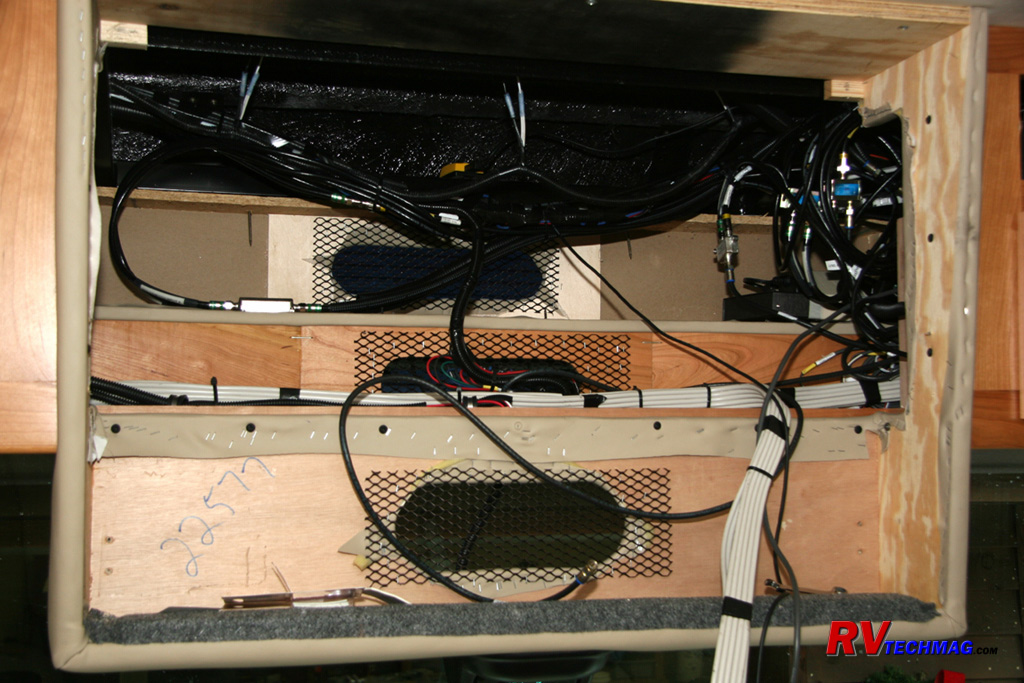
Next I removed the front TV as well as the two wooden louvered speaker covers that hide the surround sound and radio speakers.
This gave me access to the existing rat's nest of coaxial cable. I then ran 6 cables over to the two A/B switches. Two from the external feeds in the
basement, two from the KingDome, and two outputs over to an area behind the front TV, where I connected them to the inputs of a 2x4 multiswitch. This
multiswitch now gave me 4 outputs so that I could send a pair to the front DVR and a pair to the rear DVR. The silver multiswitch is visible on the
second shelf level near the left of the opening. The diplexers are shown cable tied into place at the right, near the KingDome control module. The
large flat white cable sets are the component video and audio that feed the DVR to the TV's Aux 1 inputs and also a set of S-Video and audio feeds to
feed the DVR to the TV's Aux 3 inputs. Initially I chose to take the TV's Audio Out jacks and feed it to the surround sound system's Aux inputs. That
way I can utilize the surround sound system for anything that the 32" LCD TV is viewing. When I upgraded to the Sony Bravia TV and Blu-ray/Surround
Sound system I removed these cables and utilized HDMI cables instead to maintain a digital signal rather than analog. The Sony TV had many inputs so
I ran one HDMI cable to the DVR, a second HDMI cable to the Blu-ray/Surround Sound system, and a third HDMI, as well as a standard RCA composite
audio/video cable to the cabinet to the immediate right of the TV. This can be used for a game system, camcorder, or digital camera feed to the front
TV and meant that I would not have to access the TV any more to connect any temporary devices to it.
The end result of this is that I could now select either an external tripod dish or the KingDome and send up outputs to both
of my dual channel DVRs without any rewiring or reconfiguring of the system. I now also had the physical space to locate both of the deeper DVRs for
satellite TV viewing. The next step was to replace the Panasonic equipment with Sony and do some woodworking modifications.
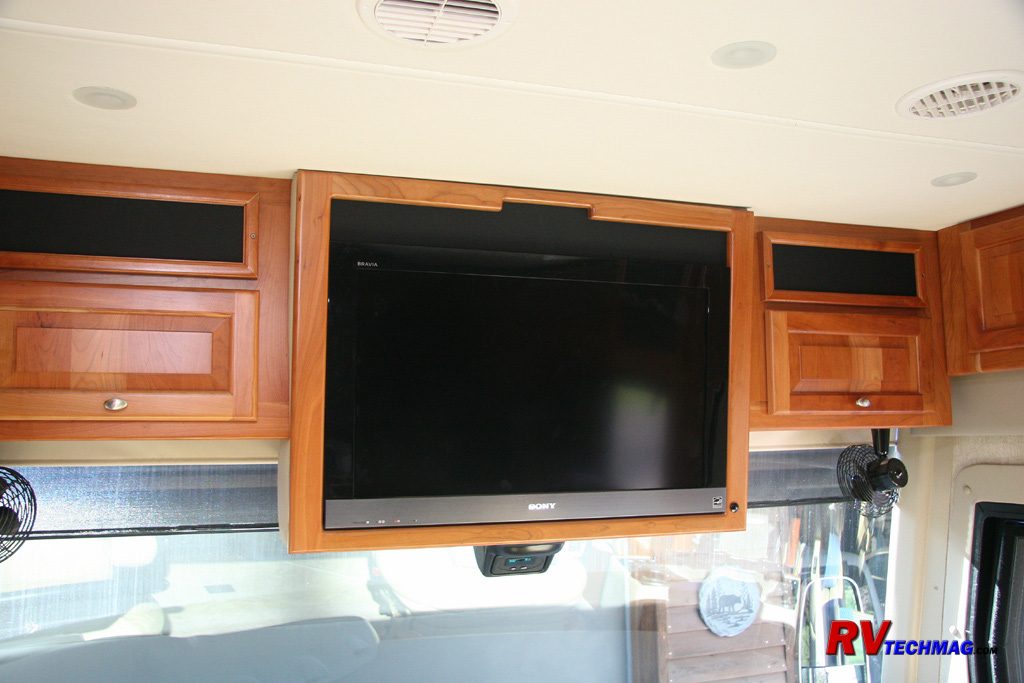
The original front 32" Panasonic TV fit slightly behind the wooden bezel. The 32" Sony Bravia fit precisely inside the wooden
bezel. It wasn't as tall as the Panasonic because the Panasonic had speakers in the front of the TV while the Sony had them near the top-rear of the TV.
I modified the metal mounting bracket from the original TV and added some extra channels to give the Sony better support. I then was able to mount the
Sony in the same fashion as the previous TV, although new screw locations were used in order top space the TV out to fit inside the wooden bezel. I then
created a speaker grill to fill in the gap above the Sony TV. I made a wooden frame using 3/4" square oak stock and then bought some black speaker grill
cloth to cover it. The end result was that it looked like it belongs there and it allows the sound from the Bravia's rear facing speakers to exit the
cabinetry without distortion.
At this time I also improved the speaker capabilities of this system. The original design provided for two speaker cabinets -
one on each side of the front TV. Each cabinet contained one speaker for the surround sound system and one speaker for the in-dash radio. The radio
speakers were particularly small and lame sounding so I replaced them with a pair of Bose 361 speakers. It got pretty crowded inside that cabinet and
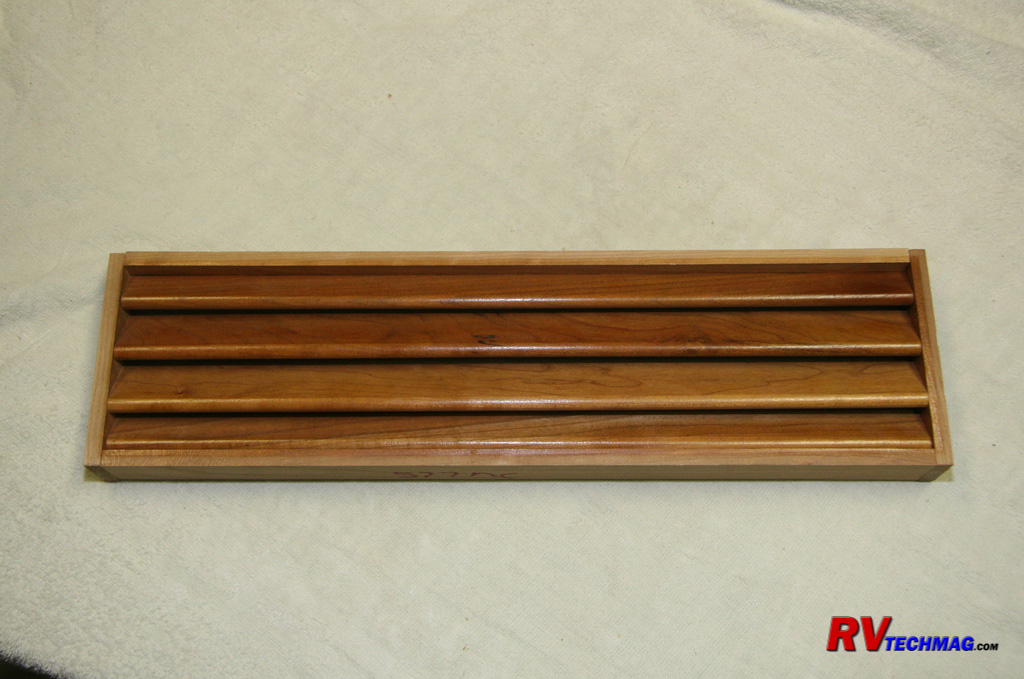
the wooden louvers did a terrible job at passing clean sound because the wooden slats broke up the sound waves and caused major distortion. I removed
the radio speakers from that area and mounted the Bose 361s directly behind the front TV set facing downward. They are not visible in that location
and they provide clean unencumbered sound.
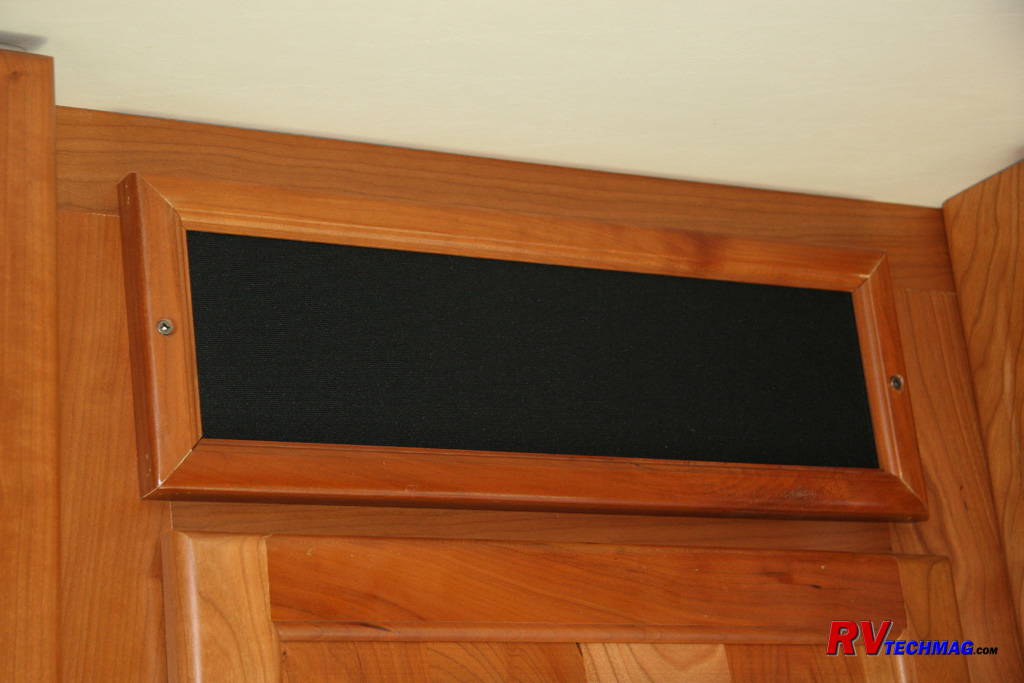
The next step was to replace the OEM Panasonic front surround sound speakers with the Sony speakers that came with the
Blu-ray/Surround Sound system. I then removed the wooden slats from the wooden frames and fabricated some small wooden frames that I covered with more
of my acoustic speaker grill cloth. The sound is transparent when passed through this acoustic grill cloth and the distortion evidenced by the previous
wooden slats is now gone and I have great sound.
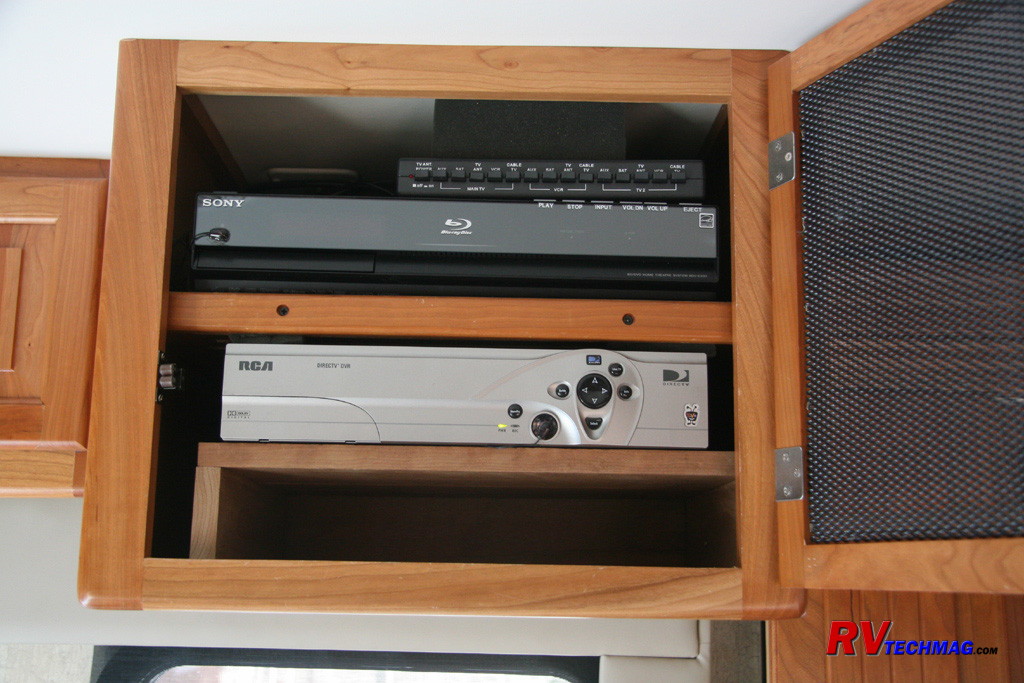
Replacing the Panasonic DVD/Surround Sound system with the Sony Blu-ray/Surround Sound system was fairly easy. Sony used nice
modular plug-in connectors for all of their speaker connections so I did have to splice into the existing bare speaker wires and solder the new Sony
pigtails onto their ends. I also ran HDMI cabling up to the front TV as well as fed a pair of RCA stereo audio cables back to the TV input port on
the Sony system to allow the surround sound system to handle the sound for any off-air stations being played on the front TV. A second set of cables
did the same from the DVR. This system also features a Digital Media Port docking station that can use the surround sound system to play any tunes
from an iPod or other portable digital device.
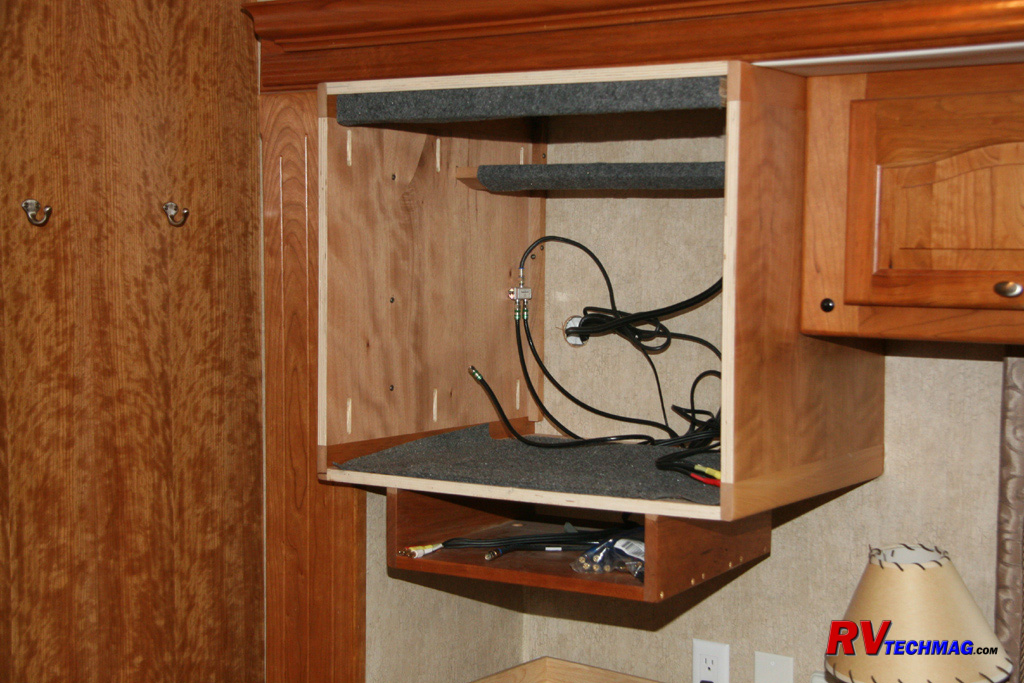
In the bedroom I removed the wooden bezel and the large CRT TV. This left a large open cavity. I considered cutting it down to
make it shallower but really didn't see the benefit in that. Plus, it would make it difficult to mount the DVR, which goes into the shelf I made that
is visible in this image, directly beneath the cabinet. Instead I decided to utilize the extra space for storage.
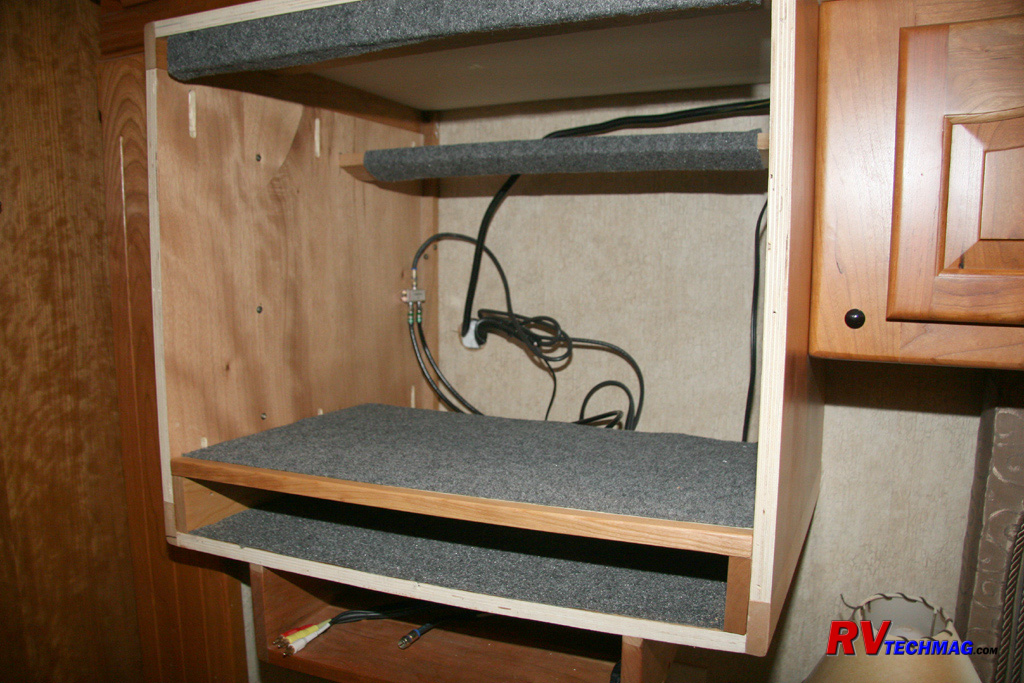
Because the original unit contained a DVD and VCR player I would be losing that by going with a flat LCD TV. However, the old
Triple Play was fairly tall to allow for that and the new wide screen LCD TV isn't as tall so that left me enough room to add a Blu-ray player beneath
the TV. There wasn't enough room to add a VCR but those things are pretty much ancient history by now anyway. I also considered removing my DVR shelf
and installing that within the enclosure but there wasn't enough room for both the DVR and Blu-ray player. So, I made a new shelf that would go above
the Blu-ray player to help support the TV. The shelf is visible in this image.
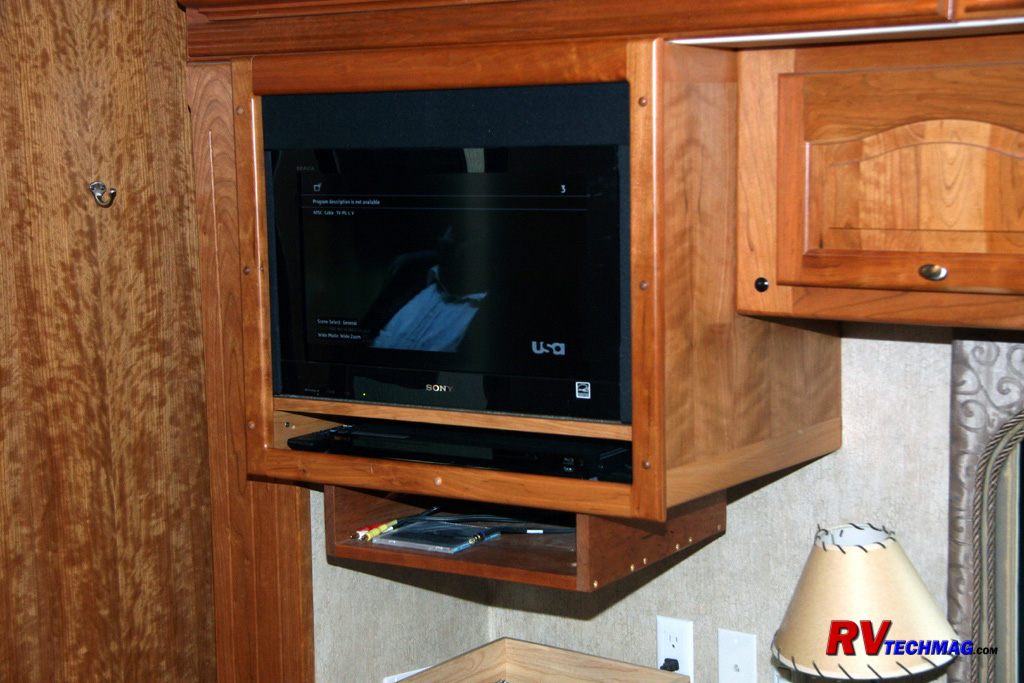
I decided to fabricate a steel mounting plate that ran across the back of the TV. The plates was laid out like a flanged channel
and it mounted to the backside of the wooden TV bezel. I then welded some hinged to the left side of the frame so that the entire frame, TV, and wooden
bezel would swing out as one assembly. Everything was recessed into the wooden cabinet so that the hinge mechanism was hidden. I then installed a hidden
retaining pin at the top to keep it tightly closed. I finished off the top by making a speaker grill assembly in the same manner as I did for the front
TV - and for the same reasons.
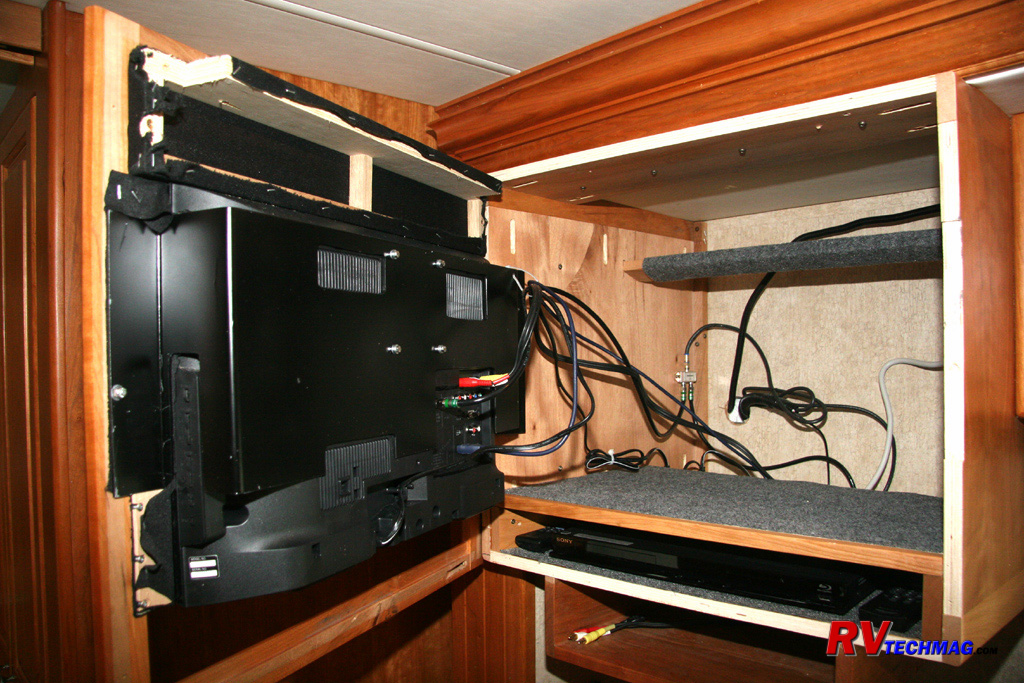
This view shows more detail when the TV is swung out. This photo was taken prior to me cleaning up all of the cables and
fastening them to the cabinet wall but you can see how much available storage space is gained. To access this area all you have to do is pull out an
L shaped pin from the top of the cabinet that drops down into a hole in the top of the speaker grill frame.
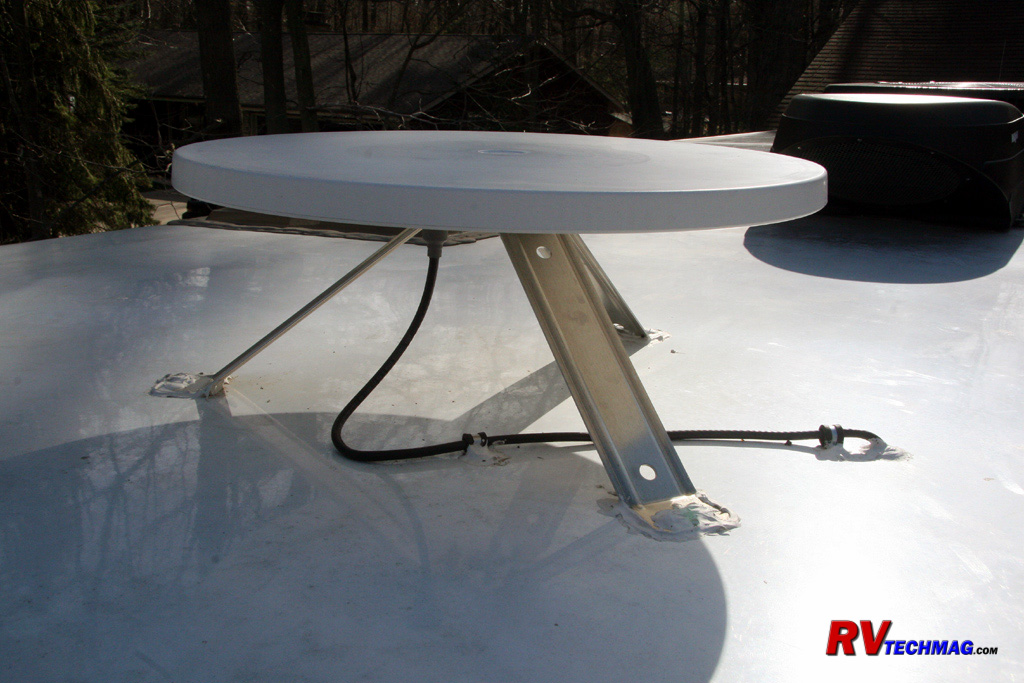
The last task was to replace my batwing antenna with a Winegard Roadstar 2000. The Roadstar 2000 is an omni directional
antenna optimized for digital broadcast signals. While not necessarily any more powerful than the batwing antenna it is much more trouble free.
It's omni directional so it can pick up off-air stations in any direction and does not require aiming. You never have to crank it up or remember
to put it back down again when leaving. You can view off-air TV while driving or in heavy winds, unlike the batwing. It normally comes with a
wall mounted switch that includes a 12 volt powered pre-amplifier to power the antenna. But you do not have to use that switch to provide power.
You can use the built-in antenna amplifier that is in the Winegard video selector switch, used in Tiffin products prior to the 2008 model year.
So, I removed my the cable from my batwing antenna and connected the Roadstar 2000 to that input on the video selector switch.
The Roadstar needs to be located 2' away from any air conditioners or other obstructions that could interfere with the
signal. I located mine halfway between the second and third air conditioners. I then used the passenger side air conditioner duct top run the
coaxial cable forward to the front of the coach. I removed a bedroom air conditioner louver that was closest to the new antenna location and
drilled a hole up through the roof. I then fed the coax down through that hole and fished it forward through the air conditioner duct. I
installed some hold-down clamps to fasten the cable securely to the roof and sealed everything up real good with Dicor self-leveling caulking.
I then removed the front TV to allow access to the front cap area. I removed the forward-most ceiling louver and poked a fish tape through the
last foot or two of foam insulation to extend the coax to the front cap area. I then fished it back to the entertainment center cabinet by
passing it in the existing cable chase behind the cabinet that is above the entry door. I then removed the batwing antenna from the roof and
riveted an aluminum plate over the access and screw holes, then caulked them up real good. That did leave a 2-3" diameter hole in the interior
ceiling where the crank mechanism used to be but I bought a carbon monoxide detector that matched my smoke detector on the opposite side and
covered the hole up with that, after stuffing some extra foam insulation into the cavity.
Summary
Installing components in an RV isn't all that difficult. The hardest part is running the cables to interconnect everything.
Some of them aren't so bad but face it, RVs were never designed for upgrading and it can be difficult to run any wiring from point A to B in some
situations. Once you overcome those hurdles the rest pretty much falls into place. I now have a great Sony entertainment system with Bravia HD TVs
and Blu-ray players. I can switch between the KingDome and an external tripod dish with ease and the dual DVRs actually allow me to record or monitor
up to four different channels at the same time. The batwing antenna no longer makes any wind noise and I never have to wonder if I remembered to
lower it. Everything fits in its cabinets and the infrared repeater system lets me run anything from a remote either in the bedroom or front living
area as long as I program each of the DVR remotes to a unique identify. The system gives me maximum flexibility with little hassle. While everything
was open I also took the time to tighten up all of the coax connections. Tiffin just finger tightens the hex nuts on the coax lines and many were
coming loose. I put a 7/16" open end wrench on them all and made sure they were tight. Now I have a nice clean signal everywhere.
To view a schematic diagram of my entertainment system wiring please click on the following link:
Return to Home Page
If you enjoyed this article be sure to recommend RVtechMag.com to your friends, like us on Facebook or Twitter
or subscribe to our RSS feed.


|


