RV Air Conditioning Service
Removing the Mystique of Air Conditioning Service Work
Article Date: December, 2014
Article and Photography by Mark Quasius
Motorhomes come with the usual house air conditioners to provide cooling for the coach but an automotive air conditioning
system is also supplied to provide cooling when driving. It's very similar to the system you have in your passenger car, truck, or SUV. And, just
like in those vehicles, this system can also fail to provide adequate cooling and will need service from time to time. In this tutorial I'll give
a brief overview of how the system works, how to do some basic diagnostic procedures, and how to do some minor service work. It's not designed to
make you an experienced and trained service technician but it will help you to deal with the small matters yourself and give you enough understanding
of the system to be able to make an educated guess as to what kind of service you might need and when to seek help from a professional. Note that
this tutorial was written based upon a 2007 Allegro Bus but other models should be similar.
How It Works
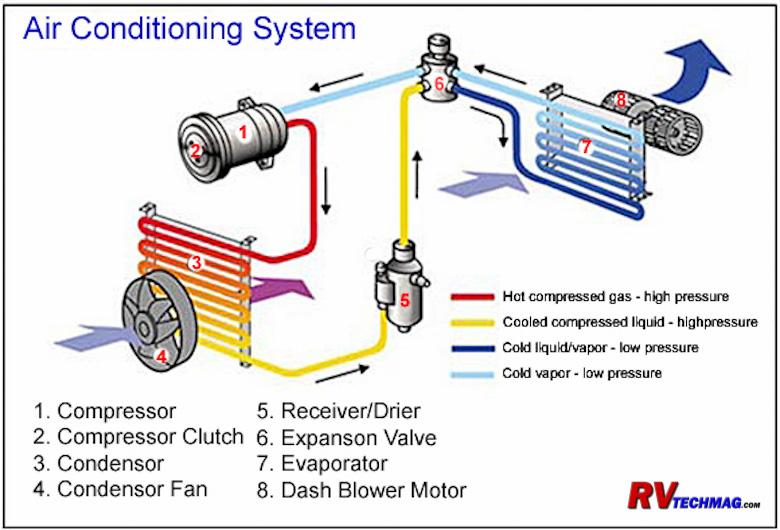
Air conditioning works by exchanging heat between two separate areas. It does this by compressing gas and then expanding it.
When the gas expands it gets cooler and absorbs heat from the interior of the vehicle. When it is compressed it retains heat, which is transferred
to the exterior of the vehicle. It does this by passing through a pair of heat exchangers, which are similar to radiators. The exchanger on the
inside of the vehicle is called the evaporator because this is where the gas expands and cool air is blown into the compartment. The exterior unit
is the condensor, so named because the gas is condensed after it leaves the compressor. This is where the heat is removed from the refrigerant by
the condensor fan, which blows it into the atmosphere.
An engine driven compressor pumps the cold low pressure vapor and compresses it into hot high pressure gas. As this gas passes
through the condensor the condensor fan blows the heat away into the atmosphere, cooling the refrigerant into a cool liquid form. It then passes through
a receiver/drier, which ensures that there is no moisture in the system that could cause any freeze ups in the lines, and then enters the expansion
valve. The expansion valve is a small orifice that allows the refrigerant to expand to a gas form as it passes through. The cool liquid refrigerant will
convert to a cold gas. As it passes through the evaporator it picks up the heat from the air that the evaporator fan is passing through the core giving
you nice cold air as it's output. It then returns to the compressor pump and begins it's cycle all over again.
Air conditioning systems have their limits. Each unit is designed for a given temperature drop in degrees. A typical system is
designed to cool up to 20 degrees. The temperature differential (also known as Delta T) between the condensor's intake air and the evaporator's output
air will be 20 degrees and no more. So, if you have 100 degree air entering your system the output temperature will never be any lower than 80 degrees.
As the intake air cools down the output air temperature will also be lowered so the cooling will improve the longer it runs. They key is to start it
early enough before the temperatures get too extreme.
Humidity also pays a factor. Humid air is dehumidified as it passes through the evaporator core. This condensate will run down
the roof or be pumped out via drain tubes. But the process of making this condensate does steal some of the ability to lower the output air temperature
so your Delta T may drop to 16-18 degrees rather than 20, depending on just how humid it is. Therefore your air conditioner will perform better in drier
climates than in humid areas. The main thing to remember is that your unit won't cool as well in seriously hotter temperatures than it will in milder
temperatures.
Each system requires a certain amount of refrigerant in order to function. If the unit is low on refrigerant it won't perform as
designed. Each system has a certain volume to it and requires a proportionate amount of Freon. An RV has a large condensor and long hose lengths that
connect the evaporator in the front of the motorhome to the rear radiator area where the condensor is found. Therefore a 40' motorhome will require more
refrigerant than a compact car. Adding extra refrigerant above and beyond the specified amount will not improve your air conditioner's performance. In
fact, it will be detrimental to it and cause higher head pressures that will result in compressor failures.
Refrigerants
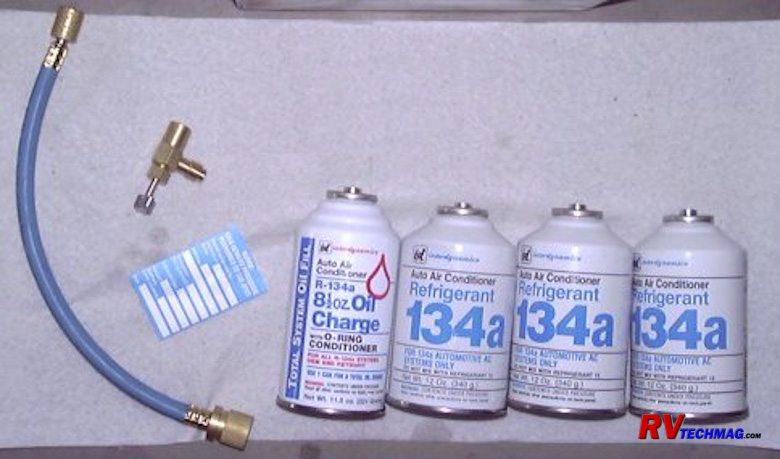
Disposable R134a Refrigerant Cans
The original refrigerant used in earlier automotive air conditioning systems was R-12. R-12 was deemed harmful to the environment
so in the early 1990s R-134a was developed as a replacement for R12. Technically known as Tetrafluoroethane, R134a is commonly referred to as Freon, as
was the earlier R-12 Dichlorodifluoromethane. It's a gas that can be compressed and expanded with excellent heat carrying characteristics. R134a is
available in small disposable cans as well as in larger tanks. As of this writing disposable cans are still banned for sale in, or shipping to, either
Wisconsin or California, even though the environmental issue has been done away with once the switch from R12 was done long ago. Note that this
refrigerant is fairly standard in automotive air conditioning systems but the rooftop units on your RV, while still using the same basic design of air
conditioning, do not use R134a and typically use R22. If you have an older R12 based system you cannot simply add R134a to it although the system can
be upgraded and modified to accept R134a.
Compressors
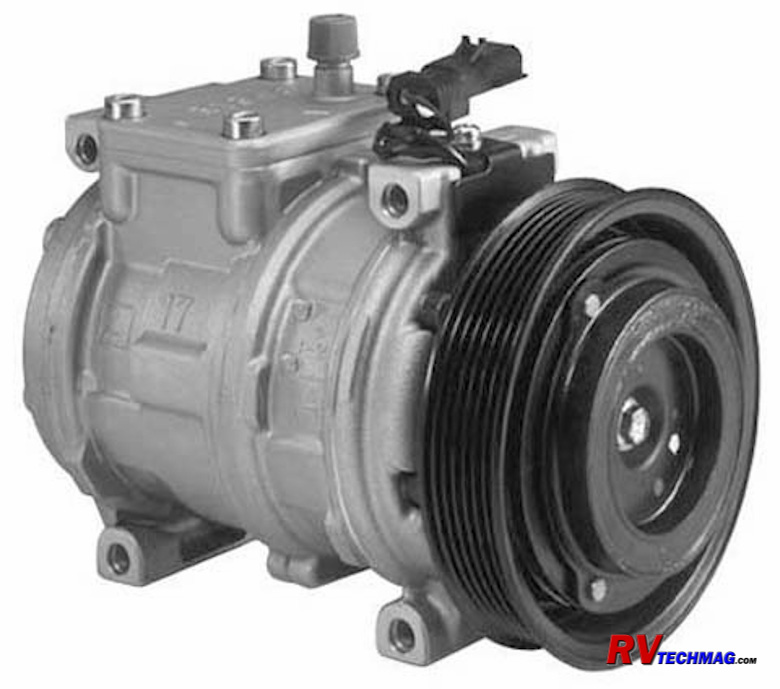
Typical Denso Compressor and Clutch
The compressor provides the basic circulation of the refrigerant through the system. It creates pressure differentials by
compressing the refrigerant to high pressure. As it passes through the various components heating and cooling occur due to controlled expansion of the
gas as shown in the diagram at the top of this page. The compressor is not designed to run non-stop. If the pressure gets high enough it will kick out.
As the refrigerant performs it's heat transfers it will gradually lose pressure and the compressor will kick in again. This is handled by the compressor
clutch, which is mounted on the end of the compressor's input shaft. Because the compressor is belt driven the belt and pulley constantly be turning
whenever the engine is running. The clutch is electromagnetic and will engage when needed to allow the compressor input shaft to turn and will disengage
whenever compressor operation is not needed. This clutch engages whenever the dash air controls are set to activate the air conditioning, however
various safety switches will switch off power to the clutch if the pressure is too high or too low or the evaporator is to the point of freezing up.
Controls
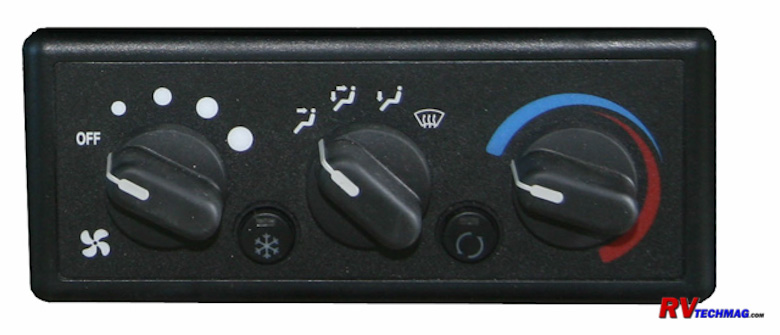
Typical RV Dash Controls
Dash HVAC controls are similar to what many passenger cars have. The knob on the left typically controls up to 4 levels of fan
speed. The center knob determines which vents the airflow should be directed to. The right knob is the temperature dial that switches between heat and
cooling as well as just how much is desired. The small "snowflake" button on the left engages the air conditioning compressor clutch while the button
on the right side allows you to switch between recirculating interior air or bringing in outside air. Notably missing is a mode selection on the center
dial that lets you split the airflow between the defroster and floor heater vents. It's either one or the other, unfortunately.
Troubleshooting Tips
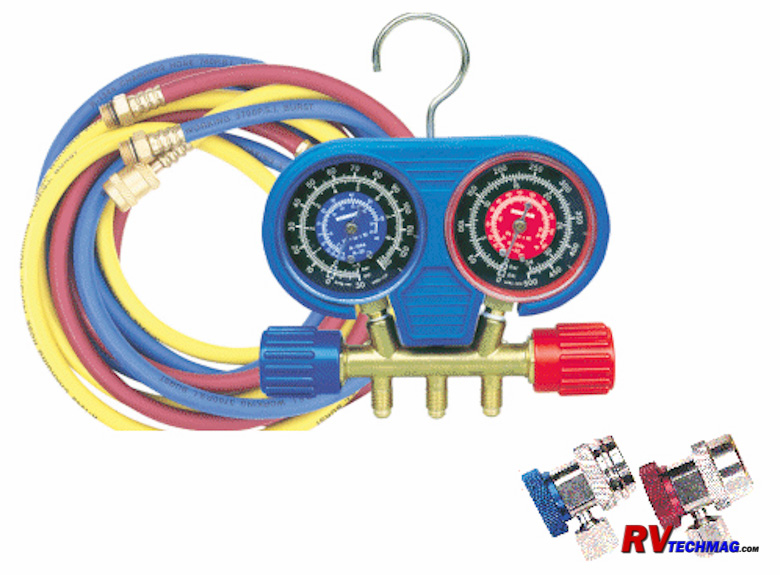
Dual Gauge Service Set
Generally then only indication you will ever get regarding an issue with your air conditioning system is when you notice that
it's just not cooling like it used to or else there is no cool air coming out whatsoever. An air conditioning system is really fairly simple in basic
theory. If you have enough refrigerant in the system and the compressor is turning, and your fans are all operating it should be working. When it
doesn't work there are a few basic steps to take to figure out why it's not working.
First of all you have to determine if the dash circulation fan is blowing air. If not, it may be a blown fuse. If the dash fan
is blowing air and the small LED illuminates when you depress the "snowflake" button, then your electrical circuits are just fine. The next thing to
look for is to see if the compressor is turning or if the clutch is not engaged. With the air conditioning turned on and the engine running you should
look at the engine area to see if the clutch is turning. If it is, and you still aren't getting any cool air you will have more serious problems and
you'll need to have a service technician look at your system. But, chances are it's not engaged so you can now do a bit more testing.
The next step is to shut down your engine. Then switch on the ignition key and turn on the dash air. You should now have 12
volts at the air conditioning compressor clutch. At the compressor you'll find a quick disconnect wiring terminal that runs to the compressor clutch.
Unplug this wire and see if you have 12 volts on the end of that wire. If you do, and the clutch still isn't turning, then you have a bad clutch. If
you don't have 12 volts it could be a bad wiring connection elsewhere in the wiring harness, but that's not a likely issue. If all of your fuses are
good and the dash controls operate then the odds are very strong that you are low on refrigerant and the low pressure cutout switch is preventing the
12 volt power from going to the clutch to engage it. So now you'll need to test your refrigerant level to see if there is enough in the system or if
it needs recharging.
For that you'll need an air conditioning service gauge set. The gauges above can be used to test both the high and low side
pressures. The valves can also be used to allow the flow of refrigerant when recharging the system and even the connection of a vacuum pump to purge
any moisture out of the system. They aren't overly expensive but if you don't want to go that route you can always get a small hand pistol device
that lets you add refrigerant from disposable cans and also has a small gauge in it to measure the system pressure.
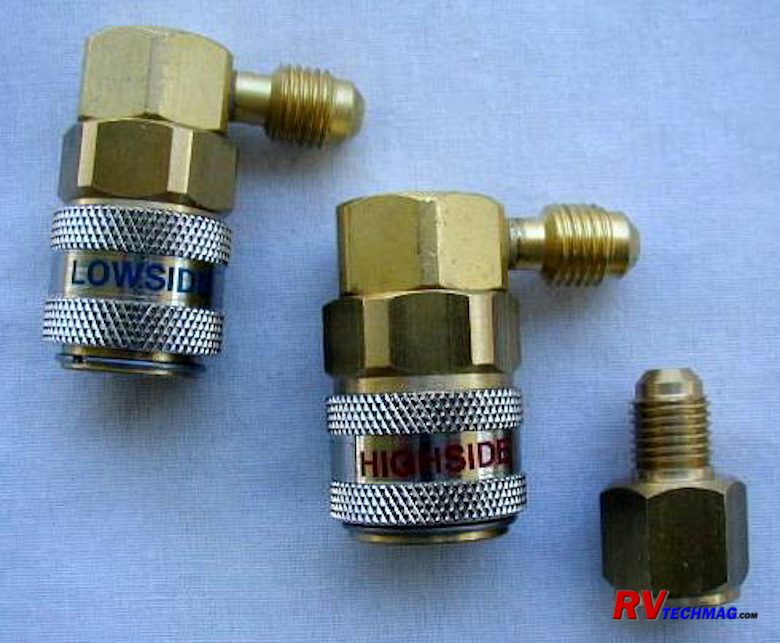
Quick Disconnect Gauge Couplers
The first thing you'll need to do is find your test ports on the system. They are generally on the front firewall directly
beneath the evaporator housing. You'll see the receiver/drier and the various lines leading into it and out of it to the evaporator. You will find a
pair of gauge ports in this location. They will be covered by screw-on plastic caps to keep the dirt and debris out of the Schrader valves. Remove
these caps and you'll notice that they are each a different size. The low pressure side is color coded blue and is the smaller diameter of the two
while the high pressure side is color coded red and is the larger diameter. The illustration above shows a pair of adaptors as well as a tank thread
adaptor. These are quick disconnect fittings and operate in the same manner as a quick disconnect coupling on an air hose. Once the snap into place
they will depress the valve stem on the Schrader valve and the gauges will read the current system pressure.
Every air conditioning system will have equal pressure between the low side and high side when the system is not running and
has been allowed to settle and rest for 15 minutes. Every system should have a given amount of pressure when at rest. However, this is not a vehicle
specific specification. Any vehicle will have the same pressure when at rest. But, the pressure will vary as to the temperature of the refrigerant.
In order to figure out if your system has an adequate charge you need to connect a gauge to the port, make certain that the system has had enough
time to bleed down if it was just run, and you must know the temperature. The temperature reading is critical because the pressure will deviate greatly
as the temperature changes.
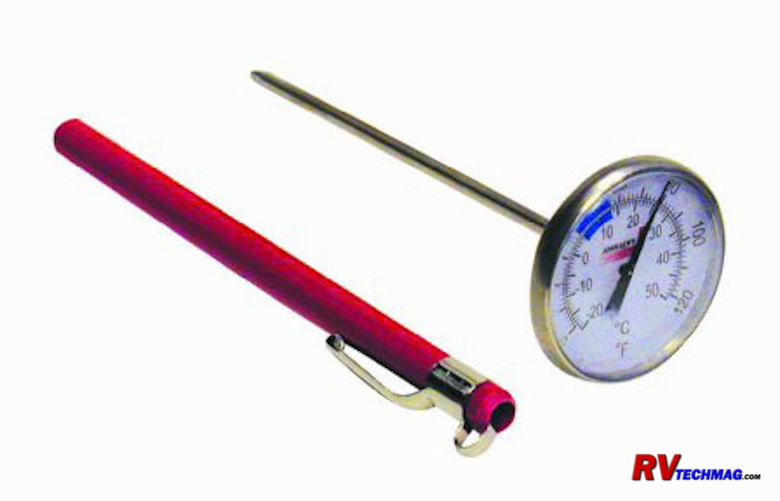
Air Conditioning Thermometer
For this you need an accurate thermometer that is designed for air conditioning service. Infrared laser thermometers are handy
tools but they measure surface temperature, not air temperature. You can use them to sample the temperature of a segment of ductwork, or the actual
temperature of an exposed steel line, but not the ambient air temperature. Once you know the actual temperature you can then determine just how much
pressure the system is supposed to have by comparing it to the chart below. The thermometer can also be used to measure the Delta T between your
intake air and output air. If the temperature differential is 20 degrees your system is performing as designed.
Refrigerant R134a Temperature-Pressure Table
Temperature (°F) |
134a Pressure(Psig) |
| -60.0 |
21.6* |
| -55.0 |
20.1* |
| -50.0 |
18.5* |
| -45.0 |
16.7* |
| -40.0 |
14.6* |
| -35.0 |
12.3* |
| -30.0 |
9.7* |
| -25.0 |
6.7* |
| -20.0 |
3.5* |
| -15.0 |
0.1 |
| -10.0 |
2.0 |
| -5.0 |
4.2 |
| 0 |
6.5 |
| 5.0 |
9.2 |
| 10.0 |
12.0 |
| 15.0 |
15.1 |
| 20.0 |
18.5 |
| 25.0 |
22.2 |
| 30.0 |
26.1 |
| 35.0 |
30.4 |
| 40.0 |
35.1 |
| 45.0 |
40.1 |
| 50.0 |
45.5 |
| 55.0 |
51.2 |
| 60.0 |
57.4 |
| 65.0 |
64.1 |
| 70.0 |
71.1 |
| 75.0 |
78.7 |
| 80.0 |
86.7 |
| 85.0 |
95.3 |
| 90.0 |
104.3 |
| 95.0 |
114.0 |
| 100.0 |
124.2 |
| 105.0 |
135.0 |
| 110.0 |
146.4 |
| 115.0 |
158.4 |
| 120.0 |
171.2 |
| 125.0 |
184.6 |
| 130.0 |
198.7 |
| 135.0 |
213.6 |
| 140.0 |
229.2 |
| 145.0 |
245.5 |
| 150.0 |
262.9 |
| 155.0 |
281.1 |
| 160.0 |
300.0 |
| |
|
| * - (in Hg) Vacuum |
As you can see in the above chart, the pressure in a system is a dynamic number that changes with the temperature. On a 75 degree
day your system's pressure should be 78.7 PSI. If the day is 85 degrees the pressure jumps up to 95.3 PSI while on a cooler 60 degree day the pressure
will drop to 57.4 PSI. Note that this is not the temperature on your back porch thermometer. It's the temperature of your refrigerant so you need to
sample that air near to the evaporator and receiver-drier. When you slide the generator forward to gain access you must also make sure that it has not
been running or else that area will have excessive heat in it and your reading will not be accurate.
Adding Refrigerant
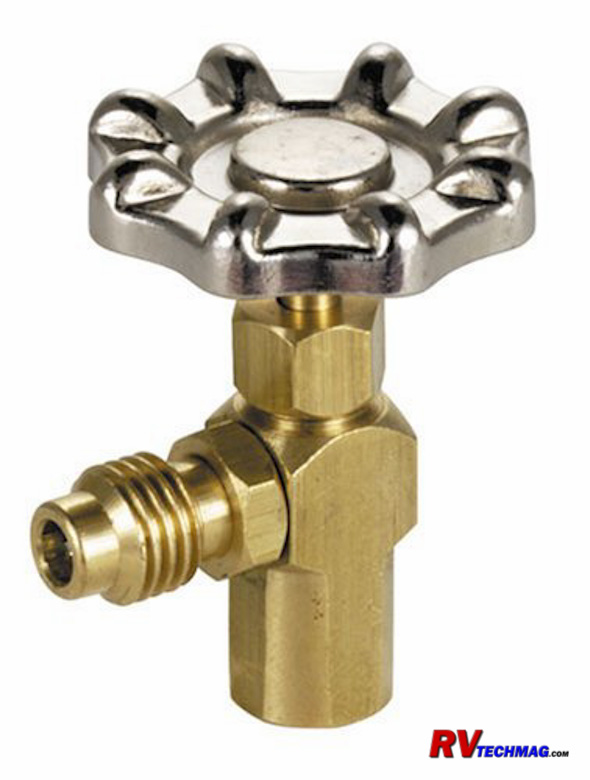
Tap for Disposable Refrigerant Cans
Once you have determined that you are low on refrigerant you will find that there is no hard and fast rule as to how much to
add. If you know that the system is totally empty and it holds "X" number of pounds, you can safely add that much and you'll be fine. However, 99% of
the time there will still be some R134a left in the system so you are going to have to add some Freon and then check the gauge pressure. There are
two variations on the procedure to do this. One is for the inexpensive DIY can dispensers that have a single gauge built into the unit. The other is
for the standard two gauge air conditioning service set. Use the following procedure to recharge your system.
- Remove the dust caps from the service valves if using a two gauge system. If using the DIY recharge kit you may leave the high side covered.
- If using a two gauge system, connect both hoses to both the high side and low side service valves.
- Start the engine and set the A/C system to maximum cooling.
- If using the DIY recharge kit install a can onto the dispenser and use the piercing needle to puncture the top of the can to allow the
refrigerant to exit the can. Connect the dispenser to the low side valve. Squeeze the trigger to dispense refrigerant into the system. This may take
some time so be patient. If the low pressure switch is not allowing the compressor to engage it will be particularly slow. You may need to allow 10
minutes per can to get it all to empty into the system. Once the pressure builds up enough so that the switch allows the compressor to engage this
process will go faster.
If using the two gauge service kit install a can onto the can adaptor on the center hose and screw down the piercing needle to puncture the can.
If you are using a larger volume tank connect it to the center hose instead. Open the low side valve to allow refrigerant to enter the system. Again,
this may take some time as well. If you are using disposable cans and need to swap cans close the low side petcock while swapping cans. Never
open the high side valve when charging the system or else the high pressure will backfeed into the can and can cause it to explode. The high side valve
is only used for purging the system moisture with a vacuum pump.
- When using disposable cans keep them upright so that gas will be expelled. If you invert them liquid
Freon will be expelled which can create
excessive pressure in the compressor head, potentially damaging the compressor.
- When the low pressure gauge (or the only gauge if using the DIY dispenser) reads between 25 and 40 PSI stop adding any more refrigerant. If using a
two gauge system you should never exceed 225-250 PSI on the high pressure gauge. Adding excess refrigerant will not improve the cooling and will only
damage your system.
- Once you think you are pretty close shut down the system and allow the pressures and temperatures to equalize. Using the above temperature-pressure
chart you should be able to see if you have the proper charge level.
- The final test is to check the temperature differential between the incoming air and output air. If you system is performing as designed the Delta T
should be around 20 degrees.
Further Testing
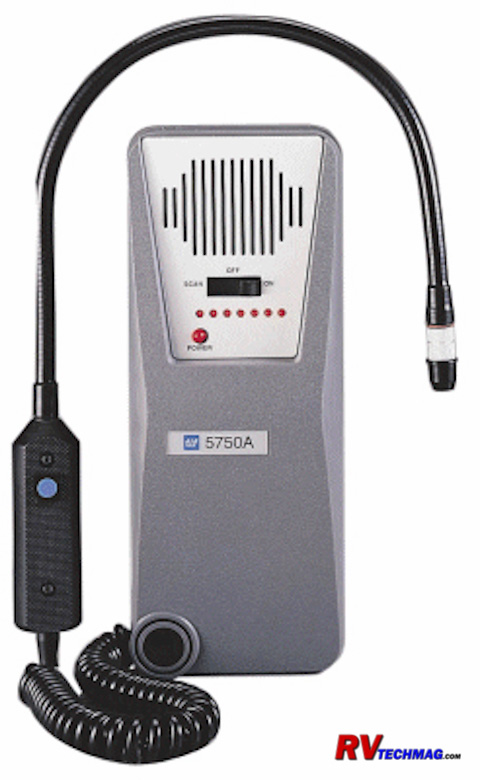
Electronic Leak Tester
Freon can slowly leak out of an air conditioning system. In theory it's a sealed system so it shouldn't have any leakage. But
in reality it can develop slow leaks over time. Compressor shaft seals, Schrader valves, and even the rubber hoses themselves can develop slow
weepage over time. Once you have charged your system up it's best to wait a week and then recheck the static pressure and compare it to what you
had previously. Be sure to use the temperature compensation chart shown above when doing this. If the present static pressure is below where it is
supposed to be you have a more serious leak. In that case you'll need to perform a leak test on the system to see where any leakage occurs. The
only way to effectively do this is with an electronic leak detector. This detector has a built in vacuum pump that moves air through a hose that
connects a hand-held probe to the meter. It will sample the air flowing through it and if any Freon is detected it will sound an alarm. This will
help you locate the source of any leak so that it can be corrected.
Keep in mind that air conditioning systems cannot have any moisture in them. If moisture was present it would freeze up at
the expansion valve and your system would fail to cool. If any lines or components need to be removed or replaced it will be necessary to attach a
vacuum pump to purge the system of any moisture. Replacing the receiver-drier at this time is also recommended. If you don't have this capability
you'll need to have a trained service tech perform that work on your system. As long as you are only adding refrigerant or testing pressures you
won't have to worry about this because the system will remain intact.
Summary
Okay, so after reading this, you're not an air conditioning service technician. There's much more that needs to be learned and
the gauges have many more uses to help diagnose what is wrong with your system. The purpose of this tutorial is to help familiarize how air conditioning
systems work and show you how to test your system for the proper charge level and how to recharge it if necessary. That can save you some valuable time
and money by allowing you to do it yourself rather than scheduling a service appointment. It should also help you to know when to seek professional
help.
Return to Home Page
If you enjoyed this article be sure to recommend RVtechMag.com to your friends, like us on Facebook or Twitter
or subscribe to our RSS feed.


|


