RV Chassis Lubricants
Selecting the Correct Lubricant
Application for Your Motorhome
Article Date: September, 2014
Article and Photography by Mark Quasius

Chassis Grease
Okay, it's grease, right? How technical or glorious can you get? You just shove a tube in a grease gun, find some grease
fittings, and squeeze away. Yet, there really is more to it than that. There's a right way and a wrong way to grease things and there's a wide variety
of greases available. Some of them barely work, while some work very well. Remember, grease is a lubricant, just like engine oil, transmission fluid,
and gear lube. It is needed to prevent wear and tear on parts that require lubrication. If you match the grease to the job, and perform the
lubrication tasks properly, your greaseable components will last for a long time. If not, you're going to have some repair bills looming sooner,
rather than later.
Grease Types and Classifications
Classification of grease is much easier than motor oils. The viscosity of grease is referred to by it's NLGI rating. Your
typical chassis grease is an NLGI 2. An NLGI 1 rating would be a thinner grease that would melt and flow at a lower temperature. This is probably
the stuff you'd want in your equipment if working the Alaska pipeline but NLGI 2 works for 90% of your automotive applications. Conversely, NLGI #3
is a stiff grease and would be used in extreme conditions where the load level is creating additional heat. Most greases are lithium based, although
synthetic greases are available that offer increased protection levels. In most applications, a synthetic grease won't offer enough benefits to
offset it's additional cost. Synthetic grease is better suited for extreme duty conditions.
Not all lithium greases are identical. Just because there's lithium in them doesn't guarantee that. There's more to grease
than lithium. Lithium is the base upon which the grease is formulated. Plain lithium grease works well for wheel bearings and also serves in driveshaft
universal joints and front end components. But, universal joints and front end parts have different needs than wheel bearings. These components don't
use rotating rollers within bearing races. They rely on a thin layer of grease to separate two metal surfaces so that the don't gall and bind. If
enough force is applied to these two surface the grease can squish and run away from between these two surfaces, allowing metal to metal contact.
Additionally, when surfaces pull apart from each other the grease film can fall away rather than stick to the surfaces. Fortunately there are other
greases that improve upon the basic lithium grease. They are still lithium greases but they've been enhanced with additives to improve the
characteristics of the grease. Naturally, they cost a bit more than your entry level lithium grease but are well worth it.
One of these characteristics is to improve the tackiness of the grease. If you place a small wad of your basic lithium grease
between you thumb and index finger and squeeze, much of the grease will ooze out but a small layer will remain. In order to remove that layer you'd
have to smack your thumb with a hammer real hard so we don't want to go there, but when you pull your two fingers apart you'll see that the grease
breaks free and sort of leaves a slight film on your fingertips. Each time you squeeze and release you'll lose more of the lubricant. Better quality
greases were developed that improved on the tackiness of a basic lithium grease. If you were to place some of this between your fingers and do the
same test you'd find that the grease would tend to stick to your fingertips and it would be harder to pull them apart. When you did pull them apart,
if you looked carefully, you'd notice that the grease would stretch like strings between your fingertips. This "tacky" version of the grease will do
a better job by staying in place better than a less expensive lithium grease.
When two surfaces are being forced together, which is typical of a ball joint or tie rod end, the grease tends to squish out
from between the two surfaces. If there was a way to keep these two surfaces from coming into contact with each other it would be a huge benefit to
component longevity. This was accomplished through the development of Moly grease. Moly is short for Molybdenum, which is technically a metal.
But Moly particles are actually lubricants and won't scratch or damage metal surfaces. When Moly is added to grease, it comes in the form of super
small round particles that act as miniature ball bearings. Moly's unique characteristics is that it will not scratch the metal, yet it is very hard
and it won't crush or be destroyed when put under pressure when two surfaces are trying to squeeze the life out of them. The Moly particles are carried
in the grease and they prevent metal to metal contact and allow the grease to filter in and around the small Moly bee bees to cool and lubricate the
components. Moly grease typically has a black color to it and is messy to clean up but it's great grease for front end work and universal joints. The
one area where Moly is not recommended is for wheel bearings. The Moly particles tend to force the rollers away from the races, which tightens
tolerance and increases heat. For wheel bearings it's best to go with a more fibrous general purpose or tacky grease that has no Moly in it.
There are super greases available. Synthetic grease is available by many lubricant suppliers. Synthetics offer a greater
temperature range than conventional greases and are great for extreme conditions but the vast majority of RV owners won't realize the benefits of
them because they don't encounter those extremes. My personal favorite grease is Kendall L-428 Tough Tac Grease. This is a lithium based grease that
has excellent tackiness as well as Moly particles. It resists water penetration, holds up well to heat, stays in place, and resists shock loads.
I've been running this grease for a long time and my universal joint and front end component longevity is remarkable. Most auto parts stores carry
Kendall, which is a division of Conoco-Phillips but don't stock this particular grease. However, there are similar greases available from Shell, such
as Shell's Gadus V460D2 grease.
One other caveat to using a good grease is slack adjusters. Slack adjusters are used on air brakes and are supposed to be
self-adjusting as you use them. In order for them to self-adjust there needs to be some friction in them. If you use a good Moly grease they'll be
too slippery and won't self adjust. So, you'll need a tube of cheap grease to do the slack adjusters. In my case I have two grease guns. One is
loaded with Kendall L-428 while the other has whatever is on sale at the moment. I use that gun strictly for the slack adjuster.
Do Your Own Service

The proper way to grease a chassis begins with getting a good quality grease, as mentioned above. The second item to have is
a good grease gun. Grease guns really run the gamut, from inexpensive imports up to pneumatic and even electric units powered by cordless drill
batteries. Pneumatic grease guns are great for use in a shop but they aren't portable. Cordless battery powered units are portable but do you
really need that kind of power in a grease gun? What happens when the batteries are dead and need recharging? Do you want to wait around for that?
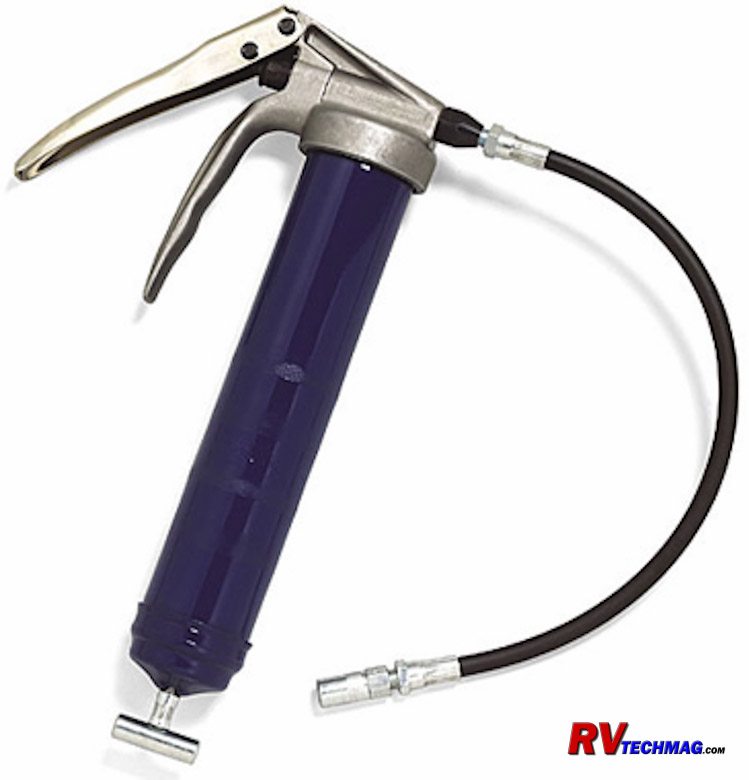
For portable use you just can't beat a well built manual grease gun. They come in different variations so it's important to keep two things in mind
when shopping for them. First of all, you'll need one with a flexible rubber hose. The steel pipe won't get into spots that a hose will. If you find
a good gun with a steel pipe you can always buy a rubber hose kit to convert it over. Secondly, you'll need to operate the gun with one hand every
now and then. You'll need your second hand to hold the hose onto the fitting in an awkward location, such as the backside of a universal joint. This
means that the guns with the pump arm on them won't work in that application. You'll need one with a trigger control, similar to the one shown in
the above image.
Once you have your choice of grease and grease guns all figured out it's time to make a listing of every grease fitting that
is on your coach. Check your owner's or service manual for all of the locations. Take the time to scout them out ahead of time, then make a checklist
with location and number of fittings that you can go through when it's time to lube the chassis. That way you won't miss any of them later. If you
do, you'll find out soon enough when that joint wears out. When it's time to perform the chassis lube have plenty of rags or disposable towels
handy. Use them to wipe any dirt off of the grease fittings prior to attaching the grease gun nozzle. You don't need to shove dirt into the joint,
only fresh grease. When you do grease the joint be sure to move enough grease through to flush any dirt or water that may have accumulated in the
joint. Face it, those rubber dust boots on tie rod ends and ball joints aren't all that tight. Once you see the new grease coming out you'll know
you've flushed all the old stuff out. Use the towels to wipe off the excess so that it doesn't make a mess.
Naturally, there are exceptions to this rule. If you are lubricating a driveshaft slip coupling Do Not over grease it. If
you apply too much grease it'll just fill up the cavity inside the driveshaft. As the coach goes up and down the spline moves back and forth inside
the slip yoke. It'll just force all of the grease out the small vent hole, which will sling all over the place underneath your coach, making it a
miserable place to be next time you have to do any service work down there. Plus, if you were to fill that cavity up good, then hit a good bump,
chances are you would blow the seal and retaining ring off of the slip yoke. This is one area where 3 or 4 pumps of grease is enough,. You only
need a little bit to keep the splines lubricated.
One final area of interest is the kingpins (if a solid front axle) or ball joints (if independent front suspension). These
areas need to be flushed with grease, just like the tie rod ends and other fittings. But, you will not be able to get the grease to everywhere it
needs to be if you do it while the motorhome is sitting on it's front wheels. You need to raise the front end up in order to relieve the pressure
on the kingpin or ball joints. That will allow them to float so that the grease can totally surround the kingpins and ooze out through the thrust
washers as they are greased. The same holds true for ball joints on IFS front ends. Some even prefer to have a second person turn the wheels while
the first one greases them. Normally that is not necessary unless they are having difficulty taking grease. In that case they were left go too
long, the grease isn't of very good quality, or the unit wasn't raised the last time it was greased. If this is the case, it's best to turn the
wheels and grease them to allow the grease to return to where it needs to be. Remember, do not trust your leveling jacks! You can use them to
raise the coach but a pair of heavy duty jack stands should be placed under the chassis to support it in the event the jack system fails while you
are underneath the coach. Chances are it won't, but the stakes are high so don't take the chance. Besides, with the money you save by not having
to pay a service center to lube your chassis you can certainly afford to buy a few tools.
Return to Home Page
If you enjoyed this article be sure to recommend RVtechMag.com to your friends, like us on Facebook or Twitter
or subscribe to our RSS feed.


|


