MCD Innovations: Made in the Shade
Upgrading an RV's Pleated Day-Night Shades and Visors
Article Date: May, 2009
Article and Photography by Mark Quasius
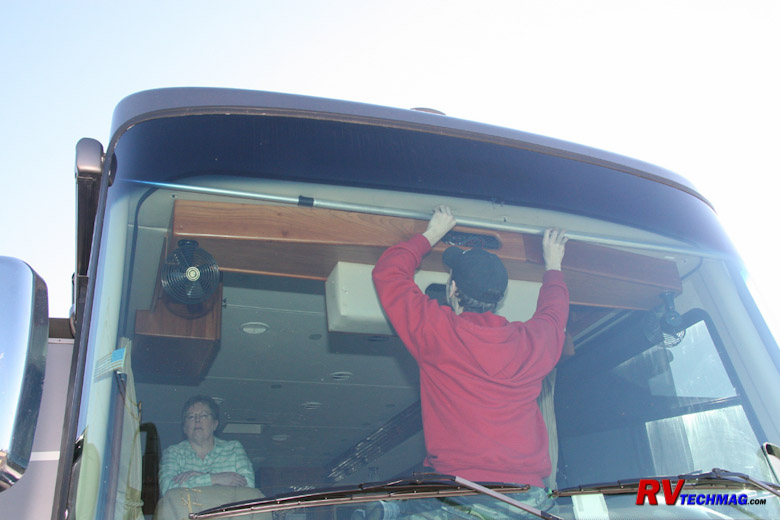
Generation I Shades
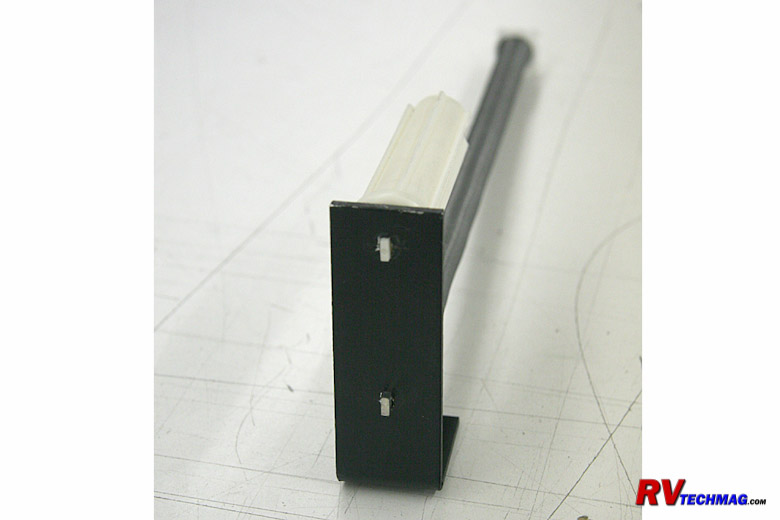
Generation I Shade Mechanism
Identified by Two Spade Ends
The very first generation of MCD interior roller shades began production in April 2007 and continued through October
2007. This generation can best be identified by looking at the end brackets. All Generation I shades have 2 flat spade mounts in the end of the
shades, in similar fashion to your basic residential shades found at home. These shades do not have an auto-stop feature so it was necessary to
give them a tug when you got to where you wanted to park them. These shades were properly tensioned at the factory but many times they were
allowed to unroll when being installed by the coach builder, which meant many of these shades did not retract properly after they were installed.
Many coach builders installed a bump stop to the valance to prevent the shade from rolling up on the roller, which was the proper way to limit
their travel.
Every generation of MCD manually operated shades does contain a speed reducer to control the ascent speed of the shade. If
for some reason the shade is not properly tensioned it may not raise all the way up. To increase the tension on these shades pull the shade down a
bit to expose a foot or so of material then allow it to lock in place. Then pop off one of the plastic end caps on the hem rail at the bottom of the
shade. The end caps just press into the rail so carefully pry them out. Then slide the hem rail off of the shade material. Without turning the shade
roller, simply tuck the shade material around the roller an extra turn or two. This will increase the spring tension on that roller and make it
retract better. If it's too tight, do the reverse and unwrap a loop or two from the roller. Then reinstall the hem rail and test its operation. If
it performs satisfactorily replace the plastic end caps in the hem rail and you're all done. Some of the early valances were quite tight and it may
be difficult to wrap the shade material around the roller. If that's the case, simply unclip the shade from the mounting brackets and work on it on
a smooth, flat surface, such as a table or workbench. Make sure to pull some material off and lock the roller when you first start your adjustment
procedure. If you do not lock the roller the spring will probably unwind once you remove the hem rail and you'll have to give it quite a few turns
in order to restore spring tension.
It should be noted that every single generation of MCD manually operated shades did incorporate a speed reducer to control
the retract speed.
Generation II Shades
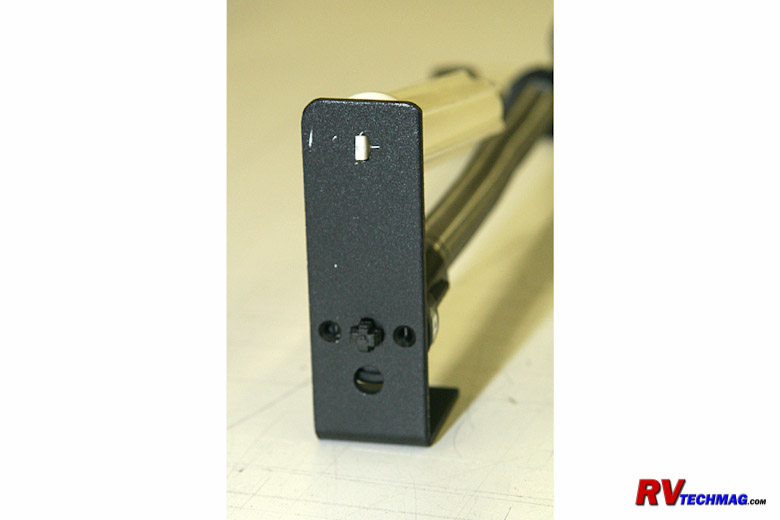
Generation II Shade Mechanism
Identified by One Spade End and One Cross End
The second generation was a temporary improvement in the spring mechanism to allow for better latching and smoother operation.
It was short-lived and ran from November 2007 through December 2007. This generation can also be identified by looking at the end brackets. Generation
II shades have 1 flat spade mount in one end and a cross mount in the other end of the shades. These shades are very similar to the Generation I
shades in that they too do not have an auto-stop feature. The improvement was in the spring mechanism so for all practical purposes you can treat
them the same as Generation I shades, using the same adjustment procedures.
Generation III Shades
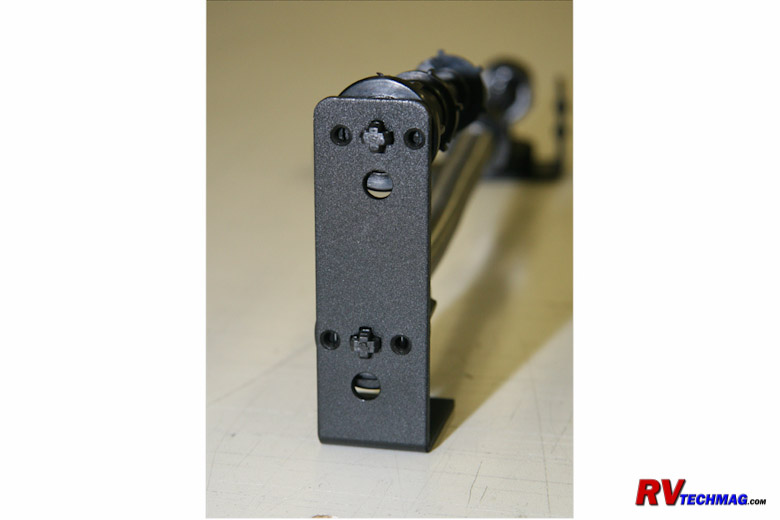
Generation III Shade Mechanism
Identified by Two Cross Ends
Generation III was a nice improvement. A new, improved speed reducer was used and an auto-stop feature was added to the shades.
This meant that shade tension and auto-stop locations were independently adjustable and bump stops were no longer required. No longer was it necessary
to remove the hem rail and wrap the shade material around the roller tube. In fact this is definitely not the way to do it because, while it will
increase spring tension, it will mess up your auto-stop settings. Generation III shades began production in January 2008 and continued through May
2009. This generation is pretty much foolproof and won't require any future adjustments as long as they are not unwound during installation by the
coach manufacturer. These shades can also be identified by looking at the end brackets. All Generation II shades have 2 cross mounts in the end of
the shades.
To increase the spring tension on these shades unclip the shade assembly from its mounting brackets and remove it from the
valance. Set it on a smooth work surface, such as a clean workbench or table. Pull the shade out a bit to allow the shade's lock mechanism to engage.
This will prevent the spring mechanism from unwinding. If it does unwind you'll need to wind it up quite a bit to restore the proper spring tension.
Once the shade assembly is laying on your bench take a careful look at it. If the shade material rolls off the back off the roller, in other words
away from you, the tension spring will be on the left side as you look at the shade while the auto-stop feature will be on the right side. Conversely,
if the material rolls off towards you, the auto-stop will be on the left and the spring tension adjustment will be on the right. Another way to
identify which side is which is that the black roller end on the spring mechanism side is slightly wider and has the letters "MCD" stamped on it.
To adjust the shade remove the end bracket from the side you want to adjust. Then flip it around so that the mounting tab
faces away from the shade roller, rather than towards it. That way you can use the bracket as a wrench. You can use anything to grab the cross and
turn it but you run the risk of damaging the plastic cross on the end if you use a pliers so using the bracket is the safest and easiest way to do
it. Just give it however many turns you think it needs, then reassemble the bracket. If you have an assistant you can probably have them hold the
shade up by the bracket and you can test its operation. If not, you may want to clip it back into the valance to see if any further adjustments
are required. If the spring tension has been totally lost from being allowed to snap free, it may take as many as 10 to 20 turns to restore proper
tension.
Generation IV Shades
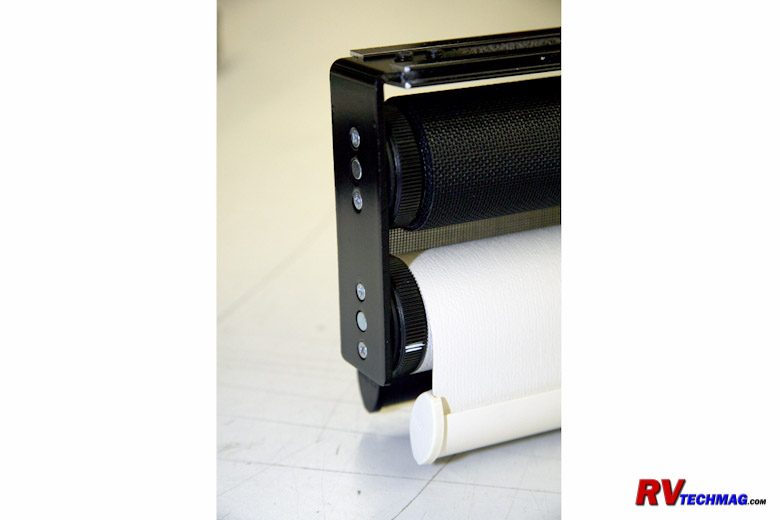
Generation IV Shade Mechanism
Identified by Knurled Adjustment Knobs on Each End
Generation IV is the latest and it doesn't get any better than this. To adjust these shades you do not need any tools nor do
you ever need to remove them from the valance. This design uses easy to access knurled knobs on the ends of the shades to handle both the retraction
rate as well as the auto-stop position. To raise these shades just give them a tug at the hem rail and let them go. The shade will automatically rise
at a controlled speed, which you can easily adjust via one of the knobs. The shade will rise until the auto-stop mechanism stops it at the set
position, which you also determine via the knob on the opposite end. The Generation IV shades are being known by the trademark GlideRise IV. All
manually operated shades produced by MCD beginning in June 2009 are GlideRise IV shades. As perfect as these are, there's just nothing left to improve.
All adjustments to these shades can be done without tools. There are two knurled adjusting knobs - one on each end of the
shade roller. One side adjusts the spring tension, which controls the retract speed, while the other side adjusts the auto-stop position for when
the shade is fully retracted. Normally the auto-stop knob will have a small white line on it, as you can see in the above photo. However, it may
be difficult to see this line if the knob is turned the wrong way or the valance is fairly close to the shade. The best way to determine which knob
is which is to look at the way the shade material falls off the roller. If the material falls off the backside, in other words the side farthest
away from you, then the auto-stop adjustment is on the right side as you are looking at the shade. If the shade material falls off the roller on
the front side, in other words towards you, then the auto-stop adjustment is on the left side of the roller as you are facing the shade. The spring
tension adjustment is always on the opposite side of the auto-stop adjustment.
To adjust the retract speed simply pull the shade down to the bottom of its travel and it will lock in position. Give it a
tug on the hem rail and let go. The shade will automatically retract. If it's not happening fast enough or smooth enough, reach up and tighten the
spring tension adjustment knob, then retest it. If it snaps up too fast reach up and loosen the spring tension adjustment knob. If the shade is
reasonably close, 1/4 turn increments should be sufficient to make a noticeable difference. Note that you can adjust the spring so that it is too
tight. If you give it too much spring tension the shade will raise with too much authority and it will jam against the lock nut in the auto-stop
mechanism. If this happens it'll take a fairly hefty tug on the shade to unstick it when you want to pull it down. If your shade is that tight,
try backing off the spring tension one or two turns and your shade will operate much easier. Remember that you really aren't trying to control
the speed of the ascent. All you really want to do is give it enough spring tension to allow the shade to raise all the way, without stopping short.
To adjust the upper stop position allow the shade to fully retract. To raise or lower the shade's upper stop limit simply
reach up and turn the auto-stop knob. The shade will raise or drop as you rotate the knob. Once you get it set where you want it, leave it alone
and it'll stay there. You want to adjust the shade so that it's easy to reach the hem rail when pulling down, but not hanging down beneath the
valance where it's visible more than what might be necessary.
The next section includes a selection of MCD Technical documents.
Return to Home Page
If you enjoyed this article be sure to recommend RVtechMag.com to your friends, like us on Facebook or Twitter
or subscribe to our RSS feed.


|


